|
While all of the Aeolian modern player piano models are slightly different, the following pictures and comments should be all that's needed to successfully remove the electric vacuum pump from the piano. There could be any number of reasons for removing the pump from the piano. Some of those reasons will be addressed at the end of this treatise.
If the hoses are brittle or stiff, it's highly recommended that they be replaced. Measure the vacuum supply flanges, elbows and/or nipples to determine the correct outside diameter. New player piano tubing is available on the Tubing Page.
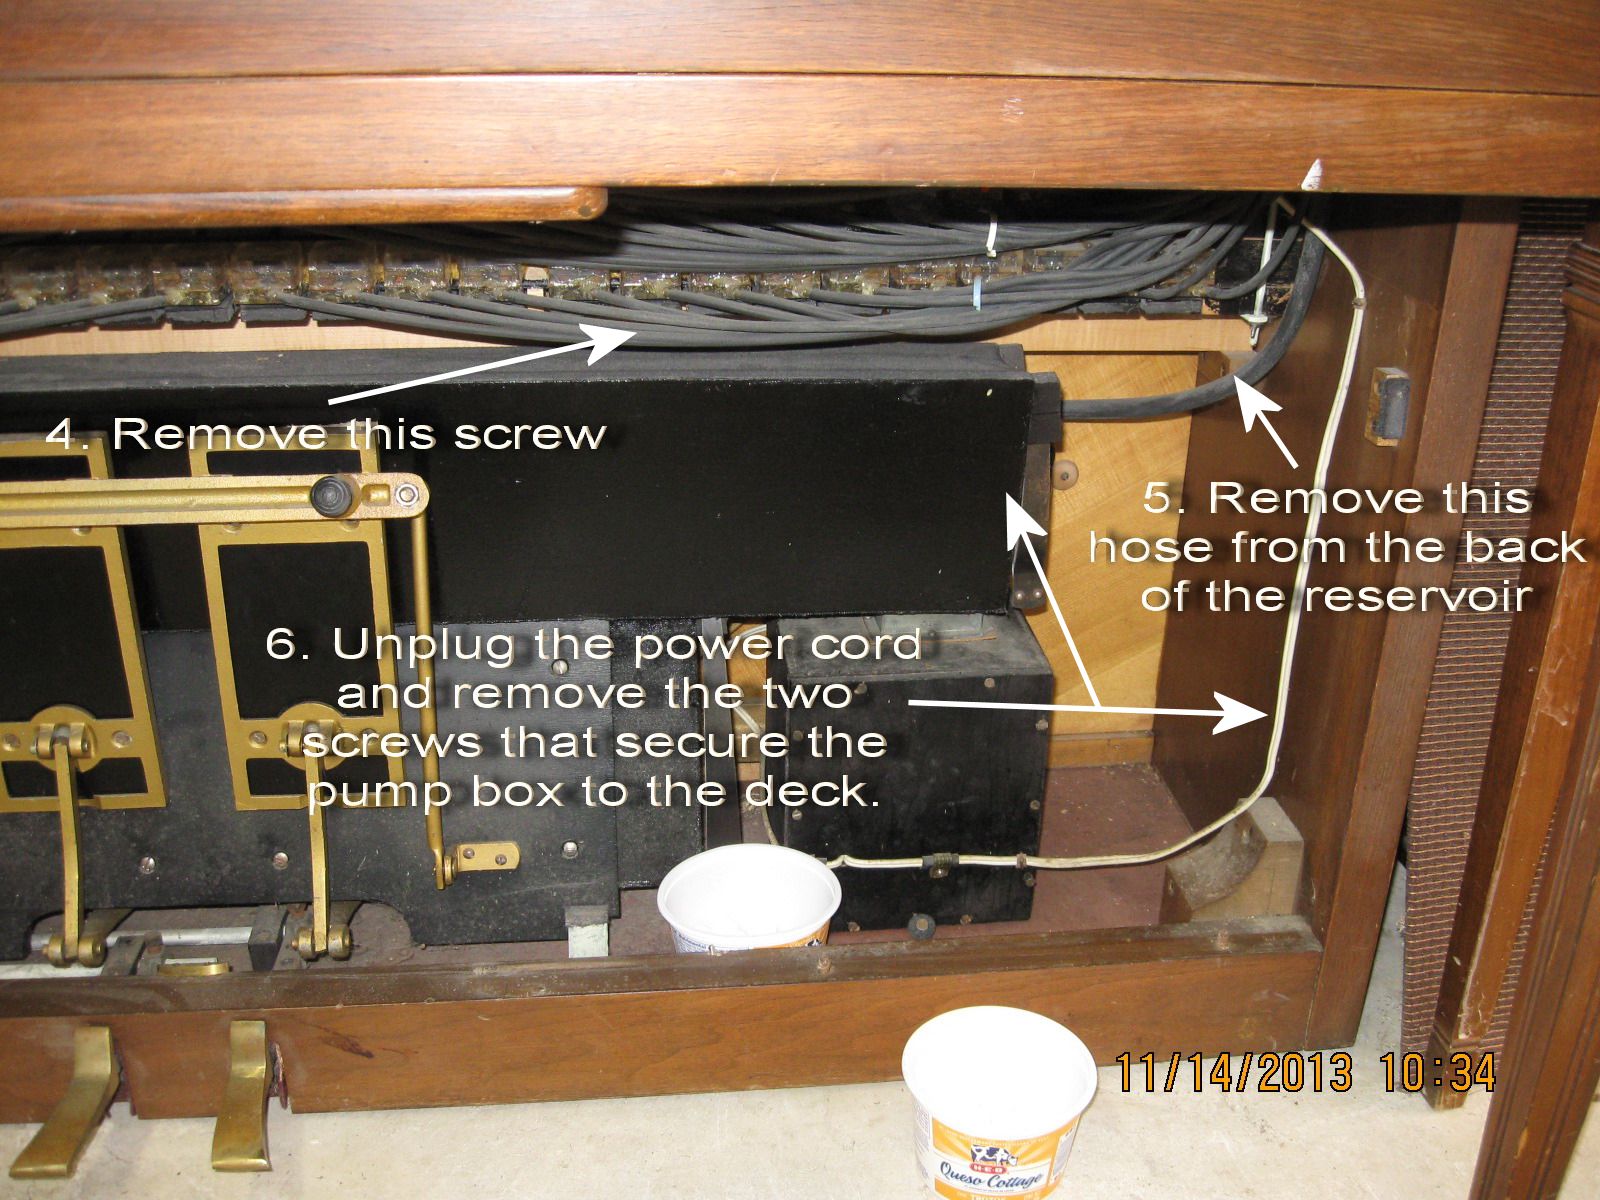
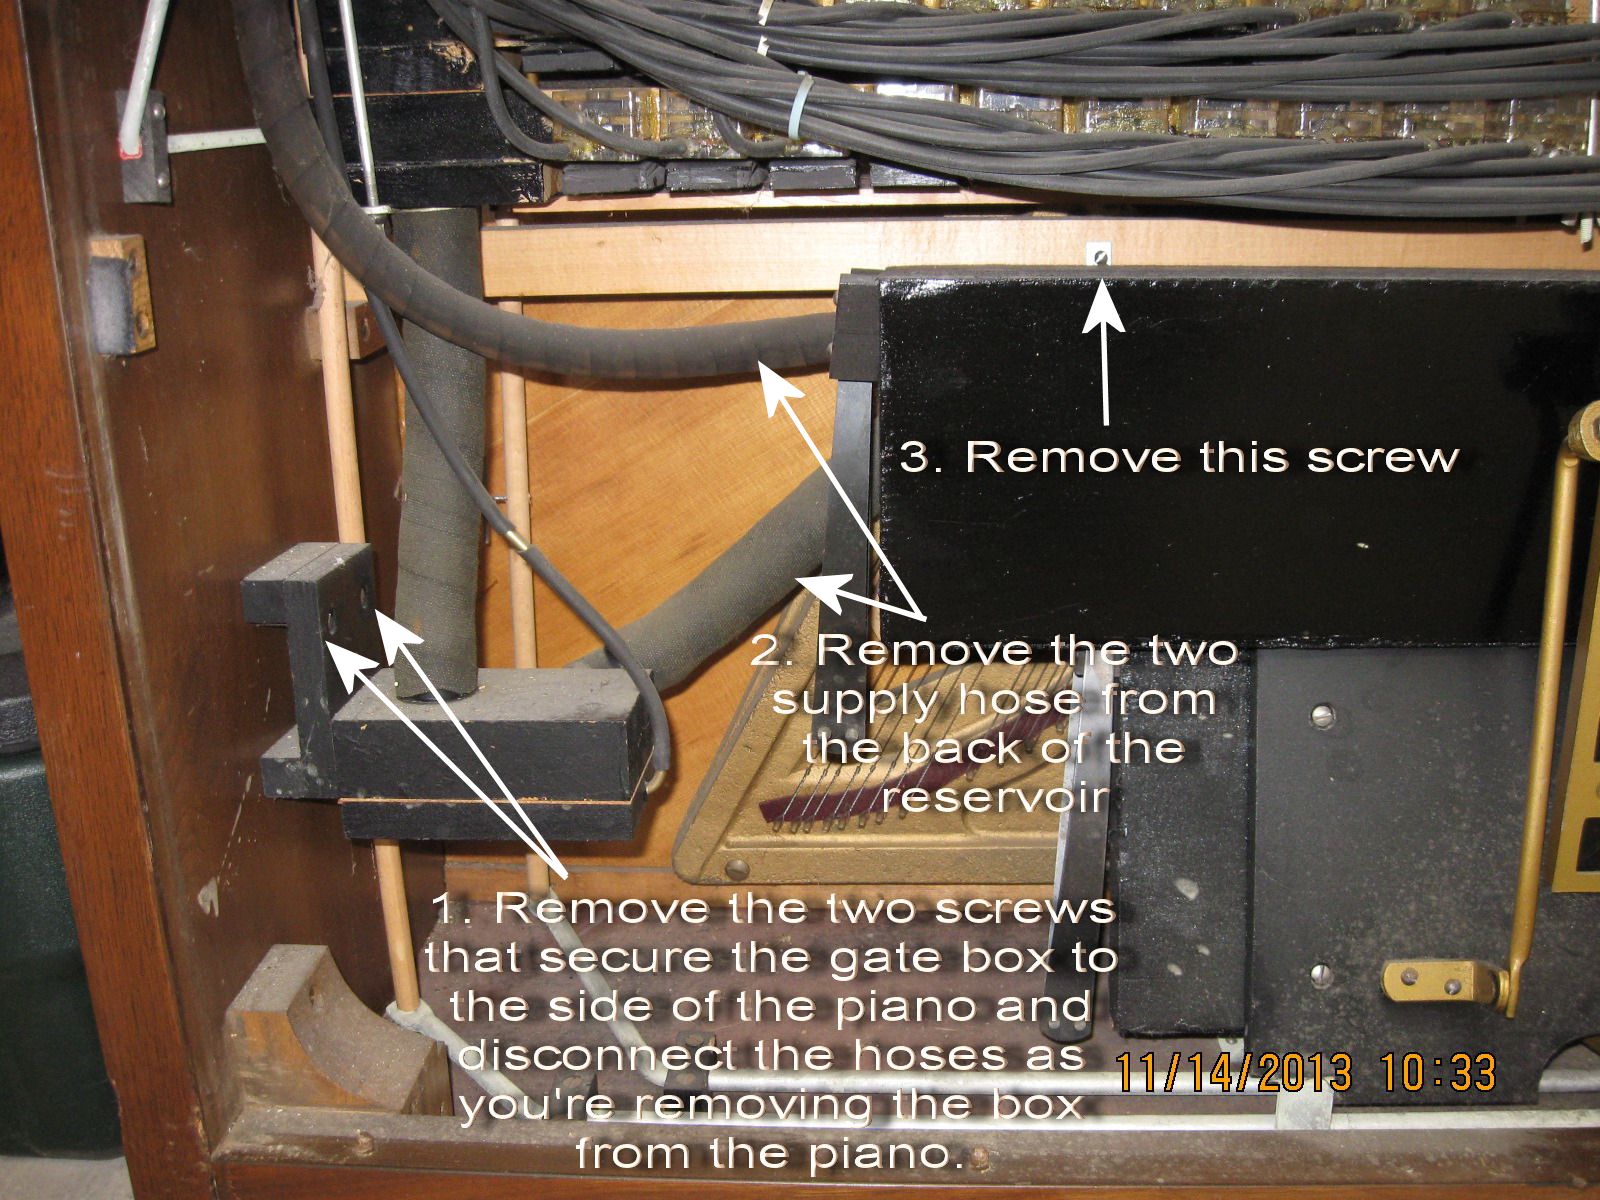
Regarding Step 4, there is a screw behind the tubing that's the same as the screw in Step 3. Regarding Step 5, there is always one hose that connects to the backside of the reservoir. Regarding Step 6, there is a 110VAC wall-type electrical socket that is mounted on the sound board behind the reservoir. A regular extension-type cord is plugged into that socket. Unplug the cord. The cord leading from the pump box to the upper half of the piano in this unit does not have the 'quick-disconnect' male/female plug that Aeolian installed in later models. For ease of service it is recommended that this line be cut. The wires can be stripped and reconnected with wire ties when the pump is reinstalled. Or, a male and female plug can be connected to the wires and then the plugs can be plugged into each other. (FYI, this wire goes up to the On-Off power switch, which is located in the spoolbox or under the keybed in about the same location as the white dot on the front of the keybed.)
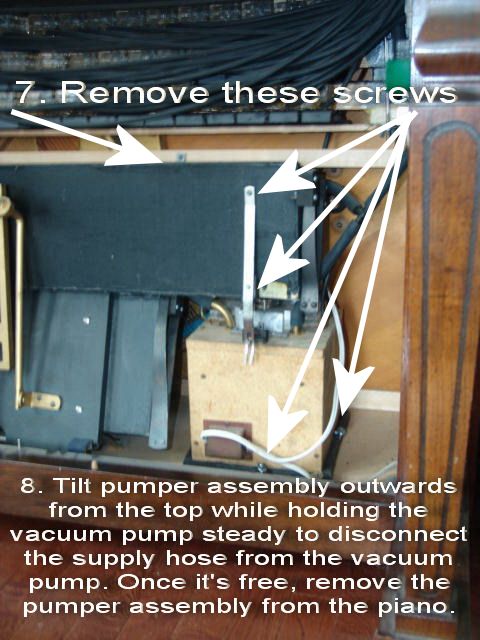
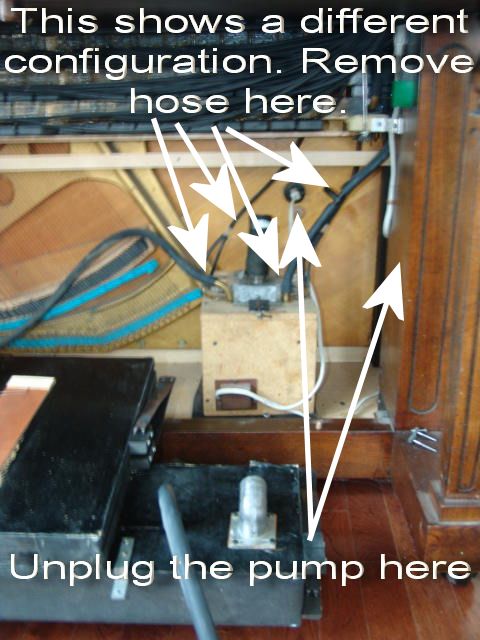
In this picture we see one of the other configurations found in the modern Aeolian player. This vacuum pump has a variable volume regulator which is activated by the aluminum fork that's connected to the reservoir bellow. It's important to note the orientation of the block of wood that's holding the fork away from the reservoir. If it's put back together incorrectly, the volume regulator will not work properly. Failure to remove the fork before removing the pumper assembly could easily bend the regulator rod on the pump. Step 7 shows the location of the screws that secure the fork to the reservoir bellows as well as the screws that secure the pump box to the bottom of the piano. It also shows the location of the screw that was not visible in Step 4. It's also quite obvious that the pump box in this picture is very different from the one in the previous picture. These differences in the pump boxes will be addressed at a later time. Also, note the three supply hose that are connected to the "T" connector. In units with this configuration, it's not necessary to remove the hose, mentioned in Step 5, from the back of the reservoir. Instead disconnect the hose, that goes behind the reservoir, at the "T" fitting. Lastly, note the two medium size vacuum supply hoses that are connected to the top of the pump box. It is NOT necessary to remove these hoses at this time. And, due to their location, trying to remove them now could create a problem.
At this point, the pumper assembly is ready to be removed. In most units, following the instructions in Step 8 will not be a problem, and the assembly will come out of the piano quite easily. HOWEVER, in some units, you will encounter a piece of wood -like a firring strip- that's used to support the lower tier of note bellows. Sometimes, you can simply push this strip of wood upwards to get the pumper assembly brackets past the strip. Other times, it will be necessary to remove the strip, which is held in place by three or four screws -depending on the model.
For reference sake, there is a large vacuum supply hose that connects the vacuum pump box to the reservoir bellow. Where that hose connects to the pump can be seen in the picture just below. This hose is NOT held in place by clamps of any sort. However, it's a short piece of tubing (about 2-1/2"-3" in length), and it might be a little reluctant to 'let go' as the pumper assembly is tilted forward. Be patient. It 'will' come loose without damaging anything. Once the hose disconnects from the vacuum pump, the pumper assembly is free to be completely removed from the piano. It rests in two felt-lined metal brackets at the bottom of the assembly. I recommend that the pumper pedals be in the upright position when removing the assembly from the piano. While this might seem a little awkward, it is a little easier because you can grab the whole assembly at the bottom of the assembly (by the piano pedal trap work) and the top of the reservoir bellows, to lift the assembly out of the piano.
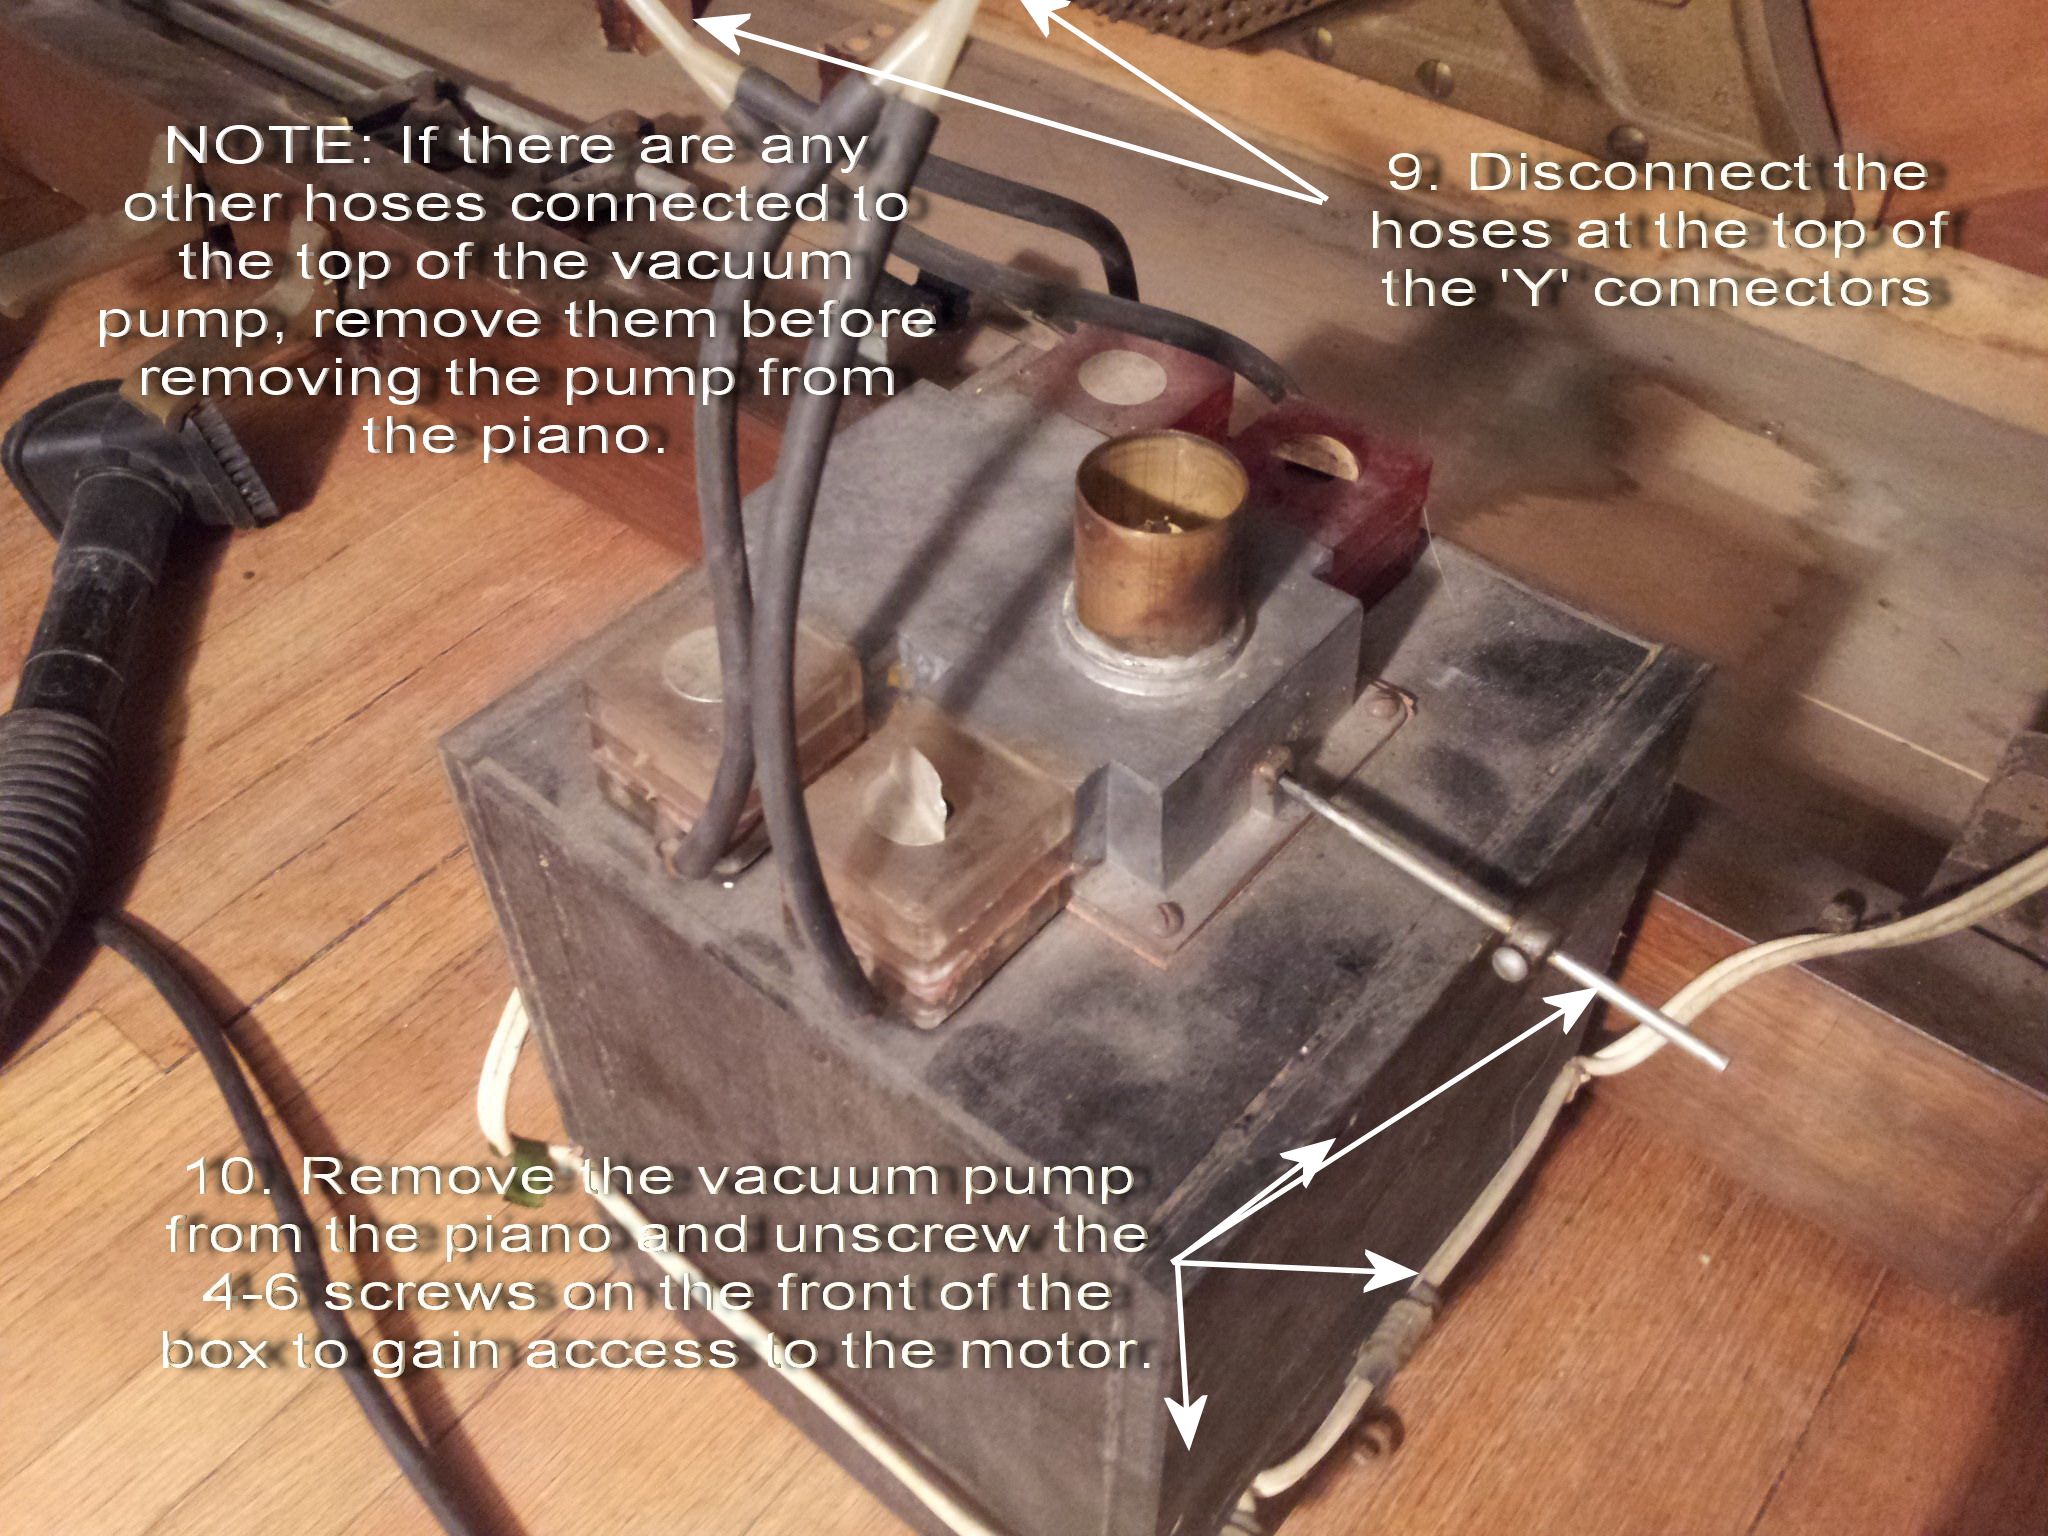
Now that the pumper assembly is out of the way, you can easily access the rest of the tubing that's connected to the top of the vacuum pump. (Also see the picture below.) It's recommended that you disconnect the small hoses at the top of the "Y" connectors. You need not mark the disconnected hoses because they can get reconnected either way. Regarding any medium size hoses that are there, they are usually very hard to remove. The "TRICK" is to force the hose further "ONTO" is fitting BEFORE attempting to pull the hose off. With patience and a fair amount of force, the hose will almost always 'break free', and then it can be safely removed without damaging/breaking the hose. (NOTE: as mentioned in the comments about Step 2, the tubing might be too stiff or brittle to be used again. So, it will have to be replaced.) Once the remaining tubing has been disconnected from the pump box, it can be removed from the piano. (SPECIAL NOTE: Please note the silver paper discs on top of the four plastic block valves. Their purpose is explained in detail on the webpage about the volume regulator.)
In this picture you can also see the vacuum supply flange on the back of the reservoir and where the medium size hose connects to the reservoir. You can also see how much easier it will be to access and remove the other hoses that are connected to the top of the pump box.Also note that when reinstalling the pump box that the medium size hose leading off to the left should NOT be touching the piano strings. It should be angled down by the bottom of the plate and run along the floor of the piano over to the auto sustain device. Also, now you can clearly see the wall-type electrical socket mentioned in Step 6.
This ends the treatise about removing the pump box
Reasons for removing the pump box
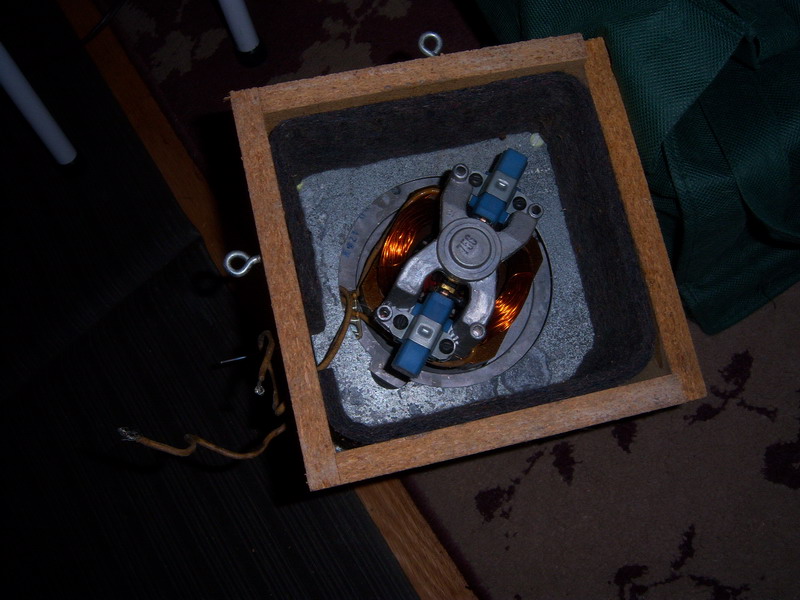
The links below lead to pages that deal with the internal workings of the pump box. One of the most common problems with the Aeolian vacuum pump motor has to do with the brushes. With increasing regularity, I've been receiving emails about pumps that just 'quit' for no apparent reason. By late 2009, it got to the point where I finally created a video to show people how to remove and clean the brushes. I've also received a fair number of emails from visitors (and technicians) who wanted to know exactly how the volume regulator on the pump works. In many cases, the regulator is malfunctioning because the exhaust ports on the regulator valves are open to the atmosphere. In fact, they must be tightly sealed with some sort of air-tight tape. Another not-so-common problem with the pump has to do with the spacers that secure the pump in its correct position inside of the pump box. In models with the black pump box, this spacer can come loose, allowing the pump to drop down about 1/4". This allows the vacuum to bypass the rubber seal on the top of the motor and escape into the atmosphere. At this time, I do not have a webpage that shows what this type of motor looks like inside of the box. However, in the picture above that shows Steps 4-6, you can see the nine screws that secure the motor access panel to the box. Removing those screws allows you to access the motor, and remove it if necessary. In pumps of this type, the motor must be removed to remove the brushes. In pumps like the one in the picture that shows Steps 7-8, the brushes are accessible simply by turning the pump box upside down. (See picture below.) The last reason for removing the pump box has to do with the plastic block valves. Occasionally they will fail or become contaminated with debris. The procedure for removing and replacing defective block valves is located here.
For information about removing the piano action -CLICK HERE
For information about removing and cleaning the brushes -CLICK HERE
|


