|
While installing a Replacement Aeolian Block Valve is a relatively simple job, removing the old block valve can be a real 'pain in the neck' (literally as well as figuratively). The heart of the problem is that the block valves were glued in place with a Duco-type cement, and the only way to get the blocks out of the piano is to break them out. Since the block valves are made out of hard plastic, there are a number of precautions that should be taken to avoid injury to both the piano and the person doing the job.
To avoid personal injury, I highly recommend the use of safety goggles. Pieces of sharp plastic and glue will be flying around. I also recommend the use of a very bright, stationary light. A flashlight simply won't be adequate. To avoid injury to the piano, follow the steps below after you have identified a defective block.
Testing the Block
|
In the Service Manual for the Modern Aeolian 64/88 Note Player System, they suggested testing the plastic block valve by laying a business card over the exhaust port, then watching to see if the associated bellows collapses or tries to collapse. While this is a good way to test for a really bad block, it is basically useless for checking for minor leakage. And, in many cases, it's the cumulative effect of numerous minor leaks that prevents the player system from operating efficiently. So, here is a much better way to test the blocks.
Procure a 3-4 foot length of rubber tubing (5/32" I.D.) that will fit into your ear, and make a listening tube. (If you happen to have a real stethoscope, that's great. Just remove the end piece, and you're set to go. Also, if you happen to have an old set of head phones like they use to give you on an airplane -before they went to electric headsets-, they work great too.) Unplug the power cord from the AC outlet. (The electric vacuum pump is too noisy to effectively check the blocks.) Get a friend to foot pedal the unit while testing the blocks. Also, I always use a Player-Care Test Roll when initially testing the blocks. They sell for $34.70. Locating and replacing obviously defective blocks will make the job of finding minor leaks much easier*. This is because the sound of a badly leaking block has a tendency to travel so far, and is so loud, that you won't be able to locate a block that has a minor leak.
After completing the initial testing of the blocks, cover the trackerbar with a piece of scotch tape, then put a roll on and turn the take up spool around a couple of turns. Set the Tempo Control to its lowest setting. If the roll creeps a little bit, that's not a problem because the trackerbar is covered. However, if you really want to test only the stack (the block valves and their associated pneumatics), disconnect and plug the hose leading to the air motor governor. Doing so will also give you a good indication of how much vacuum is being lost because of the air motor and the air motor governor.
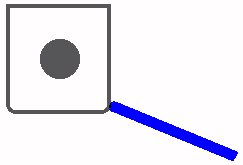
To begin testing the blocks individually, have your friend start pumping the pedals. Listen carefully for any noticeable leakage. Next, put the end of the listening tube over the hole in the top of any suspect plastic block valve. If it's leaking on the intake valve facing, you will hear an obvious 'sissing' or 'hissing' sound. This means that the intake valve facing is not seating correctly. **There are a couple of reasons why this might be happening, but for now we are identifying the defective blocks**. Next disconnect the rubber signal hose that's connect to the valve block. Doing so should activate the valve, its associated pneumatic, and play a note on the piano. If you hear any sissing or hissing when the valve is activated, that means the exhaust facing is not seating correctly. **Again, there are a couple of reasons why this might be happening, but for now we are identifying the defective blocks**. Next, cover and uncover the brass nipple on the valve block repeatedly. If the valve is working correctly, all you should hear is a slight transient 'sissing' noise as the valve changes state from 'Off' to 'On', and back 'Off' again. If it takes more than 1/10th of a second to change state, the bleed cup inside of the block might be clogged with paper debris.
To remove paper debris from the bleed cup, connect a length of trackerbar tubing (5/32" I.D.) to the brass nipple. Then, with as much force as possible, suck and blow on the tube repeatedly. Doing so will normally dislodge the obstruction, and the valve will start operating properly again. If that doesn't happen, then the block is defective and it should be replaced.
*A problem that might have been discovered during the initial use of the test roll is notes that either fail to activate, fail to activate quickly, or fail to fully activate. While the first inclination might be to suspect the valve block, it is wise to check that block by disconnecting the hose at the brass nipple before preceding further. If the valve functions correctly at the nipple, then the problem is a clogged or pinched hose somewhere between the trackerbar and the block valve. This is NOT an uncommon problem in the modern Aeolian line of players. Finding and fixing a pinched tube can be very frustrating because the tubing is massed together. In some cases, it's easier to cut the tube where it comes out of the trackerbar, and put in a new piece of tubing (using a straight 5/32" brass nipple to join the pieces of tubing) from that point to the block valve.
**Possible problems include but are not limited too; 1) Debris on the intake or exhaust valve facing. Sometimes the debris can be dislodged by blowing air forcefully into the exhaust port on the top of the block. Sometimes it can be dislodged by operating the valve numerous times (10-20). But, if the debris cannot be cleared, the block will have to be replaced. 2) The pouch might not be allowing the valve to rest against its seat (intake side). Sometimes this problem can be solved by forcefully inflating and deflating the pouch in the same manner as just described for clearing the bleed cup. But, if that doesn't work, the block must be changed. In some cases, the intake valve facing will seal when a higher level of vacuum is applied, i.e., pumping harder. If that's the case, it's best to change the block with one that works well at a low vacuum level. Otherwise, it will be a constant nuisance or annoyance.
Replacement Aeolian Block Valves are available for $32.00 each. Click Here!
===================================================================
Removing the Block
|
1. Disconnect the tubing that goes to the blocks in the area around the defective block. To insure that those tubes get back where they belong, it is wise to label them clearly.
2. Using a piece of paper or cardboard, cover the exhaust ports (or the tops) of all of the blocks in the surrounding area.
3. Using a sharp chisel or putty-type knife, break the glue seal on the side of the block. Clear away the glue until you can see the wood.
4. Using a blunt piece of metal or a piece of hardwood that is about the same width is the block valve and a hammer, tap firmly on the front corner of the block at about a 35 degree angle.
5. If the block seems quite resistant to coming loose, try attacking it from the opposite side. If it is still reluctant, hit it harder. Word of caution!! DO NOT UNDER ANY CIRCUMSTANCE USE A LEVER TO TRY AND PRY THE BLOCK LOOSE. DOING SO CAN ONLY CAUSE POSSIBLE DAMAGE TO THE ADJACENT BLOCK - AND THEN YOU WILL HAVE TO REPLACE TWO BLOCKS INSTEAD OF JUST ONE. ALSO, AVOID HITTING THE BLOCK FROM THE TOP OR THE BOTTOM. DOING SO MAY CAUSE SERIOUS DAMAGE TO THE WOOD. With patience and persistence, the block will come loose. Sometimes it will come loose in layers. That is NOT a problem.
6. In some cases, small pieces of plastic will break away from the block and stay glued to the wood. If that happens, gently chisel off the remaining pieces until the surface area is 100% clean. (Take care -- Those chips will fly!!)
7. If you are very unlucky and a little chip of the wood comes away with the plastic, don't be too concerned. If a large chip breaks off, save it!
|
Installing the Block
|
1. The recommend method of installing the replacement block requires the use of a hot-melt glue gun. It doesn't have to be a fancy industrial model. A simple craft-type glue gun will be adequate. Be sure to use clear or yellow type glue. Do not use the white, caulking type glue.
2. The only word of caution is be prepared to move quickly. Once the hot glue is applied to the block, you only have a few seconds to put the block in place. It might be wise to practice putting the block in place before you apply the hot glue. That way you'll know where your hands and eyes need to be to put the block in place squarely and evenly.
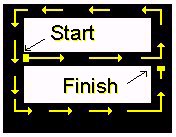
3. Using the special pattern shown below, draw a bead of glue onto the block in one even sweep. Failure to do so will result in high or low spots which can cause problems. If necessary, practice the pattern a few times beforehand. The bead should be just wide enough to cover the plastic edge in the middle of the block. Also, take care not to overlap the bead at the beginning or the end of the pattern.
4. Now, gently put the block in place and press just hard enough that you see the glue start to squeeze out around the sides. Sometimes it's easier to look through the block at the bead that is squeezing out from the middle layer. Whichever way is more convenient, do it that way. The point here is to press the block in place just hard enough to get an even layer of glue between the block and the wood. Pressing the block in too hard can cause so much glue to squeeze out that the intake and exhaust vacuum ports will become too small, and the block will not work proficiently.
5. Hold the block in place for at least 10 (ten) seconds. The glue will set very fast.
6. Remove all protective paper or cardboard. Reconnect all tubing. Test the replaced block.
7. If by chance you place the block in crooked, DO NOT ATTEMPT TO STRAIGHTEN IT OUT. REMOVE IT IMMEDIATELY AND WAIT UNTIL THE GLUE HAS COMPLETELY COOLED. One of the beauties of this installation method is that it gives you room for error. After the glue has cooled, it can be easily removed from both the block and the wood with very little effort. Normally, it will pull right off like a gasket. Occasionally, it will be a little more difficult to remove from the wood, but generally this only happens if the block was pressed too hard into place initially.
8. If this procedure is followed accurately, the block will be firmly in place for life, it will have a perfect seal, and it will work exceptionally well. Failure to follow the above instructions may lead to a myriad of problems.
|
|
Here's a video about restoring block valves -click here
For All Your Hot Melt Glue Needs, Go To: GLU-STIX
We Gladly Accept These Cards


This page was last revised on July 7, 2022
|
Since "Player-Care" is an internet business, I prefer that we correspond via E-Mail (click here to fill out the 'Request Form'). However, if I'm not in the middle of some other activity, you can reach me at 732-840-8787. But please understand that during the hours from 8AM-5PM EST (Mon-Sat), I'm generally quite busy. So, I probably won't answer the phone. If you get the answering machine, please leave a detailed message stating the reason for your call. Also, repeat your name and phone number clearly and distinctly. By necessity, I prioritize everything in my life. And, if you call and just leave your name and number, and ask me to call you back, it might be a day or two before I return your call. Why? Because I don't know why you want me to call and I might not be prepared to assist you in an effective and efficient manner. If you leave me an E-Mail address (which I prefer), spell it out phonetically. The more you do to help me, the more I can help you in return. Don't rush. You have four minutes to record your message.
|
  |
407 19th Ave, Brick, NJ, 08724
Phone Number 732-840-8787
(Voicemail Only, No Texts)
|
  |
Google Adsense Ad

|


