|

|

|
|
|
|
|
| Home | Manuals | Supplies | Search | Consult | Contact | Testing | Service |
Parts/Supplies (click) Technical Manuals .. (click here) Test your 'Player'.. (click here)


|
|
Also, check out YouTube videos by Nate Otto and Travis Hobbs. Stiffeners in Exhauster Bellows -Click Here
There are a few things that you need to be aware of if you want to make an excellent bellow. First, there are only four parts. The wood, the hinge, the cloth, and the glue. Second, assuming that the wood and the cloth are 100% airtight, the only remaining concern is the glue. The hinge is not an issue because it is inside of the bellow.
Here's a short video about installing the hinge in a striker pneumatic
Here's the link to the full size video at YouTube (Special Note: Occasionally, the portion of the bellows that is glued to the stack gets so damaged, when it is removed for recovering, that it is necessary to manufacture new pieces. If that happens, or if you just want to build a new set of bellows, I suggest that you read some of the fine information in the Archives at the Mechanical Music Digest, under "Pneumatics" Also, check out the articles on "Sizing wood for bellows".) While gluing a piece of cloth to a piece of wood might seem like a simple enough task, when it comes to making a bellows there are a couple of things that separate a decent bellows from a great bellow. Most simply put, in a great bellows, just enough glue is used to create a 100% air-tight seal between the cloth and the wood. If too little glue is used, there will be 'air gaps' in the seal which will allow air to 'leak in' when vacuum is applied. If too much glue is used, the bellows might become 'hinge-bound' (explained later). To insure that enough glue is used to create a 100% airtight seal, you must visually inspect the 'contact area' (where the wood and the cloth touch each other) AFTER the wood, glue and cloth have come together for the first time. To accomplish this, simply set about the gluing process in the normal fashion. Then, as soon as you affix the cloth to the wood, quickly remove the cloth and examine the contact area for any voids. If no voids exist, apply a thin second coating of glue and proceed as usual. If a void does exist, apply a second coat of glue, affix the cloth to the wood, and remove it again. Continue the process until there are no visible voids on the cloth. Then apply a final thin coating of glue and proceed as usual. These pictures demonstrate the problem and show the difference between a glue job that will leak and one that will not. Also, watch the video below.
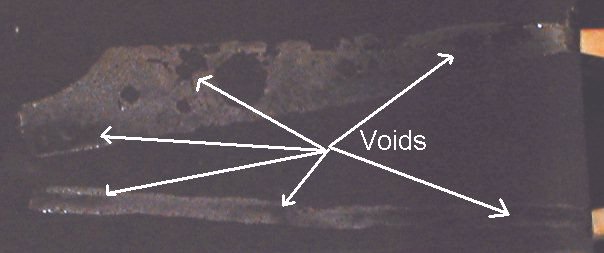 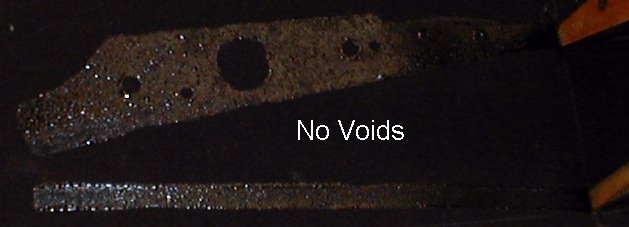
 Click on Image to see full size image
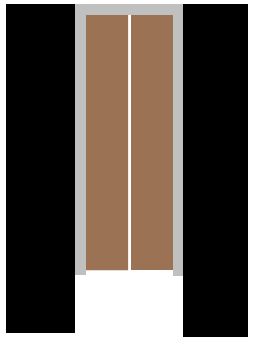
Or, watch the video at YouTube -click here If you happen to use too much glue the first time, you will probably see that glue has squeezed into the space between the two pieces of wood, where the hinge is located. If that glue is not removed, the bellows will become 'hinge-bound' when the glue dries. ("Hinge-Bound" is a term which means that the bellows will not close easily.) Naturally, the easiest way to avoid the problem is to use less glue the next time. However, there is another way to avoid the problem. As I discovered early in my career, quite a number of bellows builders removed a small amount of wood in the area that is most prone to becoming 'clogged' with glue. The graphics below shows where they pared out a small amount of wood, thus making it much more difficult for the glue to get into the area where the hinge is located.
  (Hinge is lavender - Pared section is light brown)
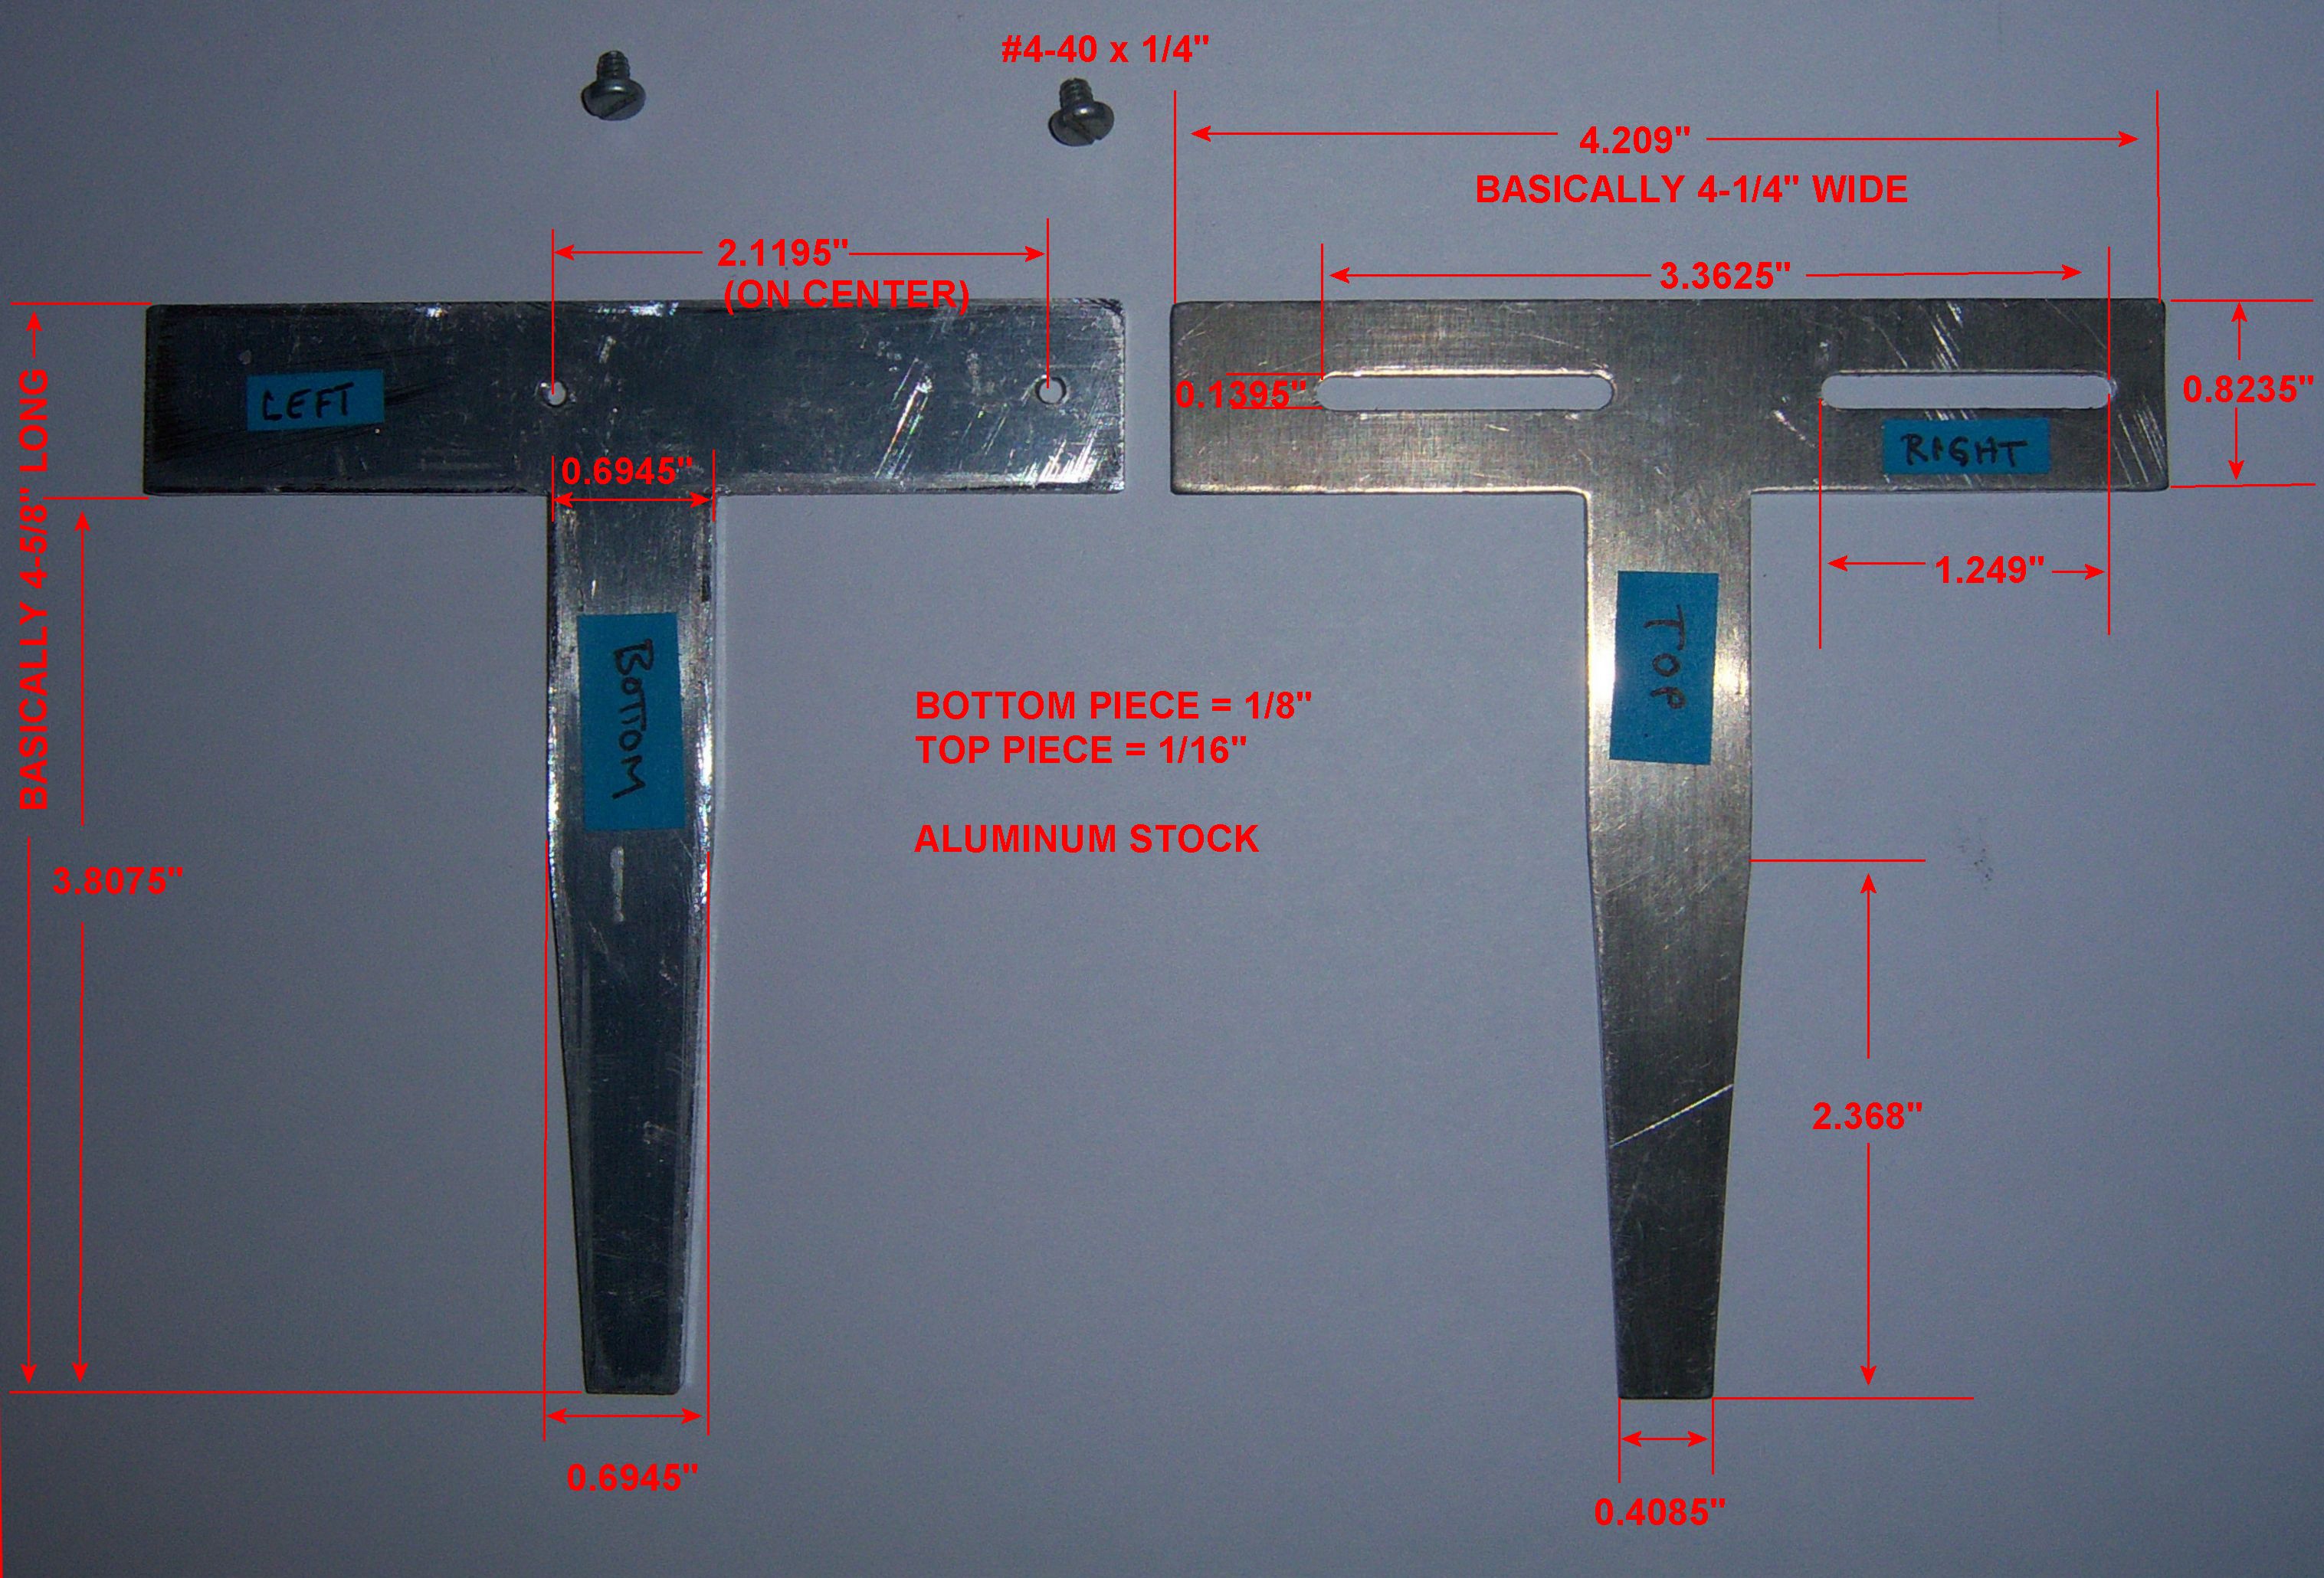
Speaking of the area where the hinge is located and the bellows cloth overlaps, there are a few points which should be mentioned. One, the area where the cloth overlaps should be at least 1/3rd of the total width of the bellow. To accomplish this, each end tab should cover 2/3rds of the back edge. Next, in my experience, it is best to wait until the first part of the overlap has dried before gluing the second part. Doing so prevents the first tab from moving while gluing the second tab. Finally, be careful not to get glue down inside the gap between the two pieces of wood. As stated above, doing so will cause the bellows to become hinge-bound. I recently took a whole series of photos while I was recovering a bellow. It would take too long to explain every single step, so I just made sure that all the photos are in the correct order - start to finish. For me, seeing how something is done is much easier to comprehend than reading about the process..... Clicking HERE will take you to the page with all the pictures. Click on the thumbnail pix to see a much larger picture. The view this video at YouTube -click here. In my continuing effort to help people rebuild their own player pianos, I found that there was no easy way to determine if a striker pneumatic had been recovered properly. So, I devised two tests. First, test the bellows with a small 20 gram weight, placed on the open end of the bellow. If the hinge is good and no glue has gotten into the hinged end, the bellows should collapse 90% of its full travel. The second test involves a monometer. This is the test shown in the video. If the bellows is well built, it should take less than 1.5" of water vacuum to collapse the bellows at least 90% of its travel. Also, as can bee seen in the video, you can also test for 'air-tightness'. (To see how to read a monometer, click here. Also, one technician wrote to me and suggested the following: "If they use hot hide glue, maybe recommend that they allow the pneumatic a full 24 hours to cure rock hard before testing it, and then to first blow into the pneumatic to test the glue joint. I found years ago that by putting a rubber cork around the air gun I could stop 18 lbs of air on all of them. So if the novice doesn't have air pressure, he can do it by mouth and get about 10 lbs maybe. But that's a good start. Then, use a hammer and wood block to sharply rap the closed hinge. This breaks any accidental "dragon's teeth" in the hinge and evens out all the pneumatics." One last word about insuring a great bellow. When in doubt about the porosity of the wood, seal it on the inside and the outside with lacquer sanding sealer. Do not seal the edges (the area where the glue will be applied). If you do, the glue cannot get into the fiber of the wood, and the cloth-to-wood seal will be compromised. As for checking the air-tightness of any bellows, tightly cover the air port with duct tape while the bellows is fully collapsed. Then try to force it open by hand. If it's air-tight, it will be almost impossible to open. For information about determining the MAXIMUM SPAN of a bellows -Click Here EDITOR'S NOTE: Here is some information that was given to a customer concerning the making and installing of the long hinge that's inside the long reservoir bellows in a Standard player system. The original 'material' that was glued to the hinge was some type of a very hard cardboard that was about 1/8" thick. In the images below, the hinge is gray, the material is brown, and the bellows boards are black. The material glued over the hinge gives the hinge more strength and helps prevent it from pulling away under stress. In some cases, the manufacturer would glue and nail the material to the hinge. Normally, the material is glued to the hinge before the hinge is glued to the bellows boards. Care needs to be taken to insure that the hinge doesn't get stretched when the bellows is fully closed. To accomplish that, you need to glue one piece of the material to the hinge first and let it dry. Then fold the hinge in half with the other piece of material so it's touching the first piece (that's already glued to the hinge). Remove all of the slack in the hinge and mark where the second piece of material will get glued to the hinge. Then glue the second piece of material in place and let it dry. See the 'example' of what the hinge and material should look like when the hinge gets glued to the bellows boards. Cork was a common material that was used between the bellows and the trunk (wind chest). The boards on the sides are there for proper alignment. Normally, the gasket was glued to either the trunk or the bellows first and left to dry. Then when the bellows was glued to the trunk, the boards on the side were already secured to the sides of the bellows. After the glue was applied to the gasket, the other screws were put in quickly, but not fully tightened. Then the bellows was clamped to the trunk to dry. Then the screws were fully tightened.
|
We Gladly Accept These Cards

![]()
|
Since "Player-Care" is an internet business, I prefer that we correspond via E-Mail (click here to fill out the 'Request Form'). However, if I'm not in the middle of some other activity, you can reach me at 732-840-8787. But please understand that during the hours from 8AM-5PM EST (Mon-Sat), I'm generally quite busy. So, I probably won't answer the phone. If you get the answering machine, please leave a detailed message stating the reason for your call. Also, repeat your name and phone number clearly and distinctly. By necessity, I prioritize everything in my life. And, if you call and just leave your name and number, and ask me to call you back, it might be a day or two before I return your call. Why? Because I don't know why you want me to call and I might not be prepared to assist you in an effective and efficient manner. If you leave me an E-Mail address (which I prefer), spell it out phonetically. The more you do to help me, the more I can help you in return. Don't rush. You have four minutes to record your message. |
|
407 19th Ave, Brick, NJ, 08724 Phone Number 732-840-8787 (Voicemail Only, No Texts) |