|
This is correspondence with Mark Silbaugh about the basic steps required to
regulate an upright piano action and to regulate the player action to the piano
action in his Starck player piano with an older 1911-1912 Autopiano player action. He was provided with this link to the basic information about removing
a player action from an upright player piano
-click here.
Hi John,
I have decided to try and remove the player action and try to make the lost
motion adjustments. I have been watching the video showing how to remove the
player action and the right side of my piano is different than what I see in
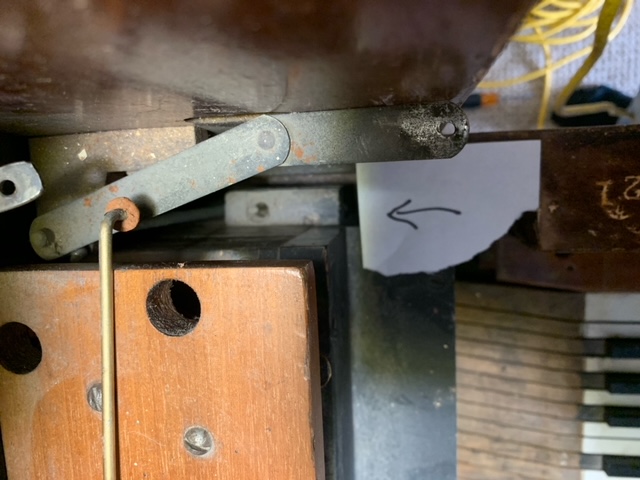
the video. You talk about removing a large 6-inch screw but on my piano I am
not sure which one to remove. See the two photos. The arrow points to
possible screw locations. Any help is greatly appreciated. Mark
Hi Mark,
That is where the screw should be. It almost looks like there's a nail in the
hole. If so, remove it.
John
Hi John,
Disregard my last email. I
got the player action removed. There was no large screw on the right
side but there was an additional smaller screw on the left. Anyway I
am hoping you can tell by the attached photo (see below) what may be off on the
lost-motion adjustment. It appears that the metal adjusting screw is
making contact with the key (sorry for my poor terminology). If you
need additional photos let me know.
Mark
Hi Mark,
The procedures for regulating the actions is described in
detail at: https://www.player-care.com/regulating-the-action.html
John
Hi John,
I did the first adjustment -
piano lost motion. I put the player action back in and now its not
working at all. The keys don't play at full power. I was careful to
reconnect everything I had disconnected. My question is did I
over-tighten the capstans at the end of the piano key? Before I started
when you slowly press a key the key had to go down maybe a quarter inch
before the hammer would move. Now it moves right when the key is pushed.
The hammers completely rest on the hammer rail. I did not make any other
adjustments. Any ideas what might be wrong?
Mark
Hi Mark,
You're doing fine... You have now completed Step 1 of the minimum four
steps. You just need to keep going. I'm very encouraged by what you
found.*
1.) Piano Action Lost Motion
2.) Piano Action Let-Off
3.) Player Action Lost Motion
4.) Player Action Stop Rail Adjustment
*Considering that before you regulated the lost motion in the "piano"
action you had to press the key about 1/4" before the hammer started
moving, the piano action lost motion adjustment was at least 60% out of
regulation. The next important regulation is the piano action let-off
adjustment. It would be best if the piano hammers move to within 1/8" of
the strings before they fall back, or 'retrace'. You have to press the keys
very slowly to make the adjustment, or you can use a piece of wood that's
1/8" thick and position it between the strings and the hammers. (You still
need to press the keys gently.) As you turn the left-off eyelet (#28) counter-clockwise,
you will reach a point where the hammer blocks against the piece of wood.
At that point, turn the eyelet 1/4 turn clockwise and move on to the next
note.
So, take the player action back out. While you've got it out, take a few
pictures of the front and back of the stack. You are going to have to split
the stack into two pieces to make the most critical of adjustments, i.e.,
the player-to-piano action lost motion adjustment.
It's a bit difficult to explain why the player doesn't work at all now, but
it actually makes perfect sense. Mainly, it has to do with the way bellows
work. Bellows have their maximum power from the moment they start to close
(or time-zero). By the time they fully close, they have no power at all. As
you can see in the graph below, by the time the bellows has close just 1/4", it
has lost about 60% of its power. With regards to why it worked before and
why it doesn't work now, it basically boils down to inertia. Even though
there was a lot of lost motion in the action, the bellows was able to get
the parts of the action 'moving' from the moment the bellows started
closing. Now, with the lost motion gone, the wippen (and all of the parts
that are connected to it) is now further away from the striker finger (B).
So, by the time the striker finger starts moving the wippen, it's already
lost about 60% of its power. Ergo, the notes don't play. The remedy is to
remove the lost motion between the player action and the piano action.
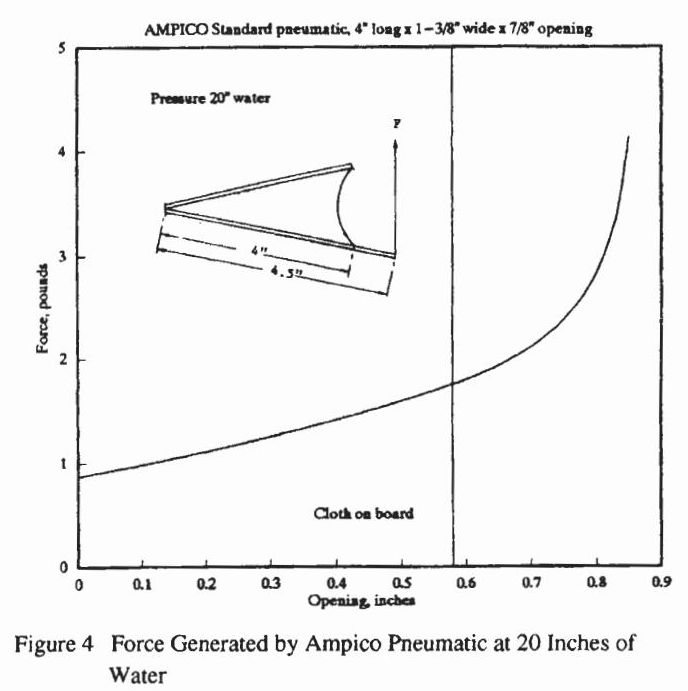
To read the article that contains this graphic -click here.
There are a few more pictures I want you to take for me. Play a note in the
center section of the piano by hand so that the note sounds firmly
(medium-to-loud volume), and while the key is pushed down all the way, take
pictures of the parts, i.e., the parts shaded in mauve (see graphics below), and the hammer. I
want to make sure that the backcheck (23) is in the correct position.
John
Hi John,
Do you still want me to do the one-eighth inch adjustment on "Let-off"? Can you refer me to a good diagram that shows where the "backcheck" and "backcheck wire" are located?
My progress on this may be slow as I am not able to devote a lot of time to this. Next week I am having surgery and will not be able to work on it for a while, so I will try to do what I can.
Thanks again,
Mark
Hi Mark,
Here are the diagrams. I sent them yesterday, but I'm sending them again.
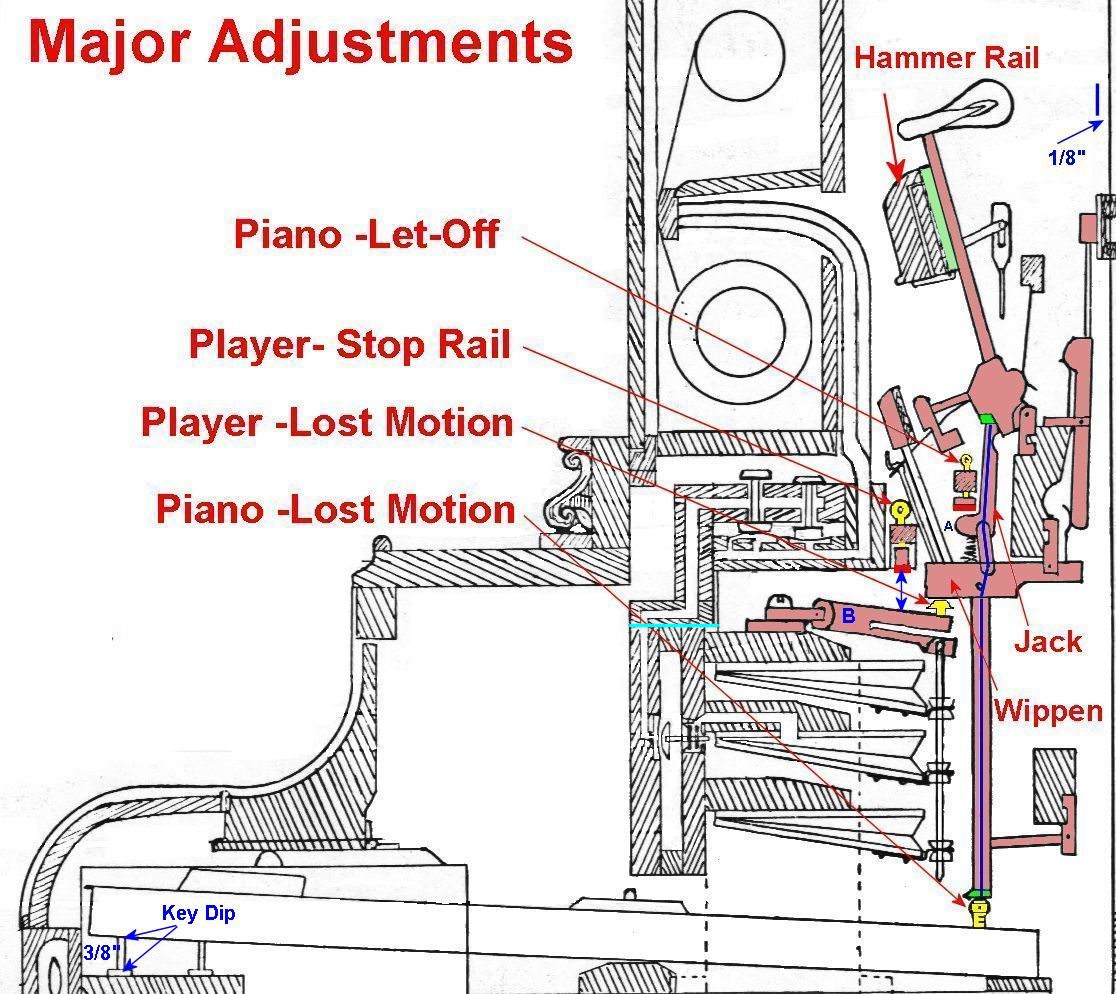
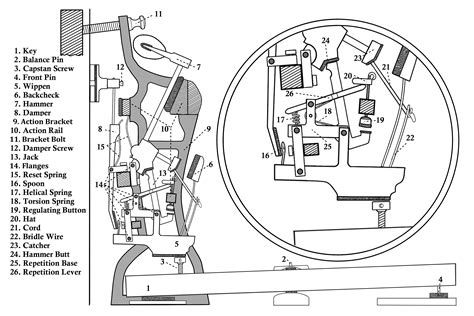
John
Hi John,
I am starting work on step 2. I checked a few keys so far and they seem to be
at the one-eighth inch distance, but this step may take awhile. The eyelets
are not real easy to get at.
I am attaching more photos as you requested. If you need additional photos
let me know.
Mark
Hi Mark,
Okay. Here's a recommendation.
After the action goes through let-off and the hammer falls back, the backcheck
catches the hammer butt. It's like the brakes in a car. When correctly adjusted
the hammer should be stopped 5/8" from the strings. To adjust the point at
which the hammer stops, you need to bend the backcheck wire. This is much
easier than it sounds. Simply hold the wippen (39) in place and pull the backcheck
back a small amount. To test, you need to play the note firmly. After you have
adjusted the backchecks, go back and double-check the let-off. When the
hammers catch too close to the strings, it's very difficult to know if the
let-off
has been correctly adjusted. So, it pays to double-check.
Regarding the splitting of the upper section of the player, see the attachments
for the screws that need to be removed. The ones though the holes should be
about 2-1/2"-3" long. The ones in front should be about 1-1/4". There are
gaskets between the two sections, but they should only be glued on one side.
The graphic shows were the gaskets are located.
Once the piano action regulation is done, first remove the stop rail on the
stack.
That way you can access the capstans on the striker fingers. Next, put just the
lower portion on the upper section (the stack) back in the piano and secure
it in
place. (see NOTE below before securing the stack in place.) Then you can start
adjusting the capstan on the striker fingers. Follow the directions for removing
the lost motion. I recommend starting in the middle of the stack. Here's why.
NOTE:
In some cases, where there is an excessive amount
of lost motion, you have to unscrew the capstan so far that it starts
feeling like
it's loose -not enough threads holding it in place. If that happens, you'll
need to
make a 'bulk' adjustment to the stack before regulating the stack to the piano
action. While that might sound difficult, it's really pretty simple.
Basically, you
just put a couple of shims in the right place to raise the whole stack upwards
the required amount. In fact, in practice, I always check to see how far off the
regulation is before making the individual adjustments. This is accomplished
by putting the stack in place but not securing it. Then, lift the whole stack
straight up (as best as possible), and eyeball how far you have to lift it
before
the piano hammers start moving. If it's more than 1/8", it's best to put wooden
shims in place to raise the whole stack up.
Let me know what you find...
John
|