
|

|

|
|
|
|
|
| Home | Manuals | Supplies | Search | Consult | Contact | Testing | Service |


Removing the Player and Piano Actions |
|
To Facilitate the Replacement of Broken Strings
This video applies to virtually every player piano with a Standard Single or Double-Valve action. In units that have Push-Button Controls for Auto-Sustain, Bass Soft, and Treble Soft, the vacuum supply tubing has to be disconnected from the lower section before it can be removed. Other than that, I can think of no step that has been left out of this presentation.
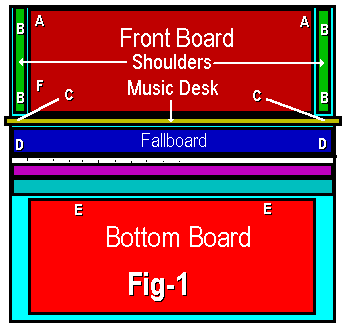
The graphic below shows the location of the various screws, springs, or fasteners that need to be removed in order to remove the various pieces of wood on the front of an upright player piano. In order, they are: "A": Devices that holds the Front Board in place. These can be latches, hooks, or just a small piece of wood that can be turned right or left to release the front board. Generally speaking, once the fasteners are moved to their 'open' position, the front board can be pulled forward at the top and lifted out of the piano. In many cases, there will be guide pins on the bottom edge of the front board that keep it from moving when it's on the piano. In some cases, as when hooks are used to secure the top of the board in place, the board must be lift up and over the pin or dowel that the hook engages with before the board can be pulled forward. Also, sometimes there is a friction hinge at point "F". If that's the case, you must first release the friction hinge before disengaging the fasteners at point "A". In some cases, the front board must be pulled forward at the bottom to access the screw that holds the friction hinge in place.
Removing the Shoulders is typically very easy. Almost always there are two screws that hold the shoulder in place. Generally speaking, they are at or near point "B", but sometimes the bottom screw is located near to the center of the shoulder rather than the bottom (as indicated in the graphic). Once the shoulder screws are removed, they should be lifted up and out of the piano. This is because there is normally a wooden guide pin on the bottom of the shoulder that's used to situate the shoulder in position before screwing them in place. Typically, if a friction hinge is connected to the front board, the screw that holds the other end of the hinge in place is located on the left shoulder. In rare case, where there are two friction hinges, the one on the right is also secured in place on the right shoulder.
Removing the Music Desk is probably the easiest piece of the piano to remove once the front board and shoulders are removed. This is because in 99% of all upright pianos there are only two screws that hold the desk in place. And, they are always located in the area directly underneath the shoulders, marked "C" in the graphic. Once the screws are removed, the board should be lifted up and out of the piano. In rare cases (1% of the time), there will be no screws under the shoulder. If that's the case, the music desk must be pulled forward at both ends about 1/2" to release it from a hook latch on the underside of the desk. Once it's released the desk should be lifted up and out of the piano.
Generally speaking, there are only two screws that hold the Fallboard in the piano. However, they are sometimes hard to see because it's fairly dark down inside the piano. So, it's a good idea to use a flashlight to locate the screws before attempting to remove them. Once they are removed, the board can be lifted up and out of the piano. In rare cases, there will be a third connection point in the very center of the piece of wood into which the two large screws are located. Usually, this connection point will involve a threaded shaft and a nut. If that's the case, unscrew the nut, and again, lift the board up and out of the piano. In about 20% of all upright pianos, the fallboard is held in place by two hinges that are plainly visible when you shine the light down into the area marked "D" in the graphic. If that's the case, unscrew all the screws and remove the board. Lastly, in very rare cases, the fallboard slides on a rail, and it's held in place by a series of two pieces of wood that are secured to the piano by small screws. In such cases, remove the screws at the point furthest from the board. One in a thousand pianos will have some odd way of securing the fallboard in place, but in such cases, look for the pivot point and remove whatever device is being used to hold that piece in place.
Lastly we come to the Bottom Board. In 99% of all upright pianos, there will be a metal spring that is used to hold the board in place at the top edge of the board. Those springs will be located in the area marked "E" in the graphic. Fairly often, there will only be one spring holding the board in place. Whether there is one or two springs, simply push the spring/s 'upwards' and once they are pushed up as far as they will go, pull the board towards you from the top edge of the board (while keeping the spring/s pushed up) until the board clears the spring/s. Then release the spring/s and continue pulling the board toward you from the top approximately 8"-12". Then lift the board upwards about an inch to free it from the guide pins on the bottom of the board. Once the board is clear of the guide pins, it can be lifted away from the piano.
To install all of the pieces, reverse the order starting with the last piece first.
|
We Gladly Accept These Cards

![]()
|
Since "Player-Care" is an internet business, I prefer that we correspond via E-Mail (click here to fill out the 'Request Form'). However, if I'm not in the middle of some other activity, you can reach me at 732-840-8787. But please understand that during the hours from 8AM-5PM EST (Mon-Sat), I'm generally quite busy. So, I probably won't answer the phone. If you get the answering machine, please leave a detailed message stating the reason for your call. Also, repeat your name and phone number clearly and distinctly. By necessity, I prioritize everything in my life. And, if you call and just leave your name and number, and ask me to call you back, it might be a day or two before I return your call. Why? Because I don't know why you want me to call and I might not be prepared to assist you in an effective and efficient manner. If you leave me an E-Mail address (which I prefer), spell it out phonetically. The more you do to help me, the more I can help you in return. Don't rush. You have four minutes to record your message. |
|
407 19th Ave, Brick, NJ, 08724 Phone Number 732-840-8787 (Voicemail Only, No Texts) |
