
|

|

|
|
|
|
|
| Home | Manuals | Supplies | Search | Consult | Contact | Testing | Service |
|
(Other Test Rolls that we offer are found here.) |
|
To purchase the Player-Care Test Roll for $34.70, Click Here to fill out the Order Form (preferred), or call 1-732-840-8787. |
|
|
The Player-Care Test Roll is designed to help the user determine Six basic operating characteristics of any regular 88-note player piano mechanism. They are: General Leakage, Tracking, Tempo Control, Scale Uniformity, Repetition, and Capacity. Our new test roll tests ALL 88 notes. It should also be noted that the tests on the roll are not individually marked or named. Therefore, small graphics are included below as necessary to help you determine which portion of the roll performs which test. To hear what the test roll sounds like as played in the MIDI program used to design the roll, click here. Or, to hear an MP3 file, click here. Before using the Test Roll, play each key on the piano by hand, and note all problems or inconsistencies. Remember: The player mechanism cannot play the piano any better than the piano plays by hand. Before You Begin: Use a Trackerbar Pump and 'Pump the Bar'.
(DO NOT SKIP OVER THIS PART) 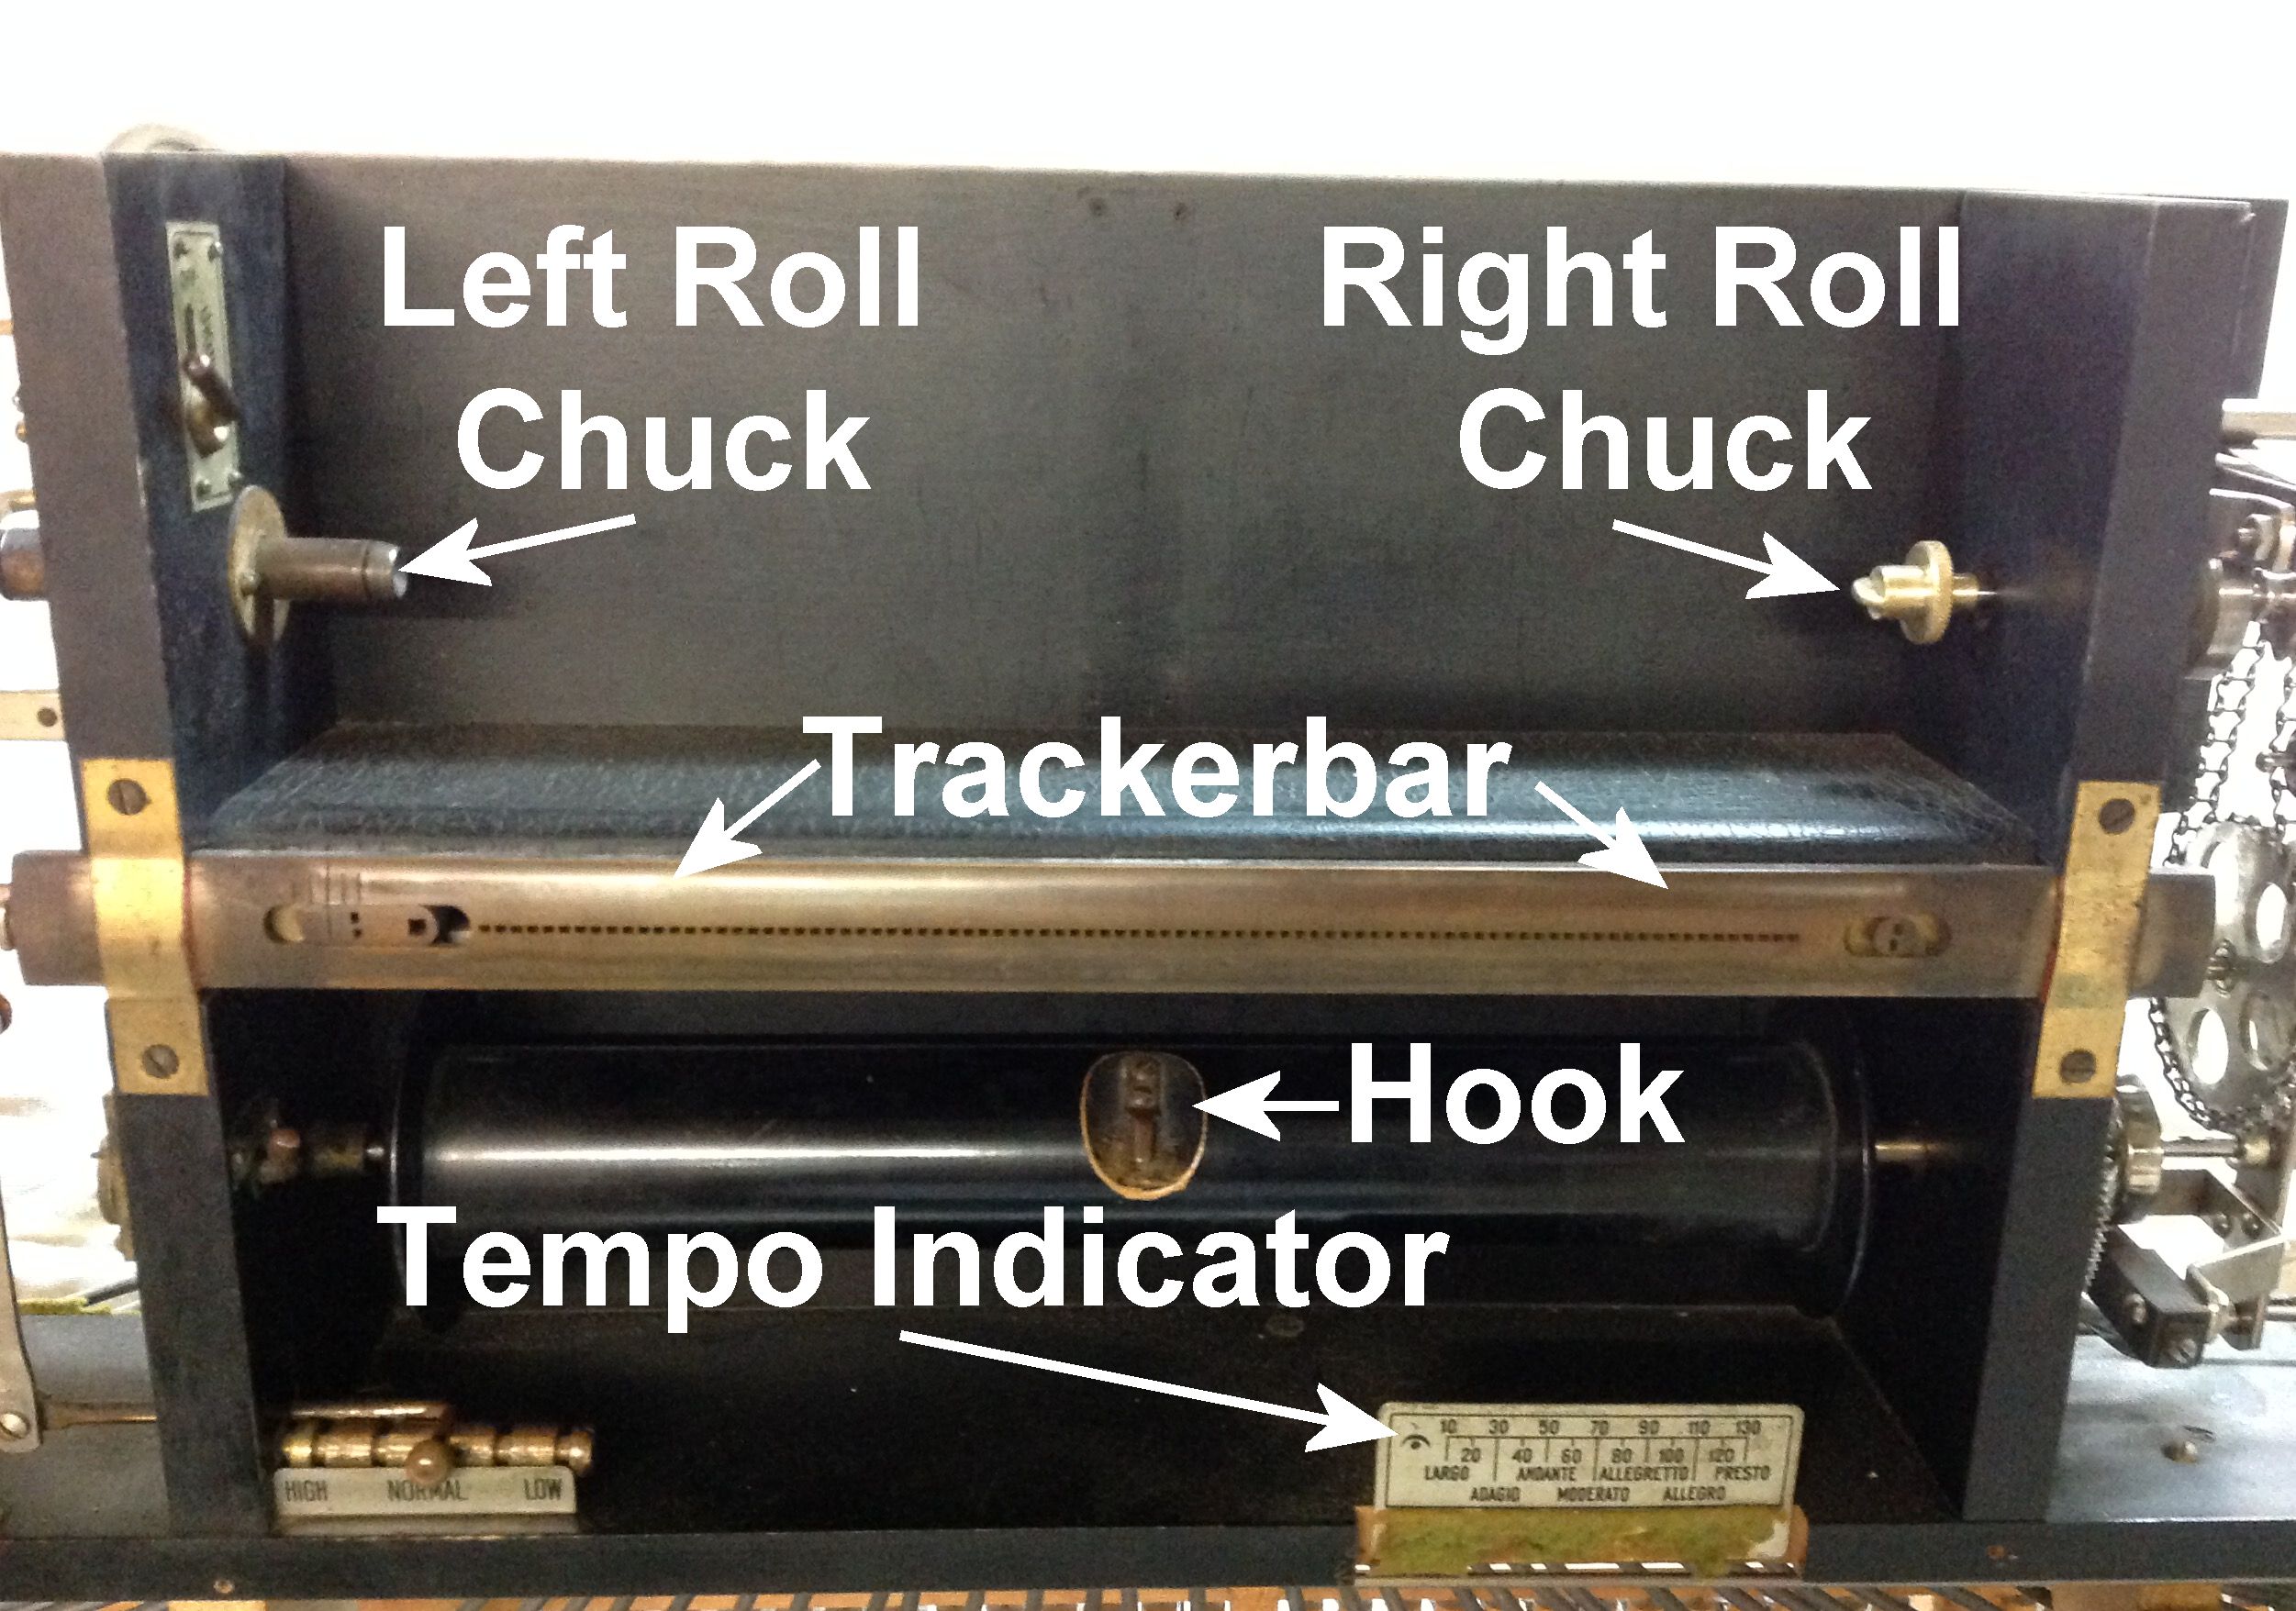
1) Place the Play/Reroll Lever in the Reroll position. This action disengages
the Take-Up Spool from the Transmission, allowing the Take-Up Spool to turn
freely.
Performing this test is quite easy. Simply start pushing alternately on the foot treadles at a rate of approximately one push per second. In a perfect world, you should only be able to push on the treadles three or four times (full pumps) before they resist being pushed any further. Next, move the Tempo Control so the indicator needle points to '10'. Give the treadles three or four full pumps and then count the number of seconds it takes before the roll stops moving. In a perfect world, it should keep moving for about 5-8 seconds. NOTE: One of the most important tests of any player piano mechanism is determining how well it can hold vacuum. The degree to which the system holds vacuum is directly related to the overall efficiency and function of the player mechanism. If the player mechanism is incapable of holding vacuum for at least a few seconds, one or more of the components in the system is leaking and should be fixed. To help you locate which component/s in the system is leaking, go to the "Test Your Player" web page - click here! After completing the leakage test, Rewind the roll to the beginning and put the unit back in the Play mode. Then set the Tempo to '70'.
The first series of perforations on the Test Roll are designed to test the operation of the 88 notes. However, the very first two perforations on the roll are notes #1 and #88. If they do not line up with holes #1 and #88 on the trackerbar, there is a problem with the alignment of the roll tracking system. Also note that some player piano makers use holes #1, #2, #87, or #88 for Automatic Rewind. If your piano uses any of those holes for Auto-Rewind, it is recommended that you take a very small piece of Scotch brand invisible tape and permanently cover the hole on the test roll. That way you can still see through the holes in the roll to see if they line up with the holes in the trackerbar. Note: The Tracking Sensors are like the 'Eyes' of the player mechanism. What they 'look at' are the edges of the music roll. Their only function is to provide the automatic tracking mechanism with information about the physical location of the music roll as it relates to the note holes in the trackerbar. If it is operating correctly, the automatic tracking mechanism will keep the holes in the music roll perfectly aligned with the holes in the trackerbar. (Some of the oldest player pianos did not have automatic tracking devices. If you have such a unit, manually adjust the position of the trackerbar so that notes #1 and #88 line up with holes #1 and #88 in the trackerbar.)
1) Start pumping. NOTE: If the Tracking Device does not perform well, or if it is sluggish in any way, the result will be a poor musical performance at the very least. Poor Tracking can also cause the player mechanism to malfunction.
NOTE: Basically speaking, the first set of perforations on the Test Roll are designed to test the function of each note. Each note should sound four times in a "Da-Dit-Dit-Dit" manner. List all of the notes that do not perform properly. Click Here to see a list of possible problems with notes that do not perform correctly. The holes in the roll are 1.7mm (or 0.067") in diameter -slightly over 1/16". 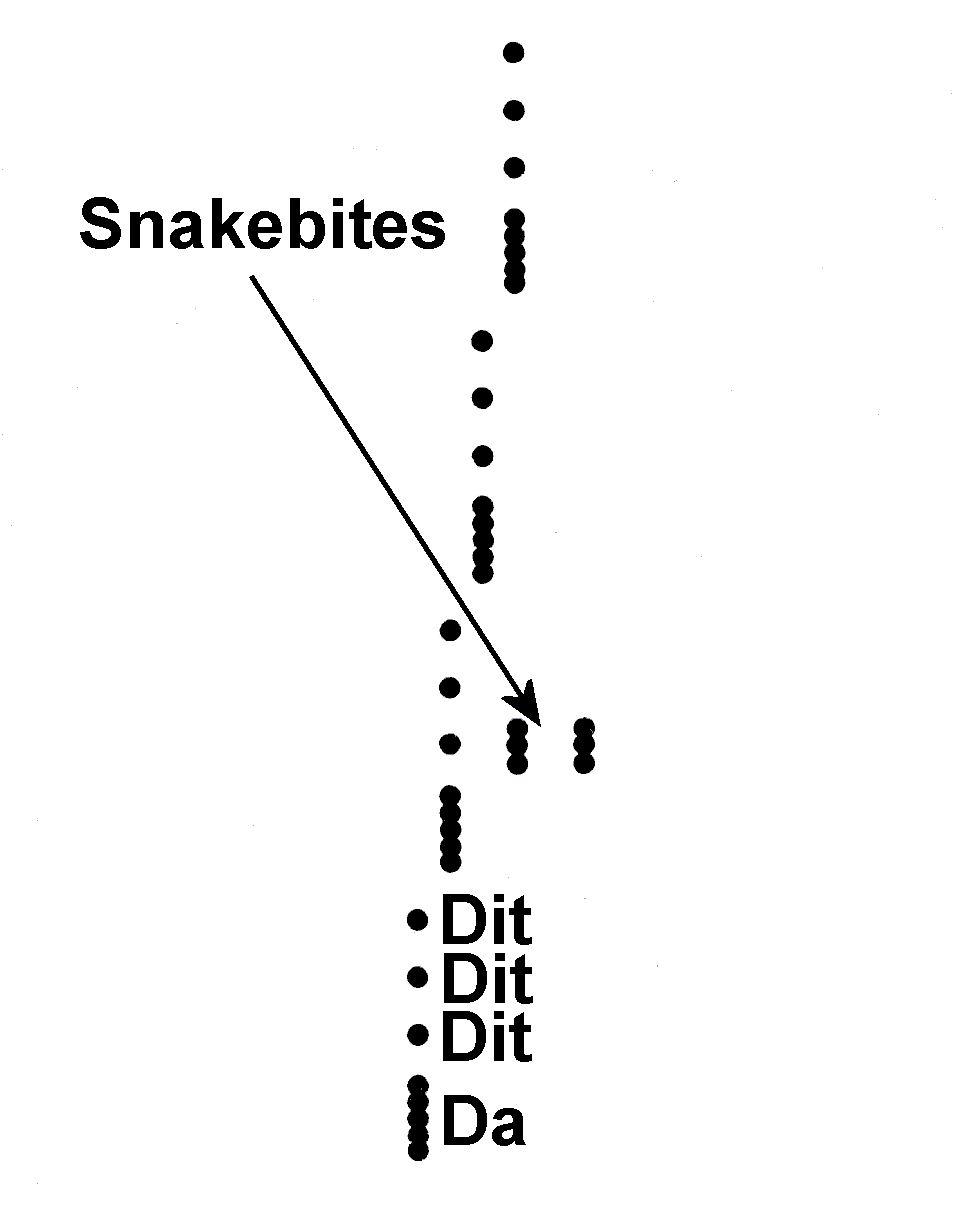 Figure 1
1) Rewind the roll to the beginning. Set the Tempo to '70'. Put the unit in
'Play'.
NOTE 1: With regards to the Tempo setting, ALL player pianos have one thing in common. For every division of '10' on the Tempo Indicator, '1' foot of music paper should travel across the trackerbar in '1' minute. So, if the Tempo is set to '50', five (5) feet of music paper should travel across the trackerbar in one (1) minute. At '100', ten (10) feet will travel across the bar in one (1) minute. NOTE 2: Although this test is primarily used to properly adjust the Tempo Control and the Air Motor Governor, it can also tell you quite a bit about the entire drive line between the 'governor' and the 'take-up spool'. For now, I will only explain how to perform the test. Note the two 'snakebite' marks in the middle of the roll (see Figure 1 above). There are ten of these snakebites on the roll. They are spaced at ONE FOOT intervals.
1) Set the Tempo set to '60'.
 NOTE: As the name implies, this test checks the repetitive ability of both the player mechanism and the piano action. In most cases, if the mechanism fails this test, there are problems with the valves or the regulation of the player mechanism. However, it is also possible that the problem is related to the regulation of the piano action. If you are in doubt about the regulation of the piano action, consult with any regular piano tuner. After performing a few very simple tests, they can tell you if the piano action is properly regulated. 1) Leave the Tempo set at '70' and pump the treadles so that the volume of each note is as soft as possible. Pumping the treadles hard or fast can mask repetition problems. As each perforation passes over the trackerbar, the corresponding notes should articulate evenly. Note all inconsistencies.
 NOTE: As the name implies, this test checks the uniformity of the scale from Note 4 to Note 84. What this means is that the volume of each note should be the same as every other note. The volume should be 'uniform' from one end of the scale to the other. Most 'uniformity' problems are related to improper regulation of player action or the piano action. 1) Leave the Tempo set at '70' and pump the treadles so that the volume of each note is as soft as possible. Pumping the treadles hard or fast can play the notes so loudly that it will be difficult to determine which notes are louder or softer than the rest. Note all inconsistencies.
 NOTE: This test is designed to give you a good idea about how the unit will perform under 'normal' to 'very heavy' usage. Unlike the previous portions of the Test Roll, this section plays numerous notes at the same time.
1) Leave the Tempo at '70' and pump the treadles normally (as though you
are playing a regular music roll). |
|
Below is a list of the various problems that could cause a note not to work correctly. Some of these problems are relatively easy to correct. Therefore, for simplicity sake, the corrective action is included here. As time permits, I plan to link the other problems to a web page that will endeavor to explain how to correct the problem.
1. Paper Dust and Debris in the trackerbar tubing and the bleed cups. Remedy: "Pump the Bar" |
|
The above tests are merely the major aspects of a player system that can be checked and/or tested by using the Player-Care Test Roll. I often use the roll to troubleshoot normal problems like intermittent or leaky valves, and odd problems like incorrect tubing of the trackerbar or leaky exhauster flaps. In the hands of a qualified technician, or an experienced user, the Test Roll can even be effectively used to check the regulation of the player and piano actions. The point is, THE TEST ROLL IS A VERY IMPORTANT TOOL.
Musically,
John A. Tuttle |

![]() ..To
The Top of this Page . . . . . . . . . . .
..To
The Top of this Page . . . . . . . . . . . ![]() ..To The HOME Page
..To The HOME Page
|
Since "Player-Care" is an internet business, I prefer that we correspond via E-Mail (click here to fill out the 'Request Form'). However, if I'm not in the middle of some other activity, you can reach me at 732-840-8787. But please understand that during the hours from 8AM-5PM EST (Mon-Sat), I'm generally quite busy. So, I probably won't answer the phone. If you get the answering machine, please leave a detailed message stating the reason for your call. Also, repeat your name and phone number clearly and distinctly. By necessity, I prioritize everything in my life. And, if you call and just leave your name and number, and ask me to call you back, it might be a day or two before I return your call. Why? Because I don't know why you want me to call and I might not be prepared to assist you in an effective and efficient manner. If you leave me an E-Mail address (which I prefer), spell it out phonetically. The more you do to help me, the more I can help you in return. Don't rush. You have four minutes to record your message. |
|
407 19th Ave, Brick, NJ, 08724 Phone Number 732-840-8787 (Voicemail Only, No Texts) |
