|
Splitting open the Simplex Valve Block
At least three authors have written procedures for rebuilding
the Simplex Valve Block, and each describes a different method
for splitting the block open. I tried each method three times and
encountered at least one consistent problem with each method.
Therefore, I did some experimenting and came up with a method
that I believe is superior to all three. To read about the method
developed by Durrell Armstrong from the Player Piano Co., click here.
After studying the characteristics of hot hide glue, I
discovered that extreme cold (zero degrees F. or colder) would
crystallize the glue, weakening the bond to the adjoining piece.
In addition, I knew from prior experience, that intense steam
heat would loosen the cloth covering in about three minutes.
Therefore, armed with those two facts, I developed the following
procedure.
The 'Tuttle' Method
Splitting the Simplex Block with virtually no
damage to the wood, valve cap, valve (intake face) or valve seat.
Preface: Scrape off most of
the burnt shellac that holds the valve cap in place, but do not
attempt to remove the cap at this time. Number each unit on the
block and on the movable board with a ballpoint pen. It is best
to indent the wood slightly since the steam will liquefy the ink
and it could be easily rubbed off by accident.
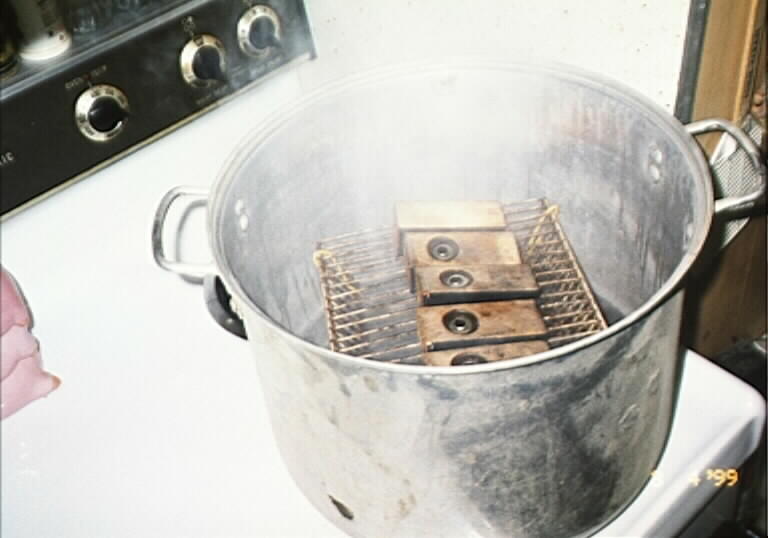
Before the blocks can be split open, the pneumatic cloth and
gasket must be removed. The method I use for the task involves a lobster pot (or very large pot), a
grate to elevate the blocks, a sharp knife, protective rubber
gloves and steam. Do not remove the movable board. First timers
should work with no more than 10 units (or less) at a time. It is far
easier to work with smaller sets than 80-88 units all at once.
The process goes like this:
1) Fill the pot with about one-inch of water, cover, and bring to
a rapid boil.
2) Place a block on the elevated grate and start timing minutes. (You
should turn the heat down so the boiling water does not splash
onto the block.) Keep adding blocks at *one
minute intervals until five minutes have
elapsed.
3) Put another block in the pot and remove one block. Locate the
portion of the cloth that is overlapped (usually on the side,
near the gasket) and peel off the cloth with the knife, all the
way around. If the cloth resists being removed, put the block
back in the pot and wait for another minute.
4) Before setting the block and movable board aside, take the
knife and scrape off any remaining burnt shellac. Then slap the
block (valve cap side down) onto a hard surface. The cap should
almost fall out since the burnt shellac is mostly gone, and the
steam heat has softened what is left under the cap. The cap can
also be removed prying it out with the knife. However, it might
get bent and that would render it useless.
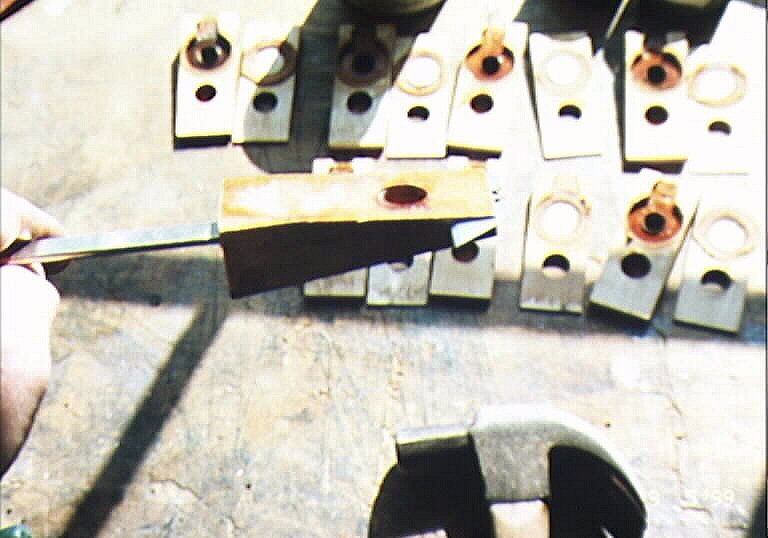
5) Mark the block number on the 'inside' of the block with a felt
marker. Then arrange the block, valve cap, valve and movable
board in a box just as though they were all one piece and move on
to the next unit.
NOTE: The amount of time it takes to complete
Steps 3-5 will determine how many blocks will be in the pot at
any one time. Do not leave any block in the pot for more than six
minutes. If you notice that the moveable board is warping, turn
the heat down. With very little practice, you will know how long
to leave the block in the pot. For beginners, I suggest working
with just one block at first. Remove the block after three
minutes and see if the cloth is easily removed. If it 'fights'
you, or does not come off in one piece, it is not ready. Give it
another minute. (Back)
After about ten units are completed, take just the valve
blocks and place them in a very cold freezer. To insure that the
blocks get super-frozen, place slabs of dry ice around the
blocks, but avoid allowing the dry ice to touch the blocks by
placing paper between the two. Then wait at least 24 hours.
(The valve caps and valves can be put aside. The remaining
moveable boards can be arranged in the box with the 'inside'
facing up. This is a good time to seal the inside portion of the
board. I recommend three or four coats of lacquer sanding sealer,
applied either by brush or spray.)
The "Split"
The final step in the disassembly process
involves three tools: a small hammer, a specially sized piece of
iron, and the blade from a utility knife or a very strong but
very thin straight-edged knife.
(To avoid having to run back and forth from the freezer to the
shop, I place a piece of dry ice in a small Styrofoam cooler with
8-10 blocks.)
1) Remove a block from the cooler and locate the joint on the
very front leading edge of the block.
 You might have to wipe off the ice crystals to see the joint
clearly.
You might have to wipe off the ice crystals to see the joint
clearly.
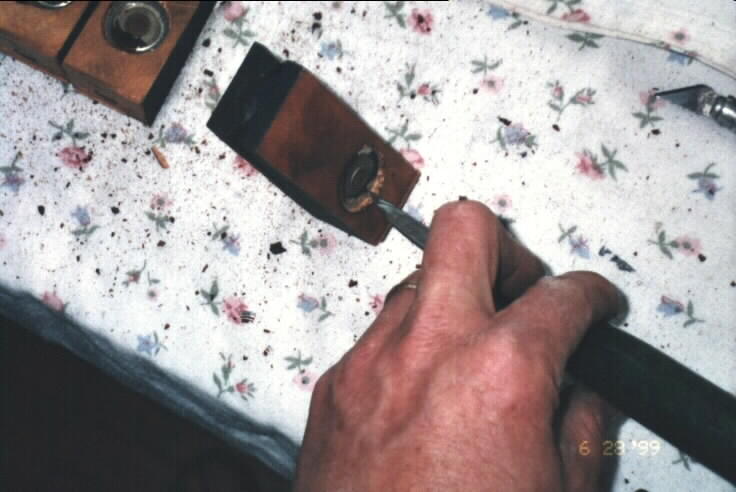
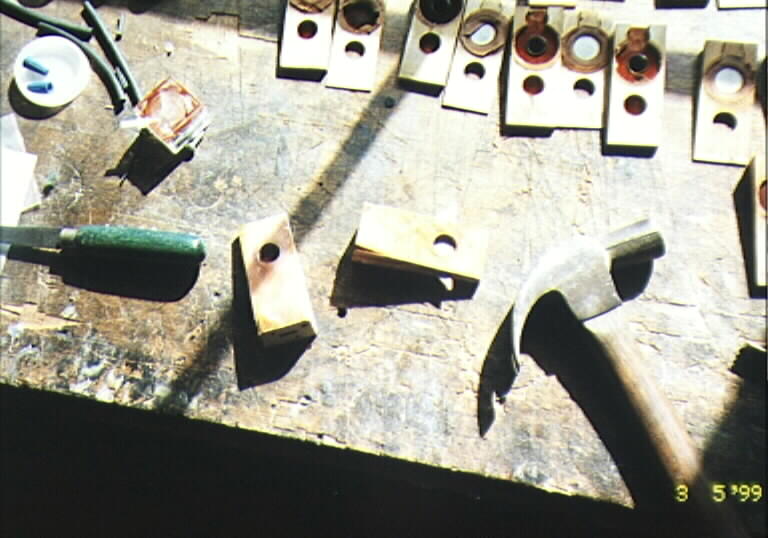
2) Put the block on the workbench with the gasket side down and
place the knife edge directly over the center of the glue joint.
Then tap the blade with the small hammer. Keep tapping until the
blade is buried in the block approximately 3/4". (See photo)
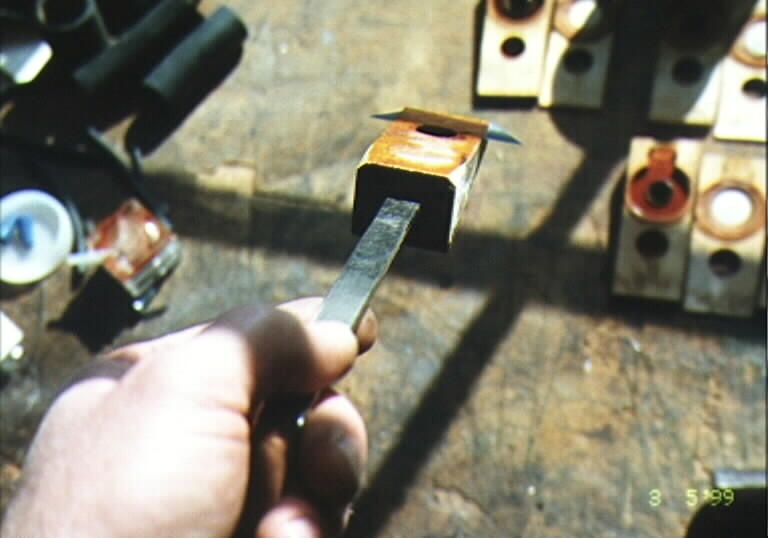
3) Push the iron bar into the vacuum supply hole approximately
1/2", no more. (See photo)
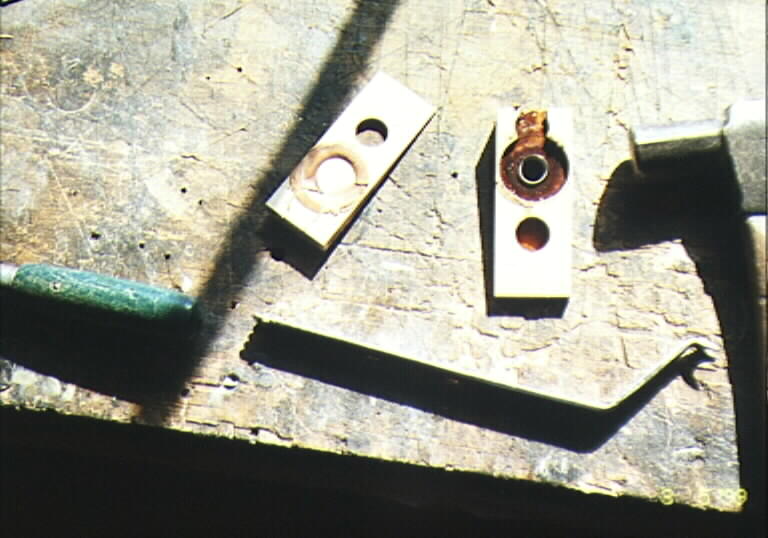
With the block oriented as it is in the photograph, place the
block on the bench and steady it with one hand. Grab the end of
the iron piece (pry bar) and push down. (DO NOT lift up on the
pry bar. Here's why. If you accidentally push the pry bar too far
inside the supply hole, you could damage the edge of the pouch
well or the bottom side of the valve seat.) As soon as the block
cracks open the first time, STOP!
4) Remove the blade from the other end. And while holding the
block partly open with the pry bar, insert the blade into the
opened area with the sharp edge pointed towards the narrow end of
the block. (See photo)
5) Gently tap on either side of the blade and evenly drive the
blade to the narrow end until the block is complete separated. (See photo)
This ends the procedure for splitting open the Simplex Valve
Blocks. For more information about Rebuilding the Blocks, follow
this link... Blocks(Response to a Question)
For another technique that was recently developed by Bruce Newman, watch his YouTube video at: Rebuilding Simplex Player Piano Unit Pneumatics
===================================================
Some Information about Setting the Valve Travel
At 10:22 AM 11/9/04, you wrote:
Hi John,
I'm working on a Jan 1923 Lakeside with a Simplex action. So far I have replaced,
every piece of felt, leather, all dampers, and hammers in the piano action.
Since this one is for my own pleasure, and I'm not as much of a purist as Craig,
I do not intend to replace the pin block, pins, or re-string the instrument.
I have already rebuilt the air motor and timed it.
The TUTTLE METHOD works like a champ for working on the striker pneumatics.
Thank you for your ideas.
When I removed the old leather facings from the 3/4" diameter valve buttons I
noted that the tops had just the facing leather but the bottoms (stem side) had
two thicknesses of 9/16" diameter pneumatic cloth between the leather facing and
the wooden button itself.
Is this a normal method used to insure minimum travel of the valve? I have a
set of PPC's removable .035" spacers to use under the new fiber covers when I
reassemble the valve blocks so travel will be limited to that amount anyway.
Your comments are solicited.
Being located in one of the centers of the furniture industry (Hickory, NC)
the case is out being refinished while I work on the innards.
By the way, well done on your stand in support of Craig vis a vis MMD.
Keep 'em rolling,
Joe Getlein
===========================================================
Hi Joe,
Thanks for the kudos.... :-)
I use a rather novel technique/method to establish valve travel
that isn't in any book. As you may know, Simplex used burnt
shellac to secure the valve plates in place. From what I was
able to figure, they used a light weight four-pronged device
that was inserted in the hole in the plate which established
the exact valve gap and held the plate perfectly level, using
the exhaust valve facing as its reference. Then the shellac
was applied around the edges of the plate. It may be that
they also applied a small amount of the shellac to the rim
(or groove) before inserting the plate, but that's hard to tell
for certain.
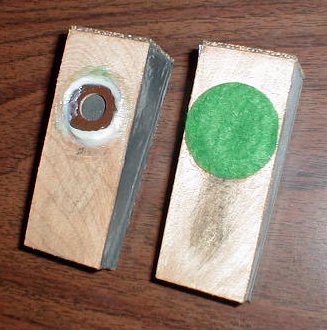
Since the only objective is to seal the plate to the wood so
that it's 100% air-tight, I saw no need to apply any sealant to
the underside of the plate. So, having made the small gapping
tool to support the plate in place, I simply sealed the plate
around the edge --- with synthetic hot melt glue from a hot
glue gun. The result was a perfect seal that made removing
the plate, at a future date, extremely easy. The real beauty
of the method wasn't fully realized until I experience a small
leak in one of the blocks - turns out there was a microscopic
crack in the wood by the brass intake valve ring that I didn't
see during the rebuild process. Since the hot glue didn't
'seep' into the wood, I just grabbed ahold of the bead (going
around the plate) with a pair of pliers and pulled it off.
It's not the prettiest method in the world, but once you glue
on the felt filter no one can see anything.... ;-)

Musically,
John A Tuttle
Player-Care.com
Brick, NJ, USA
Portions of this email might get used in the web page about
rebuilding Simplex valves..
==========================================
We Gladly Accept These Cards

 ..To
The Top of this Page . . . . . . . . . . .
..To The HOME Page ..To
The Top of this Page . . . . . . . . . . .
..To The HOME Page
This page was last revised
October 8, 2016 by John A. Tuttle, who Assumes No
Liability
For The Accuracy or Validity of the Statements and/or Opinions
Expressed within the Pages of the Player-Care Domain.
Cartoon Graphics by E7 Style Graphics (Eric Styles)
|
Since "Player-Care" is an internet business, I prefer that we correspond via E-Mail (click here to fill out the 'Request Form'). However, if I'm not in the middle of some other activity, you can reach me at 732-840-8787. But please understand that during the hours from 8AM-5PM EST (Mon-Sat), I'm generally quite busy. So, I probably won't answer the phone. If you get the answering machine, please leave a detailed message stating the reason for your call. Also, repeat your name and phone number clearly and distinctly. By necessity, I prioritize everything in my life. And, if you call and just leave your name and number, and ask me to call you back, it might be a day or two before I return your call. Why? Because I don't know why you want me to call and I might not be prepared to assist you in an effective and efficient manner. If you leave me an E-Mail address (which I prefer), spell it out phonetically. The more you do to help me, the more I can help you in return. Don't rush. You have four minutes to record your message.
|
  |
407 19th Ave, Brick, NJ, 08724
Phone Number 732-840-8787
(Voicemail Only, No Texts)
|
  |
Google Adsense Ad

|
|