
|

|

|
|
|
|
|
| Home | Manuals | Supplies | Search | Consult | Contact | Testing | Service |
|
NOTE: I now use Phenoseal to seal the wood inside the unit. HI Bill, While I would never call myself an expert at anything, I have spent many days perfecting the rebuilding of the Simplex block valve/pneumatic to the point where they work every single time. The vast majority of the units that failed early on did so because of leakage through the wood or through the mounting screw holes. Depending on the technique that you used to take the blocks apart, there could be microscopic cracks between the upper and lower valve chamber. To give you an idea of how the vacuum gets from the vacuum chamber to the bellows, see the graphic below. You can see that the wood is quite thin in the areas that are lightly shaded in red. Noting the pneumatic on the bottom, you can see that the atmosphere could have a path to the pouch well through the thin wood. You can also see that the vacuum could have a path to the atmosphere through the thin wood at the valve seat. That area is more clearly marked in light blue in the second graphic below.
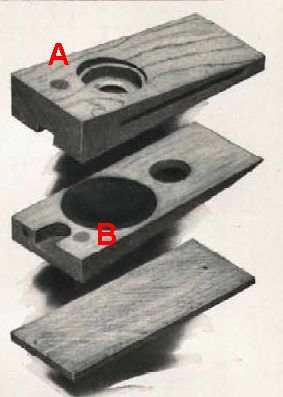
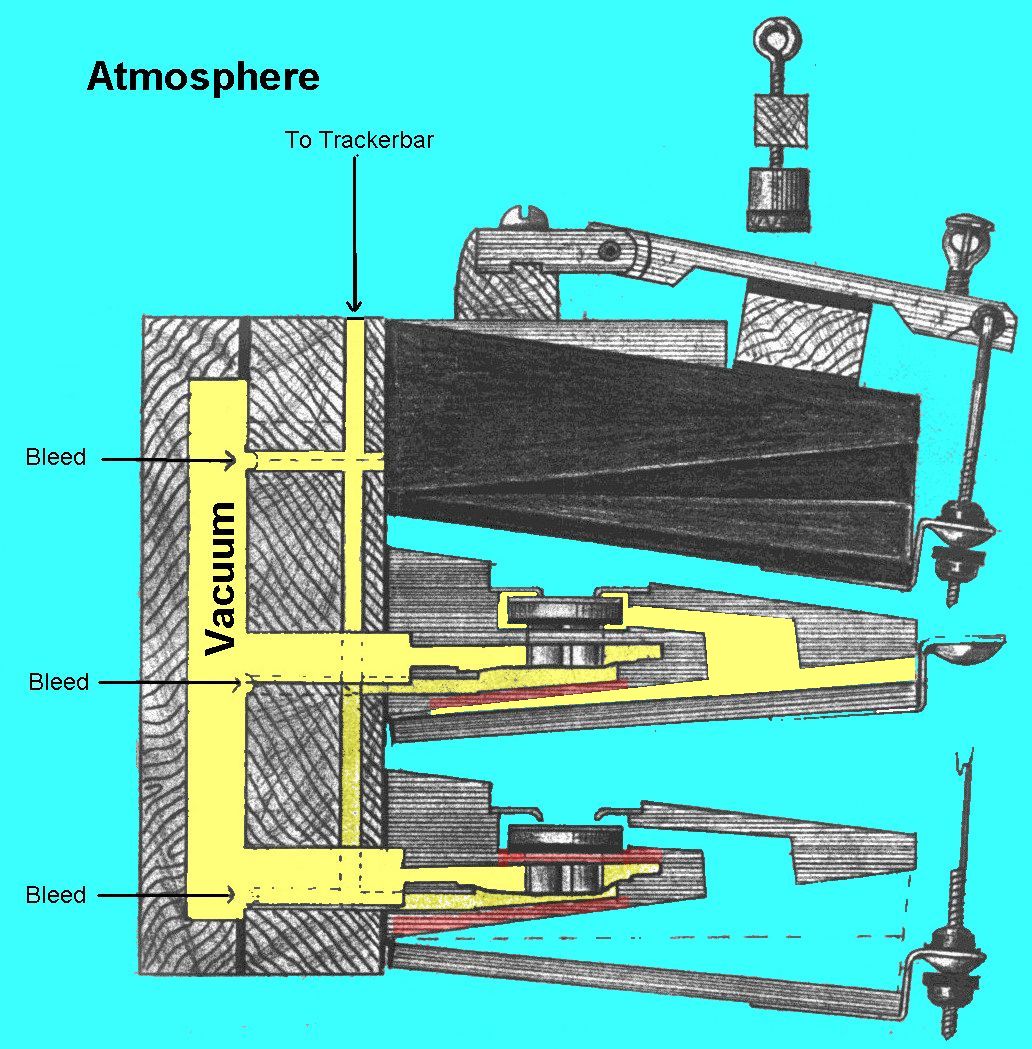  In my experience, it's this area in light blue that is the most problematic. It's well known that all wood dries out as it ages, and it become more porous. The vacuum leakage at the area marked in light blue becomes so great that when multiplied by 88 block valves, the system will hardly operate. Testing for this leakage is fairly simple. Just put a piece of tape over the valve seat, seal the valve cap in place, and then suck on the vacuum supply channel with your finger covering the hole in the valve cap. If the bellows closes slowly, you have leakage. To eliminate the possibility of such leakage, I reseal every square millimeter on the inside of the unit. In the pouch well and the lower half of the valve chamber, I use shellac, two thick coats. I also seal the hole leading to the pouch well and the vacuum channel with shellac. And, after the blocks are back together, I seal the area on the block that's inside the pneumatic and the vacuum channel leading from the exhaust side of the valve to the inside of the pneumatic, including the slit section. To seal the area in the upper half of valve chamber, around the metal valve seat, I use Phenoseal. But I don't just paint it on. After I apply a thin coat, I close off the seat with my finger and suck gently on the supply channel. This sucks the Phenoseal into the wood. After that's dry, I apply another thin coat and then blow gently into the vacuum channel. If there is any wood leakage, the Phenoseal will bubble up, identifying the leaking area. In each case where leakage was detected, the air was leaking through the chamber walls, and not around the valve seat (since it is sealed on the underside with shellac). Quite honestly, I've never been able to pin point exactly where the air is coming in, but my belief is that it is coming in through the open mounting screw holes. (I made a 3-perspective drawing of the block to see how close the screw holes are to the valve chambers and pouch wells and it's measured in thousandths of an inch. So such leakage is extremely plausible. You might also find that if that is indeed the problem, it will magically disappear when the blocks are installed into the piano, since those holes are totally closed off from outside air by the screw. See the dowels marked A and B in the graphic below, and note how close B is to the pouch well.)
 Now I'll back up a little. Unlike most rebuilders, I do not seal the pouches. We could get into a very long draw out discussion about the benefits and drawbacks of sealing the pouches, but common sense tells me that if you add anything to the pouch leather, the flexibility of the leather decreases. The question I asked myself from square one was: if sealing the pouches is so important, why didn't the manufacturer seal them? Since they felt no need to do it, I don't either. Moving on. When I put the block back together, the two halves are dry fit to see if there is any warpage. And if there is, the warped half or halves are lightly sanded. I also use a fairly substantial amount of hot hide glue when glueing the pieces back together, especially around the air channel leading into the pneumatic. I found that since the edge of the pouch is dangerously close to that opening, air can seep underneath (or through the edge) of the pouch, allowing atmospheric air into the pouch well. This causes the pouch to rise when being tested, like the note is turned 'on'. When the pouch is also sealed (on top), making it more air tight than ever intended, the whole situation becomes even more critical, and even the slightest leakage through the edge of the pouch will trigger the note. One thing I know for absolute positive is that a pouch will not move if there is an equal amount of vacuum on both sides of the leather. And only two things can change that state. One, the entrance of atmospheric air (or reduced vacuum) on the underside of the pouch. Two, the entrance of a higher vacuum level above the pouch. Since #2 is basically impossible, that leaves #1. The question then becomes: where is the air leaking 'in'? Eliminating every possible place (even through the wood) where air can leak 'in' eliminates the possibility of a problem. Musically,
John A. Tuttle One of the real headaches about the Simplex unit is the proximity of the pneumatic air channel and the pouch chamber (both above and below the pouch). They are quite close to each other and even the slightest leakage between the two will render a unit useless. I noticed when opening the blocks that Simplex was not adverse to using copious amounts of hide glue. The evidence is everywhere. They knew how critical it was to have complete separation between the two spaces and that each space had to be air tight. Glue filled any and all of the voids and regularly was seen all around the edges on the pouch, infringing on the operating area by as much as 1/8" nearly all the way around. The reality that Simplex was in no way concerned about the 'over-flowing' glue onto the operating portions of the pouch, got me to wondering about the often overstated importance of pouch placement. It's often been said that a pneumatic-operated pouch-setting tool must be used to reduce the possibility of dragging the glue into the operating portion of the pouch well. While this is reasonable in instances where the pouch is 'free standing' on a pouch board, it is a totally unnecessary concern when applying the pouches in the Simplex block. Simplex obviously designed the pouch to be big enough in total size that losing 1/8" all the way around was of no significance at all. In fact, when you examine the physics of the matter, a smaller pouch will react faster than a larger pouch (all other factors being the same). So one has to consider that Simplex actually planned on using lots of glue to put the blocks together, knowing that, in a sense, 'more was better'. I noticed during the rebuilding of an entire set; the units I had problems with were the ones where I had been skimpy with the hide glue, when putting the blocks back together. Also, the consistency of the glue was definitely a factor. I constantly added small amounts of water to keep the glue at just the right thickness. |
| Player Piano Reference Materials - Click Here |

![]() ..To
The Top of this Page . . . . . . . . . . .
..To
The Top of this Page . . . . . . . . . . . ![]() ..To The HOME Page
..To The HOME Page
|
Since "Player-Care" is an internet business, I prefer that we correspond via E-Mail (click here to fill out the 'Request Form'). However, if I'm not in the middle of some other activity, you can reach me at 732-840-8787. But please understand that during the hours from 8AM-5PM EST (Mon-Sat), I'm generally quite busy. So, I probably won't answer the phone. If you get the answering machine, please leave a detailed message stating the reason for your call. Also, repeat your name and phone number clearly and distinctly. By necessity, I prioritize everything in my life. And, if you call and just leave your name and number, and ask me to call you back, it might be a day or two before I return your call. Why? Because I don't know why you want me to call and I might not be prepared to assist you in an effective and efficient manner. If you leave me an E-Mail address (which I prefer), spell it out phonetically. The more you do to help me, the more I can help you in return. Don't rush. You have four minutes to record your message. |
|
407 19th Ave, Brick, NJ, 08724 Phone Number 732-840-8787 (Voicemail Only, No Texts) |
