
|

|

|
|
|
|
|
| Home | Manuals | Supplies | Search | Consult | Contact | Testing | Service |


Serious Air-Motor Leakage |
|
Hi All,
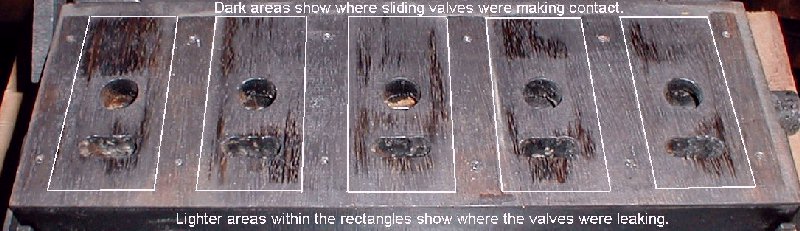
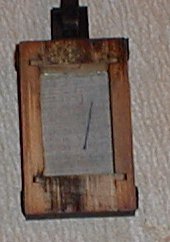
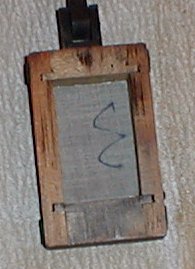
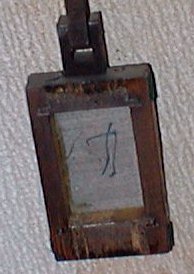
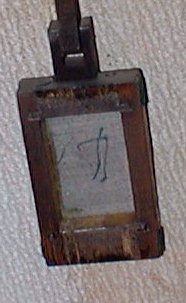
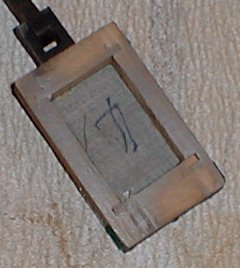
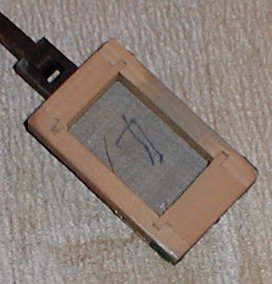
I'm only writing this posting because I've encountered a few seriously bad air motors in the past year and all of them had been "rebuilt". While the cloth was in excellent shape, they all leaked like a sieve. Also, the task of selling the repair job to the customer was complicated by the fact that the motors 'seemed' to work pretty good. In fact, I was initially somewhat misled by the performance of the player, and thought that the main problem was the stack valves. However, I noted that when I was rewinding the roll, I still had to pump rather quickly, which was unusual, and that prompted me to dig a little deeper. In every case, the problem was both internal channel leakage and valve leakage. If I were to guess at percentages, I'd say that 40% of the leakage was in the vacuum supply channel and 60% was in the sliding valves (see Fig. 1 below). Fixing the internal channel leaks was basically a snap. I simply sealed the holes in the block with duct tape, poured Phenoseal into the channel until it was full, and poured out the excess. Then I removed the tape and allowed it to dry overnight. The next morning, I tested it again, and it was still leaking a small amount. So, I taped it up and sealed it again. In one case, I had to re-seal the channel three times before it was air-tight. (Obviously, the block had gotten severely damaged when the motor was previously dismantled for rebuilding, and no effort was made to insure that it was air-tight when it was put back together... Or, in defense of the rebuilder, perhaps it was air-tight when the glue was still pretty fresh. Then, as it dried fully, it started leaking. --I try to give people the benefit of the doubt--) (See Note at end) BTW, here's a little tip that could save you some frustration and/or embarrassment. When you pour the Phenoseal in for the first time, make sure the motor is facing 'bellows up'. That way, if there are cracks or leaks in and/or around the bellows, the sealer won't get into or on the bellows. Also, it's wise to pour in a relatively small amount of sealer at first to see what happens. In one case, the leakage was so severe that the sealer seemed like it was leaking out from everywhere, and I had a bit of a mess to clean up... Live and Learn.... In closing, the improvement in overall system performance that was achieved by fixing the air motor(s) was so marked that it was deemed unnecessary to do any other repair work to the player mechanism. Point being that it's well worth the time spent to eliminate the motor as a possible problem before performing other more involved tests. Simply remove the vacuum supply hose from the air-motor and cap it off or plug up. Then check the pumping tension (in both Play and Rewind) with the motor out of the system. If there's a significant difference in tension with the air-motor out of the system, and that same difference wasn't there with the motor in the system, check the air-motor!! Note: Something else came to mind while writing this posting which might help explain the valve leakage. I reviewed the pictures I took while sanding the blocks and found one thing in common. All of them were, for lack of a better term, 'warped'. Looking from left to right across the face of the block, they were all 'low' in the center. (see Figure 2 below) This makes me wonder if the 'warpage' problem might have something to do with re-surfacing the block before the bellows were mounted. It was fairly obvious that the blocks were all re-surfaced when the motor was initially rebuilt, and it seemed odd that they were all warped the same way.... hmmmm However, if the problems (leakage and warpage) resulted from the glue fully drying, wouldn't the block be warped 'outward' instead of 'inward'? Still investigating.... Musically, |


![]() ..To
The Top of this Page . . . . . . . . . . .
..To
The Top of this Page . . . . . . . . . . . ![]() ..To The HOME Page
..To The HOME Page
|
Since "Player-Care" is an internet business, I prefer that we correspond via E-Mail (click here to fill out the 'Request Form'). However, if I'm not in the middle of some other activity, you can reach me at 732-840-8787. But please understand that during the hours from 8AM-5PM EST (Mon-Sat), I'm generally quite busy. So, I probably won't answer the phone. If you get the answering machine, please leave a detailed message stating the reason for your call. Also, repeat your name and phone number clearly and distinctly. By necessity, I prioritize everything in my life. And, if you call and just leave your name and number, and ask me to call you back, it might be a day or two before I return your call. Why? Because I don't know why you want me to call and I might not be prepared to assist you in an effective and efficient manner. If you leave me an E-Mail address (which I prefer), spell it out phonetically. The more you do to help me, the more I can help you in return. Don't rush. You have four minutes to record your message. |
|
407 19th Ave, Brick, NJ, 08724 Phone Number 732-840-8787 (Voicemail Only, No Texts) |
