
|

|

|
|
|
|
|
| Home | Manuals | Supplies | Search | Consult | Contact | Testing | Service |
|
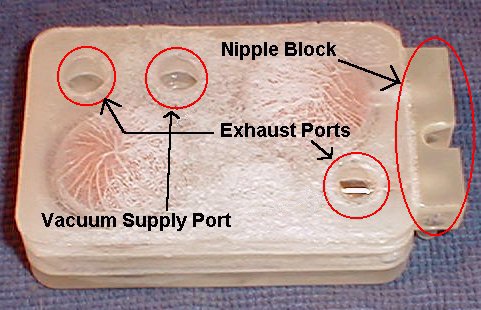
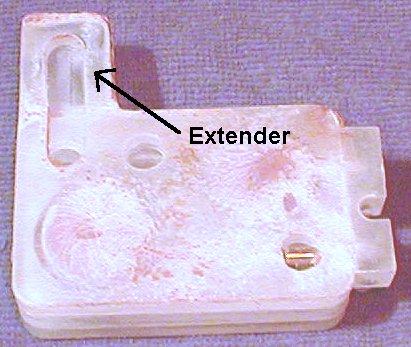
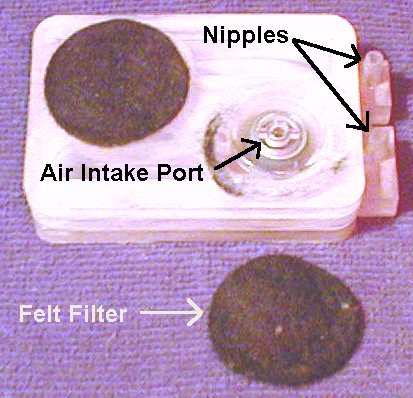
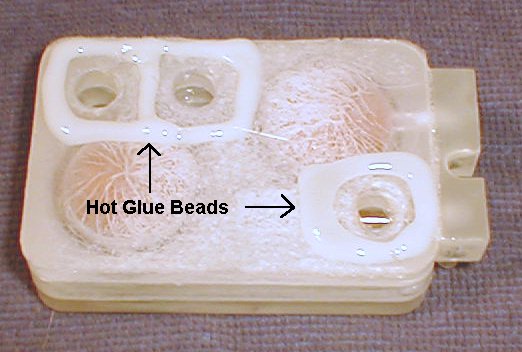
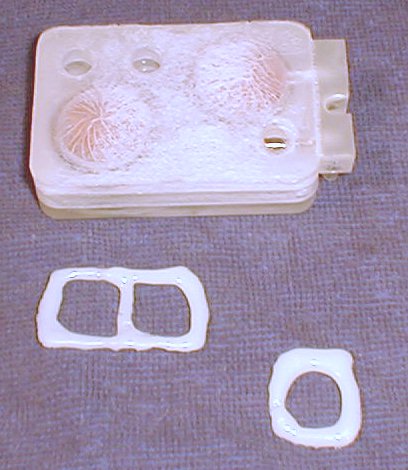
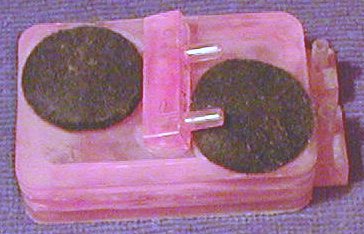
Hot-Gluing Kimball Valve Blocks to the Tiers NOTE: It is in your best interest to read this treatise thoroughly before attempting any repair. Or, as many teachers have said in the past, As Kimball discovered some years after they made the model C and D players, the difference in the coefficient of expansion and contraction between the wooden tiers and the plastic block valves caused the blocks to come 'unglued', causing severe leakage. Had they used a flexible glue as a 'buffer' between the wood and the plastic, the problem never would have occurred. What they ultimately decided to do was to make a cork gasket for each block, which was glued between the tier and each block with a Duco-type cement - model airplane glue. At that time, they supplied dealers and/or player piano technicians with a kit which contained the gaskets and the glue. And, while Kimball was still in business, these kits were supplied at no cost to the repairmen. However, after they stopped making the model C and D, they also stopped making the repair kits. This left technicians and dealers with no option except to come up with an alternative method of fixing the problem. At about that same time, hot melt glue and hot glue guns were becoming popular in the craft industry. So, I purchased an industrial-type hot glue gun and industrial-type glue sticks and tried something new, realizing that the heart of the problem was more the fact that the Duco-type glue, which got very hard and inflexible, was more the culprit than anything else, and that if an excessive amount of cement was used to secure the gasket to the tier and the valve block to the gasket, the problem would surely raise its ugly head at some time in the future. So, after some experimenting, I discovered that it was faster, easier, and much less expensive to eliminate the cork gasket and cement altogether, and glue the blocks directly to the tiers using an industrial-strength synthetic hot melt glue. Although it might initially sound complicated, the following repair procedure is actually very straightforward once you understand all of the aims and aspects of the job at hand. For that reason, it is highly recommended that you read this entire treatise very carefully before you start taking the piano apart. Better yet, read it twice! You might decide that the job is better left to a professional. After removing the stack from the piano and dismantling (or separating) the tiers, remove all of the valve blocks, making sure to keep them in perfect order. (Note that the small rectangular nipple block on the front of the valve block is NOT glued to the tier (See Fig. 1). Also, note that the front edge of the block comes right to the leading edge of the tier. This is important, and will be mentioned later when it comes time to place the blocks back onto the tier.) In a few places, you will find that the valve blocks are so close to each other that the glue that was used to secure the valve blocks to the tier is actually gluing the blocks to each other. In those cases, simply take one block in each hand and break (or bend) them apart. (The blocks will not be damaged.) Also, there are two blocks which have an extra piece attached to the left rear side of the block (See Fig. 2). In some cases, this piece will break off (or separate from) the block and remain stuck to the tier when the block is removed. If that happens, carefully remove the extra piece (called the extender) with a chisel or other sharp tool in such a manner that it does not get broken. If it is very resistant, first chisel the glue off from around the outside edges of the piece and then try prying it off again. Repairing these two blocks will be addressed near the end of this treatise. (See Note 1) Then, using a belt sander, grind off all of the old glue from around the left, right, and back sides of the blocks. If you inadvertently sand off a little of the plastic from the sides, back, and corners, don't worry. The blocks are plenty thick enough to handle the loss. Finally, carefully sand off any glue protruding from the bottom of the block, making certain that you do not accidentally curve or contort the bottom. The bottom must remain very flat. After doing that, vacuum out any plastic particles that may have found their way up and inside of the holes on the bottom of the block with a vacuum cleaner. Next, sucking on the vacuum supply port (See Fig. 1) by mouth, check the operation of each valve in the block by opening and closing the nipples on the nipple block with your fingers - leaving the two exhaust ports 'open'. This also help to insure that any 'stray' plastic particles get sucked out of the block. Next, seal the exhaust ports with a piece of duct tape and again suck on the vacuum supply port while opening and closing both nipples simultaneously. This is done to test the air-tightness and operation of the valves themselves. (99% of the time, it will be found that the valves are in perfect working order - not leaking) If the block checks 'good', put it off to the side in its correct order. If a block should be found to have a leaking valve (or two), first check to see that the nipple block is securely fastened to the block. Sometimes the aggressive sanding and cleaning of the block will loosen the nipple block, allowing air to seep in around the seal between the two pieces. If this is the case, first seal all three ports on the bottom of the block with duct tape. Then, using a piece of tracker tubing connected to the nipple, suck vigorously - by mouth - on the tubing and listen carefully. Typically, if the nipple block is at all loose, you will hear a 'hissing' sound, indicating that the air leaking 'in'. If that is the case, carefully remove the nipple block and glue it back on with the hot glue - insuring that NO glue gets into the small nipple holes. Then, test the block again as stated above. If, during the testing, it is found that one of the exhaust valve faces in leaking (as evidenced by a hissing sound at the air intake port), remove the felt air filter and blow vigorously into the top of the valve opening (See Fig. 3). Sometimes a small piece of debris, like dust or a strand of felt gets stuck to the top of the exhaust valve facing, preventing it from sealing 100%. And, because of the simple construction of the valve blocks, it's very rare for a block to fail completely. If all repairing and cleaning fails, I do have a very small stock of cleaned and tested blocks which sell for $28.00 each. Gluing the cleaned and tested blocks back onto their respective tier can be a little tricky. However, bear in mind that there are only three holes on the bottom of the block that are of any significance. They are the vacuum supply hole and the two exhaust posts. There is absolutely no need to glue the whole bottom of the block to the tier. The glue that will be applied to the bottom of the block (in circles, around each of the three holes) will be more that adequate to permanently secure the block to the tier. As a preliminary step, you may want to use a pencil or pen to scribe lines on the tier to help insure that the holes in the blocks will align properly with the holes in the tier. However, as you will see later, "perfect" alignment is not critical or necessary because of the way the hot glue is applied to the bottom of the block before it is put in place. In essence, and as stated above, the only thing that is critical is that there is a perfect air-tight seal between the holes on the bottom of the blocks and the corresponding holes in the tiers. However, it is important that the holes in the blocks and the holes in the tiers not become fouled or filled up with the hot glue when the block is 'pressed' into place. This is most easily accomplished by applying the hot glue as depicted in Fig. 4. Most simply put, instead of trying to draw circles of hot glue around each of the three holes on the block, draw squares around the holes that are at least 3/16" to 1/4" away from each hole. This allows for some degree of error in terms of placement. As soon as the glue beads have been applied, place the block on the tier (See next paragraph for additional information). However, do not use a lot of force to press the blocks into place. It is not necessary or desirable. Only a gentle force is required, as the glue is plenty strong enough to secure the block to the tier indefinitely. Also, using excessive force will squeeze the glue too much, creating the possibility that some of it will get into the ports, thereby reducing the air flow through the port. Also, it will create such a tight seal that it will be next to impossible to remove the block at some future date, should the block ultimately fail for some reason. When you actually start applying the hot glue to the bottom of the block, it must be understood that time is of the essence. From the time you start applying the glue to the time the block is placing in position on the tier, you have less than twenty seconds. That's about how long it takes for the glue to start to 'set' (or cool down). However, once you get the hang of it, it should only take about ten seconds from the time you start applying the glue to the time the block is put into place. That is why, as I explained earlier, it is wise to scribe marks on the tier, so that you know exactly where the blocks will be placed. If by chance you feel you have messed up while applying the glue (as explained previously), DO NOT PANIC! Simply stop and put the block aside until the glue has thoroughly cooled down. You can tell when it has thoroughly cooled because it will turn white and feel cold to the touch. If it is at all 'sticky', let it cool down some more. After it has thoroughly cooled, the glue can be easily removed by taking a sharp knife and sticking it between the bottom of the bead and the block and then lifting it upwards. (See Fig. 5) Furthermore, when pressing the block onto the tier, it is not at all uncommon for some of the hot glue to squeeze out beyond the edge of the block. And as long as there is plenty of room between two adjacent blocks, this will not present a problem. However, in the cases where two or more blocks are very close to each other, the excess glue that has squeezed out MUST be trimmed off before the next block is placed into position. If this is not done, the next block will not sit flat on the tier and it will have to be removed. Trust me, that is not something you want to do. It is very difficult and quite messy. Lastly, replacing the gaskets between the two tiers is not necessary. A 100% air-tight seal can be created by drawing a bead of any clear silicon sealer around the edge of the gasket before putting the two pieces back together. However, if the gasket is replaced, be sure to use gasket material of the same thickness and be sure to glue both sides to the wood. The gasket material itself is not 100% air-tight unless it is glued in place. On the other hand, since the original gasket was glued in place, the silicon sealer will easily seal the area where the gasket came apart during disassembly. Note 1: If the small extender that's glued to the left side of the two blocks mentioned above gets broken off of the tier during disassembly, it is important NOT to sand the left side of the block, the extender, or the bottom of the block until after the extender has been glued back onto the block. This is because the strongest possible seal will be created between the block and the extender if the uneven areas are glued right together so that they 'mesh' perfectly. Once they are glued back together, the left side, the back, and the bottom of the block can be sanded clean as was done with all of the other blocks. It is unnecessary to sand down the right side because those two blocks do not come close to any of the other blocks. So, there is plenty of room between the left side of the block and its closest 'neighbor'. |
 |
 |
 |
 |
 |
 |
We Gladly Accept These Cards

![]()
|
Since "Player-Care" is an internet business, I prefer that we correspond via E-Mail (click here to fill out the 'Request Form'). However, if I'm not in the middle of some other activity, you can reach me at 732-840-8787. But please understand that during the hours from 8AM-5PM EST (Mon-Sat), I'm generally quite busy. So, I probably won't answer the phone. If you get the answering machine, please leave a detailed message stating the reason for your call. Also, repeat your name and phone number clearly and distinctly. By necessity, I prioritize everything in my life. And, if you call and just leave your name and number, and ask me to call you back, it might be a day or two before I return your call. Why? Because I don't know why you want me to call and I might not be prepared to assist you in an effective and efficient manner. If you leave me an E-Mail address (which I prefer), spell it out phonetically. The more you do to help me, the more I can help you in return. Don't rush. You have four minutes to record your message. |
|
407 19th Ave, Brick, NJ, 08724 Phone Number 732-840-8787 (Voicemail Only, No Texts) |
