|

|

|
|
|
|
|
| Home | Manuals | Supplies | Search | Consult | Contact | Testing | Service |


Gluing Striker Reference Materials |
|
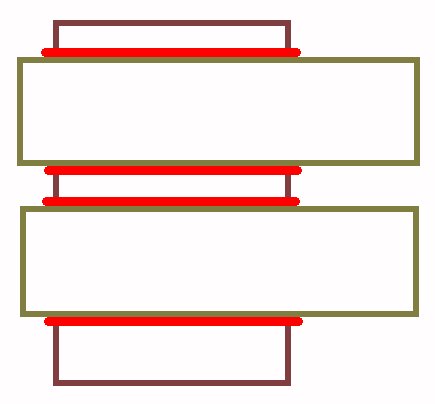
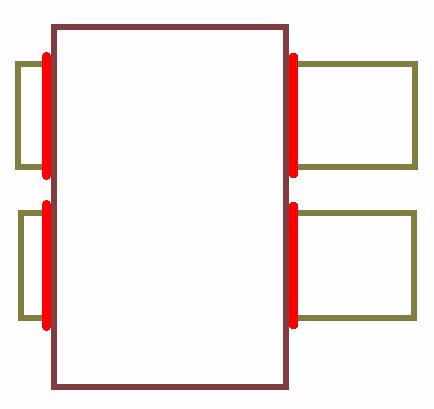
Without a doubt, the most important aspect of gluing a striker pneumatic (or note bellow) to the tier is getting it positioned in exactly the same place where it was before it was removed. However, proper placement will be of little value if the glue seal is less than 100% air-tight. So, one might argue that the placement and the seal are equally important. Generally speaking, getting the bellows back in the same place that it came from is very easy as long as things were well marked before the bellows was removed. In fact, unless the stationary board and the tier were sanded flat at some point after the bellows was removed, the uneven shards of wood that either came off the tier with the bellows or the shards of wood from the bellows that remained on the tier, act as a perfect guide with regards to the correct placement of the bellow. On the other hand, getting a perfect glue seal can be a little allusive unless you know the 'trick', or technique that was used when the stack was originally build. You might recall that when you were marking the position of each bellows, you had to scrape or cut away the glue at the edges, where the bellows was joined to the tier before the bellows was removed. That should have been a BIG clue as to how the makers insured a good glue seal. In fact, the assemblers were taught 'If you see the squeeze, the seal's good'. But exactly where do you need to look for the squeeze? Below are two simple graphics that show you where to look for the 'squeeze' (marked in red). As long as you can see the squeeze along all four edges and they all connect, you can be assured of a perfect seal.
Admittedly, I've exaggerated the squeeze somewhat for purposes of clarity, but you get the point. And, here's another important point to remember. It doesn't matter what's in between the stationary board and the tier as long as that squeeze is present. Many people feel that they have to make sure that the seal is good where the hole in the stationary board mates up with the hole in the tier. Nothing could be further from the truth. As a matter of fact, I've seen numerous instances where there was so much glue around the holes that it (the glue) was restricting the flow of air, causing the bellows to be less responsive (or slow). Unlike most rebuilders, who use a brush to apply the glue, I use an 8 oz. plastic squeeze bottle with a tapered tip. What I do is 'draw' a rectangle of glue onto the tier approximately 1/4" from the edges where the bellows will make contact with the tier. Then I place the bellows and push it down slightly, looking for the squeeze and 'feeling' for the mating of the shards of wood, which I use for alignment. Once I feel I've got the alignment right, I push the bellows down a little harder. This technique also helps avoid another relatively common problem, which is that the glue starts to gel before the bellows is properly positioned. Regarding the comment that I just made about the glue gelling before the bellows is properly positioned, some rebuilders think that it's okay to move the bellows around a little after the glue has started to gel. As it was explained to me by Craig Brougher (master rebuilder and author of The Orchestrion Builders Manual and Pneumatics Handbook"), moving the bellows after the glue has started to gel is like a cold solder joint. In other words, the bond is severely weaken. The reason my technique works well is because the glue is much, much thicker at the point where it makes contact with the wood, unlike what happens when the glue is brushed onto the wood. Therefore, it stays hotter for a slightly longer period of time. Naturally, if you've heated the wood and are working in a nice warm shop, the glue won't start to gel as fast as it will if you're working in a basement or a garage in the Winter. The point is, my technique gives you more time to work. |

|
Since "Player-Care" is an internet business, I prefer that we correspond via E-Mail (click here to fill out the 'Request Form'). However, if I'm not in the middle of some other activity, you can reach me at 732-840-8787. But please understand that during the hours from 8AM-5PM EST (Mon-Sat), I'm generally quite busy. So, I probably won't answer the phone. If you get the answering machine, please leave a detailed message stating the reason for your call. Also, repeat your name and phone number clearly and distinctly. By necessity, I prioritize everything in my life. And, if you call and just leave your name and number, and ask me to call you back, it might be a day or two before I return your call. Why? Because I don't know why you want me to call and I might not be prepared to assist you in an effective and efficient manner. If you leave me an E-Mail address (which I prefer), spell it out phonetically. The more you do to help me, the more I can help you in return. Don't rush. You have four minutes to record your message. |
|
407 19th Ave, Brick, NJ, 08724 Phone Number 732-840-8787 (Voicemail Only, No Texts) |