|
Automatic Shut-Off Installation Instructions
Here are instructions for installing the 'automatic shut-off after reroll' device in your player piano. Typical installation time for this unit is an hour. Read the instructions fully before installation, as it contains many helpful tips.
The items included:
1. Slap switch unit module with connector
2. 7 foot long extension cable with connectors
3. Six wire hold-down clips
4. Two wire nuts
You will need a Phillips screwdriver, an electric drill , 3/8" and 1/2" drill bits to complete the installation.
Switch operation:
The switch is designed to mount in the upper part of the spoolbox to sense the end of the rewind of a piano roll. The switch has a tab (actuator) that hangs down behind the roll and when the roll finishes rewinding, the action of the roll tab flapping in the spool hits the tab and shuts the switch off. A small push button resets the switch and starts the playing over again. There is nothing in contact with the paper roll as it plays.
Installation:
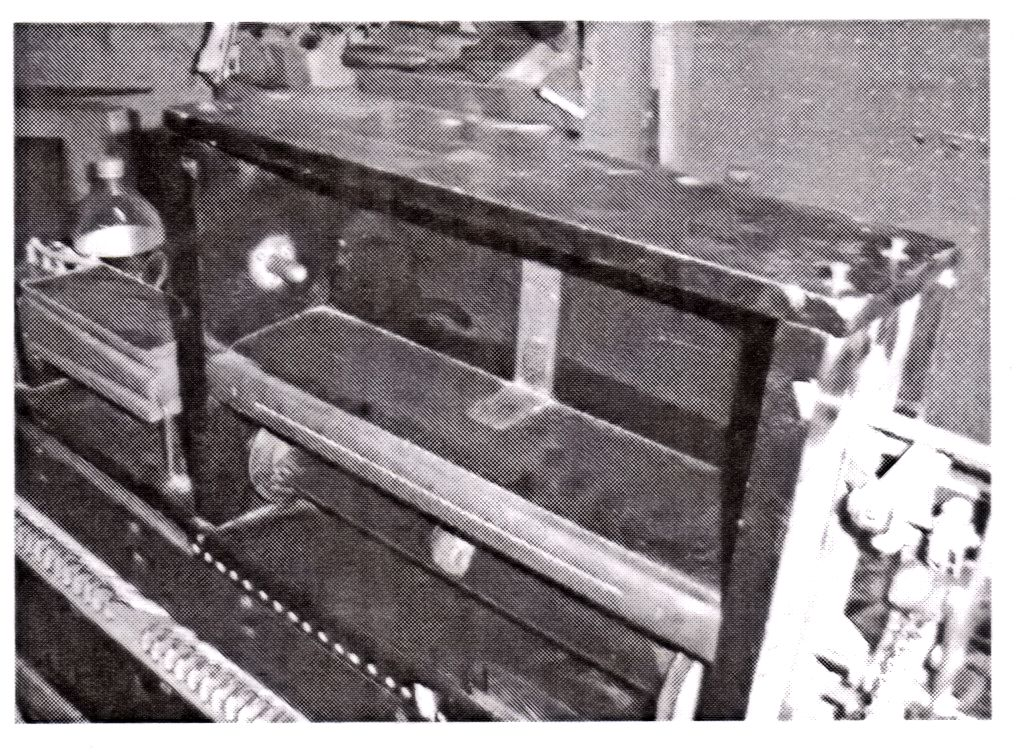
The switch can be installed either inside the spoolbox or on top of the spoolbox. It is recommended to install it on top of the spoolbox unless the upper portion for the roll is exceptionally large, as mounting it inside the spoolbox may interfere with large size long-playing rolls. But mounting it on top means drilling holes in the spoolbox, and some may not feel comfortable drilling holes in their instrument.
Many player systems have spoolboxes that have no top. If your player system spoolbox doesn't have a top cover, one can be fabricated to fit. Use a board 1/4" or 3/8" thick and at least three inches wide. It will look best if you make it as wide as the rest of the spoolbox is deep. Cut it long enough to fit the spoolbox, and paint it black to make it look proper. Screw this board onto the spoolbox securely. Always drill pilot holes when screwing into the player system.
Mounting on top of the spoolbox:
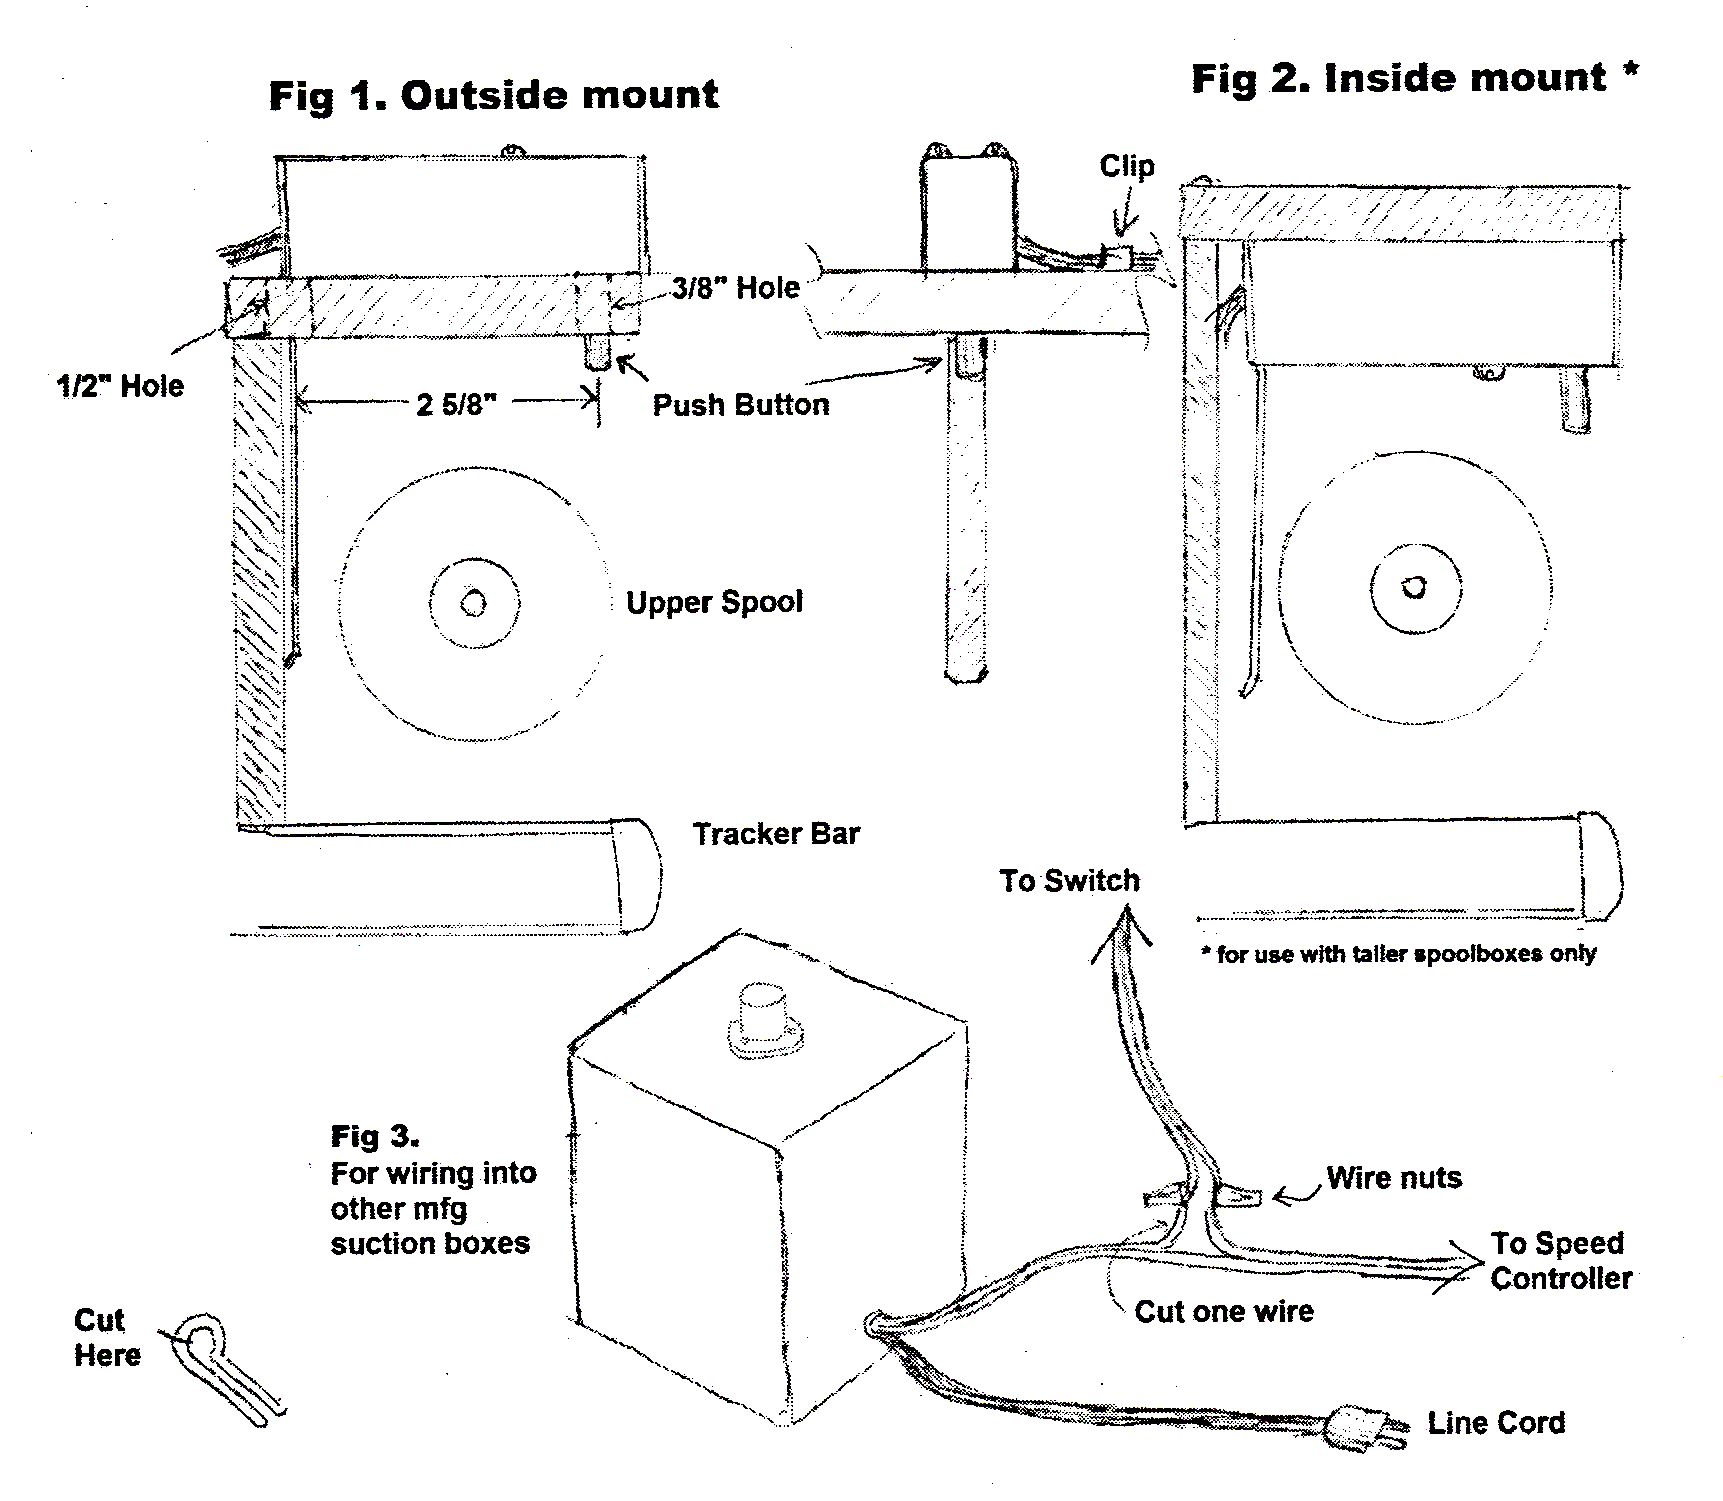
Follow these instructions if you are mounting the switch on top of the spoolbox. See figure 1 below. First find the location where the roll tab will hit the switch tab. This can be done by putting a roll in and using the eyelet on the roll as a guide, draw a center pencil line on the inside of the top cover. Also mark where the spoolbox back meets the top. Where these two lines meet is where you will drill a hole for the actuator tongue.
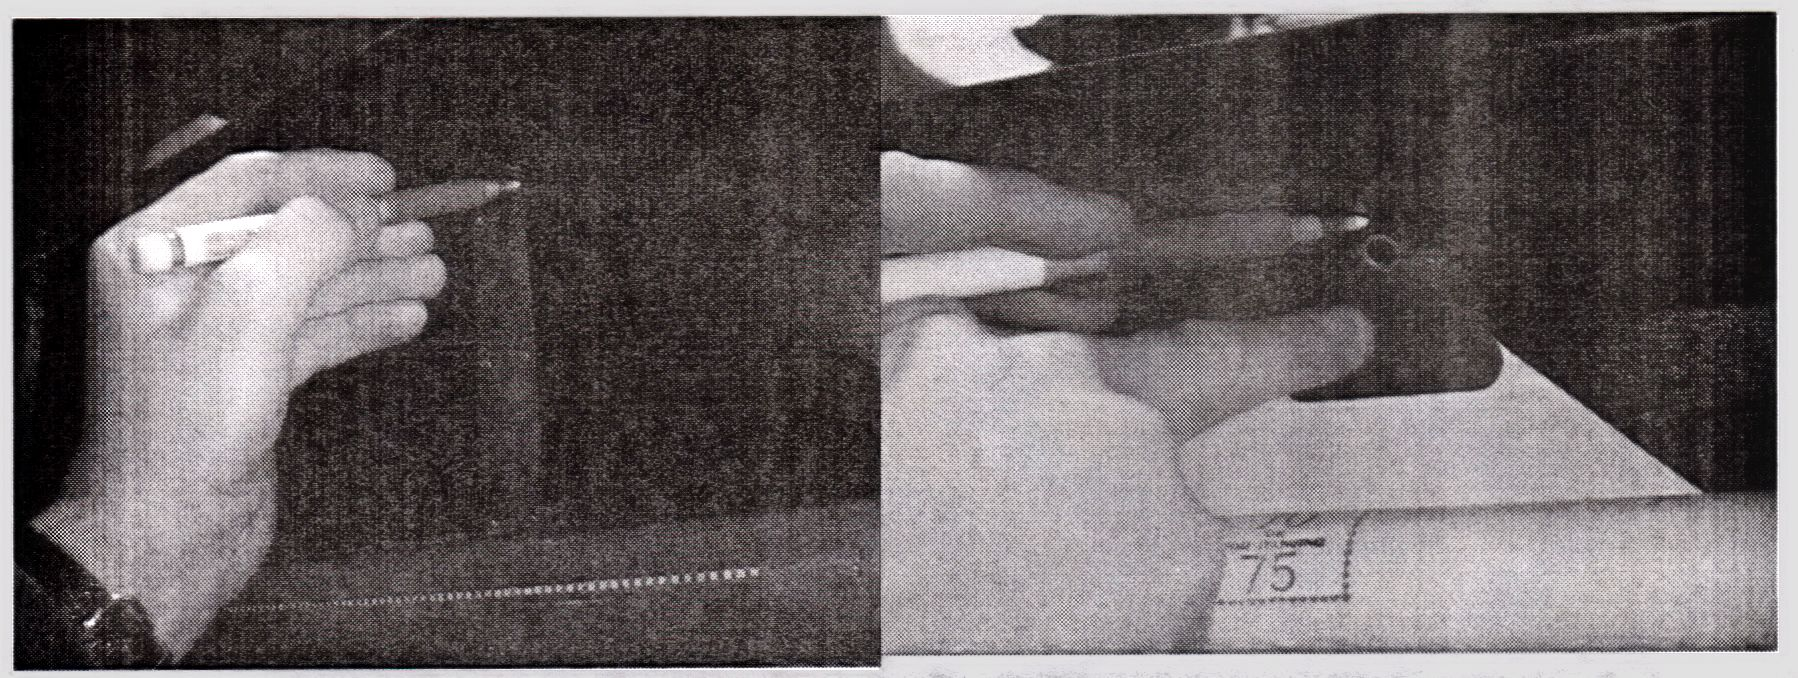
Remove the spoolbox top. Forward of this hole and still on the center line, mark the location of the push button hole 2-5/8" from the tongue hole. Carefully check that these marks are 2-5/8" apart and that the center of the rearward hole will end up at the very back of the spoolbox. Drill a 1/2" hole for the actuator tab and a 3/8" hole for the pushbutton.

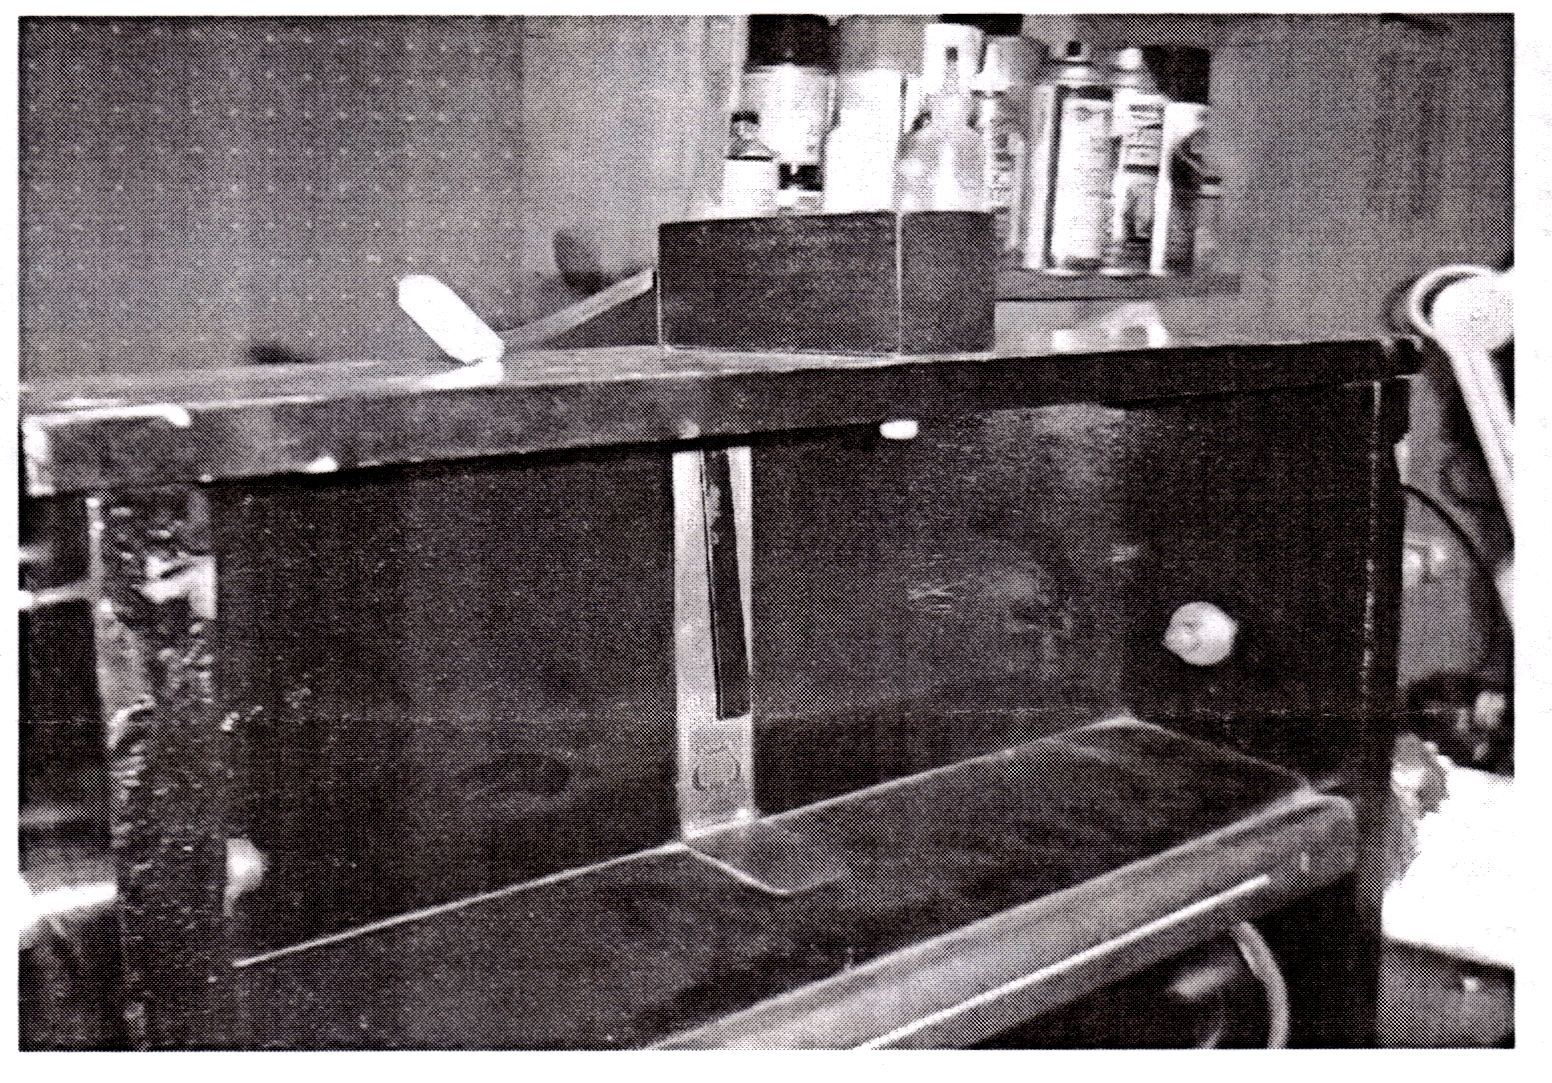
Re-install the spoolbox top on the player action. Now place the switch on the top of the spoolbox with the actuator and pushbutton sticking through the holes just drilled. Move the switch around to find a spot where neither the actuator or the button will have any binding with the holes in the top. Once this centered location is determined, use the #6 x 1-1/2" wood screws to mark the top by putting them in the holes on the switch and tap the screws lightly with a hammer so that the thread gets a bite in the wood, then turn the screws the rest of the way in. Check that there is still free movement of the actuator and pushbutton and make any adjustments, as necessary.
Mounting inside the spoolbox:
Skip this section if you have mounted the switch to the top of the spoolbox. To mount the switch inside the spoolbox, you should trial fit the unit to see that you have room for rolls of all sizes, including long play large rolls. See figure 2 below. Mark the centerline location where the roll tab hits the spoolbox as outlined above. It is always easier to install the switch with the top cover of the spoolbox removed. Mark the final location, remove the top cover, and then determine the place to drill pilot holes for the mounting screws. Mount the switch using the #6 screws provided. You will have to make a notch in the back of the spoolbox to route the wire out the back. Then re-install the cover and proceed to testing. You may have to bend the actuator tab toward the rear a bit to make it such that it clears the roll properly.
Actuator tongue length:
One thing to note, the switch is equipped with a fairly long actuator arm. It is long enough to make it universal for all kinds of player systems. When installed, this actuator should end up about 3/4" above the floor of the spoolbox roll area. If it is too long the roll tab may not hit the actuator properly and it may not shut off. If you need to shorten the actuator, you can either cut it with a tin snip or bend it with a pair of pliers back and forth until it breaks off. If you use the second method, consider filing or sanding ragged edges so the actuator doesn't damage the rolls.
Wiring the controller:
The switch comes with a quick connector on it which is identical to the PPCo #652. If you are replacing an old or broken switch, it should just snap into the old connector. If this is a new installation, then use the extension cable that comes with the switch. Use the included plastic p-clips to hold the wire in place as it's routed down toward the electric pump. If you are connecting the switch directly to a vacuum pump, the switch must be wired in series with one leg of the AC line. If the switch is replacing a regular toggle type on-off switch, remove the old toggle switch and wire the new switch exactly as the toggle switch was wired into the pump. If you are wiring the switch into a system that has a pump speed controller, the switch must be wired in series with one leg of the wires goign to the pump. Regardless of the configuration of the existing system, the switch MUST be wired in series with one leg of the AC line voltage. If you are in any way unsure about how to wire the switch into the system, please call John Tuttle at 732-840-8787 or send an email to: john at player-care dot com. See Figure 3 for details.
Using the switch:
Using the switch is simple. Put a roll in, hitch it to the lower spool, put the transmission in 'play' mode and push the button upward until it clicks on. When the roll is finished, put the piano in 'rewind' mode. When the roll is done rewinding and the paper comes off the take-up spool it will slap into the switch actuator and shut the piano off. If you need to shut the piano off before re-roll, just reach over the top of the roll, and gently touch the actuator. This will flip the switch and turn the pump off.
Notes on connecting the switch:
1. Always use wire nuts. Two Wire nuts are included with the kit.
2. Never use electrical tape, it will not last and presents a safety hazard.
3. Use care when stripping wires, do not cut into the copper conductors.
4. Carefully route the wires, do not pinch wires or drive screws through wires.
5. Do not leave wires dangling in the piano. Always secure them to the cabinet.
6. The switch must be put in series with one leg of the AC line if your pump system doesn't have a speed controller.
If you cut the clip as shown above and use the upper part of the clip, you will have a wire hold down that you can easily pull the wire out of.
We Gladly Accept These Cards

 ..To
The Top of this Page . . . . . . . . . . .
..To The HOME Page ..To
The Top of this Page . . . . . . . . . . .
..To The HOME Page
This page was last revised
May 14, 2017 by John A. Tuttle, who Assumes No
Liability
For The Accuracy or Validity of the Statements and/or Opinions
Expressed within the Pages of the Player-Care Domain.
Cartoon Graphics by E7 Style Graphics (Eric T Styles)
|
Since "Player-Care" is an internet business, I prefer that we correspond via E-Mail (click here to fill out the 'Request Form'). However, if I'm not in the middle of some other activity, you can reach me at 732-840-8787. But please understand that during the hours from 8AM-5PM EST (Mon-Sat), I'm generally quite busy. So, I probably won't answer the phone. If you get the answering machine, please leave a detailed message stating the reason for your call. Also, repeat your name and phone number clearly and distinctly. By necessity, I prioritize everything in my life. And, if you call and just leave your name and number, and ask me to call you back, it might be a day or two before I return your call. Why? Because I don't know why you want me to call and I might not be prepared to assist you in an effective and efficient manner. If you leave me an E-Mail address (which I prefer), spell it out phonetically. The more you do to help me, the more I can help you in return. Don't rush. You have four minutes to record your message.
|
  |
407 19th Ave, Brick, NJ, 08724
Phone Number 732-840-8787
(Voicemail Only, No Texts)
|
  |
Google Adsense Ad

|


