
|

|

|
|
|
|
|
| Home | Manuals | Supplies | Search | Consult | Contact | Testing | Service |


'3-D' Finishing |
|
Back in the mid-70's, I discovered a way of finishing wood that gave it what I ended up calling a "3-D Effect". While the series of pictures just below don't really do the technique justice, they give you an idea of what the wood looked like in the sunlight at various angles. The actual appearance of the wood is quite a bit more striking. I often referred to its appearance as 'phosphorescent' because it had a 'glow' that I had never seen on any other pieces of furniture. In my opinion, this finishing technique brought the wood 'to life'. I used the technique on all of the pianos I refinished until I stopped doing refinishing work in 1997.
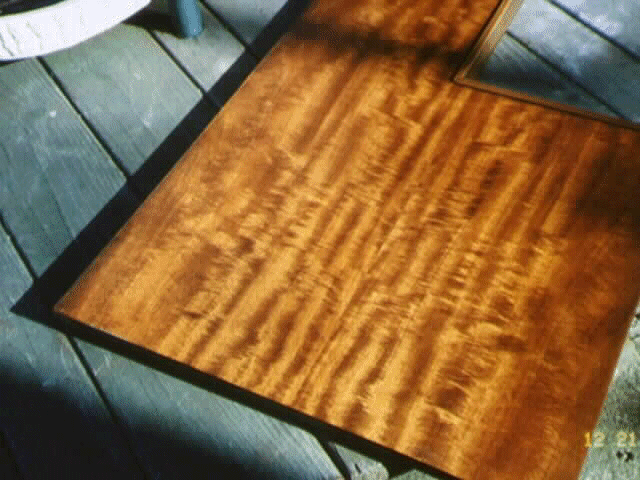 Many people have asked me how I was able to consistently achieve the '3-D Effect', and to the surprise of most people, they learned that it wasn't really that difficult. In fact, in my opinion it was easier than 'not' achieving the effect. What I discovered, rather by accident, has to do with the tiny wood fibers that are present in all wood. Early in my career, while working at the Tusting's Piano Co., in Asbury Park, NJ, I was instructed to never use water when cleaning wood, prior to staining or applying finish. The reason I was given is rather well known in the world of finishing. Most simply put, I was told that using water would "raise the grain", and that this was 'undesirable' - a "no-no". So, as long as I worked at Tusting's, I never used water to clean the wood. However, a couple of years later, when I had my own business, a customer asked me to radically change the color of their piano from dark red mahogany to light american walnut. After striping off the old finish and cleaning the wood with lacquer thinner, it was much lighter, but it was still very 'red'. I must have wasted over a gallon of lacquer thinner in the vain attempt to get rid of the red color on just one of the smaller pieces of the cabinet -one of the sliding doors... as I remember. Then I tried other kinds of thinners and solvents. All of them worked to some degree, but I wasn't able to get rid of that 'red hue'. Then I went to the library and did some research. (There was no such things as the Internet back then. In fact, the 'world wide web' hadn't even been invented yet.) What I soon discovered was that back in the 20's, the most common types of stains were alkali based. Most simply put, they are 'water-soluble' stains. So, contrary to everything that I had been taught, I tried cleaning the wood with water. To my delight (and almost 'amazement'), just rubbing the wood with a water-soaked rag pulled out some of the stain. Cutting to the chase, I ended up using a scrub brush and very hot water to get the stain out of the wood. "Success" The next step was to stain the wood with an oil-based stain, and that went without a hitch. Next, I did as I was taught and applied the 'filler' to fill in the grain. (So I would end up with the proper "filled flat finish".) However, the filler made the wood darker than the customer wanted. So, I tried a lighter stain and filler. Still no good... Finally, in frustration, I just stained the wood so it was the right color and then applied the first coat of sanding sealer. Well, as you might imagine, the pores of the wood were plainly visible after the sealer dried. So, I sprayed on a couple more coats of sealer, figuring that the pores would fill in and level off sooner or later... Wrong! Well, since it was a nice Summer day, and succumbing to the realization that I would have to aggressively sand the finish 'flat' -which would be very 'dusty'-, I decided to take the job outside to the backyard. So, I set up a make-shift bench, got my handy electric orbital sander, and brought the piece outside to start the job. It was while I was deciding which way to 'attack' the piece and rotating it on the bench that I noticed something unusual. When the piece was turned one way, it looked one color, and when it was turned another way, it looked a different color. I was frantic!!! How could this be?? I had been so careful about color selection... Well, having been through everything I had to that point, I made the decision to just keep on working. What else could I do? Bleach the wood or paint it light brown? Those weren't reasonable options... After about seven coats of sealer, and sanding the wood flat after every two or three coats, the finish was finally 'filled' and 'flat'. Then the final finish coats were applied, and the piece looked beautiful (if I do say so myself). However, it had that distinctive '3-D' look when in the sunlight. Fortunately (I thought at the time), it was much less apparent when inside the house or under artificial light. So, having achieved the correct color, and having found a technique that rendered the proper 'filled flat' finish, I completed the job. I must admit that I was a little nervous when I invited the customer over to inspect the piano before it was delivered. That fear quickly melted away when the first words out of their mouth were "John! It's Gorgeous!!". In the years that followed, terms like "alive", "glowing", and "magical" were often used to explain the '3-D Effect' that I was able to achieve by "doing the job the wrong way". Frankly, I've often wondered why wood finishes almost always appear so 'lifeless' when bringing them 'to life' isn't really very difficult at all.... Here's another piece from the same piano.
 |

![]() ..To
The Top of this Page . . . . . . . . . . .
..To
The Top of this Page . . . . . . . . . . . ![]() ..To The HOME Page
..To The HOME Page
|
Since "Player-Care" is an internet business, I prefer that we correspond via E-Mail (click here to fill out the 'Request Form'). However, if I'm not in the middle of some other activity, you can reach me at 732-840-8787. But please understand that during the hours from 8AM-5PM EST (Mon-Sat), I'm generally quite busy. So, I probably won't answer the phone. If you get the answering machine, please leave a detailed message stating the reason for your call. Also, repeat your name and phone number clearly and distinctly. By necessity, I prioritize everything in my life. And, if you call and just leave your name and number, and ask me to call you back, it might be a day or two before I return your call. Why? Because I don't know why you want me to call and I might not be prepared to assist you in an effective and efficient manner. If you leave me an E-Mail address (which I prefer), spell it out phonetically. The more you do to help me, the more I can help you in return. Don't rush. You have four minutes to record your message. |
|
407 19th Ave, Brick, NJ, 08724 Phone Number 732-840-8787 (Voicemail Only, No Texts) |
