
|

|

|
|
|
|
|
| Home | Manuals | Supplies | Search | Consult | Contact | Testing | Service |
|
from the Air Motor Camshaft Removing and replacing air motor bushings only looks difficult. The real trick is learning how to remove and replace the connecting rods. Here are the steps. After removing the cam and connecting rods (as one unit) from the motor, do a quick cleaning of the cam (the exposed areas) with any product similar to steel wool, to remove as much of the gunky buildup as possible*. Don't be too concerned about the small scratches you might make in the cam, you'll be polishing it before you begin the assembly process. *You can also use a good metal cleaning polish. The point is to get the bends in the cam fairly clean. Forcing the bearing around a dirty corner requires considerably more effort, which can lead to breakage. Now, mark each connecting rod so you won't mistake where it came from. This step is absolutely necessary since it is extremely common for the flange screw holes and the flange 'break-off' pattern to be different from piece to piece. Don't leave it to chance. The real trick to removing the connecting rods without cracking them at the bearing hole is to orient them such that the flanged end of the rod is on the same side as the longest part of each bend (see Figure 1). Kind of like taking the 'longest-way-around' the corner. As you round the corner, wiggle the flange-end of the rod up and down (in a plane perpendicular to the bend) slightly. Continue 'working' the rod around the corner until it reaches the next straight part. Now re-orient the rod for the next bend and begin again. Naturally, you want to take the shortest route from each connecting rod to the outermost part of the cam. So connecting rods 1 and 2 are removed to the left and 4 and 5 are reomved to the right (or visa-versa). No. 3... well, that's your call. Once the rods are off the cam, take a sharp, pointed knife and gently work the bushing out of the rod. You'll find they come out rather easily. Save a couple of them for sizing the new strip of bushing cloth. Finish polishing the cam and then give it a very thin coating with Marvel Mystery Oil. After installing the new bushings, reverse the disassembly process. 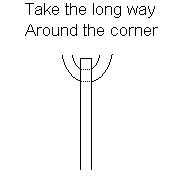 Figure 1 For the correct procedure to install the new bushings, read my webpage: Installing the Bushings |
| Player Piano Reference Materials - Click Here |

|
Since "Player-Care" is an internet business, I prefer that we correspond via E-Mail (click here to fill out the 'Request Form'). However, if I'm not in the middle of some other activity, you can reach me at 732-840-8787. But please understand that during the hours from 8AM-5PM EST (Mon-Sat), I'm generally quite busy. So, I probably won't answer the phone. If you get the answering machine, please leave a detailed message stating the reason for your call. Also, repeat your name and phone number clearly and distinctly. By necessity, I prioritize everything in my life. And, if you call and just leave your name and number, and ask me to call you back, it might be a day or two before I return your call. Why? Because I don't know why you want me to call and I might not be prepared to assist you in an effective and efficient manner. If you leave me an E-Mail address (which I prefer), spell it out phonetically. The more you do to help me, the more I can help you in return. Don't rush. You have four minutes to record your message. |
|
407 19th Ave, Brick, NJ, 08724 Phone Number 732-840-8787 (Voicemail Only, No Texts) |
