
|

|

|
|
|
|
|
| Home | Manuals | Supplies | Search | Consult | Contact | Testing | Service |


Removing and |
|
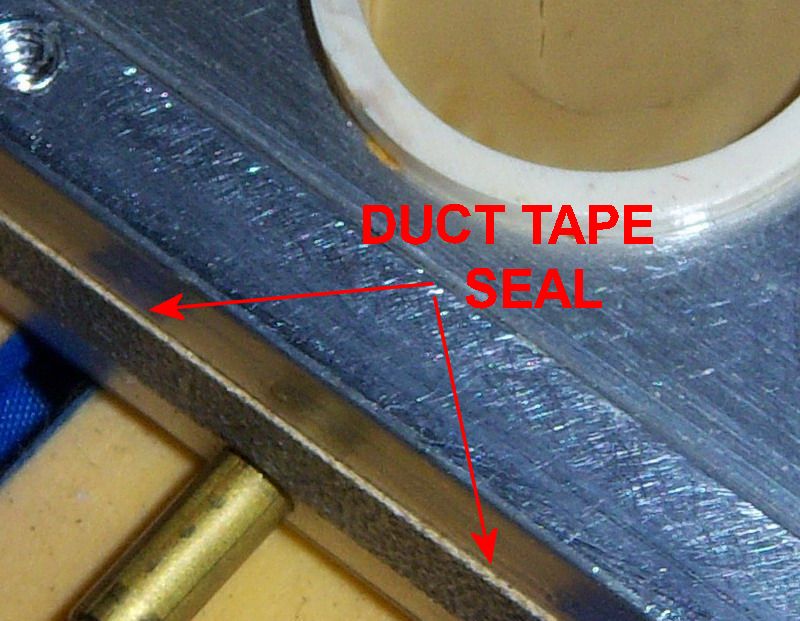
in the modern Universal player piano In this segment of the treatise on Refurbishing the Modern Universal Stack, the main point that I'll cover is the removal and replacement of the pouch rings. By comparison, this is probably the least complicated of all of the tasks involved in rebuilding the stack, but as with any job, there are a few necessary precautions. The three other steps that will be covered are sealing the bleed access ports, sealing the brass nipples, and cleaning/preparing the stack for reassembly. The most 'dangerous' aspect of this job is removing the pouch rings. They are made out of plastic and they were 'force-fit' or 'compressed' into the pouch well by a machine when the stack was assembled. As a result, getting them out of the pouch well without damaging them requires some skill and patience. It also requires a screwdriver that has been 'modified' slightly. As seen in the video below, the one I use has a 3/8" inch wide blade that has been rounded at the edges to remove the sharp points. The picture below shows the original material that was used to seal the bleed access ports -which you'll see in a moment. The material is very much like (if not identical to) duct tape, and it must be removed and replaced with a material that provides a permanent seal. Unfortunately, as was discovered years after these units were manufactured, the adhesive on the tape dries out, which allows air to get into the bleed access ports. These tiny leaks cause the pouch to inflate slightly, which lifts the valve off the intake seat, causing the valve to leak. In some cases, the leaks have been so bad that the note actually stays 'on' all of the time.
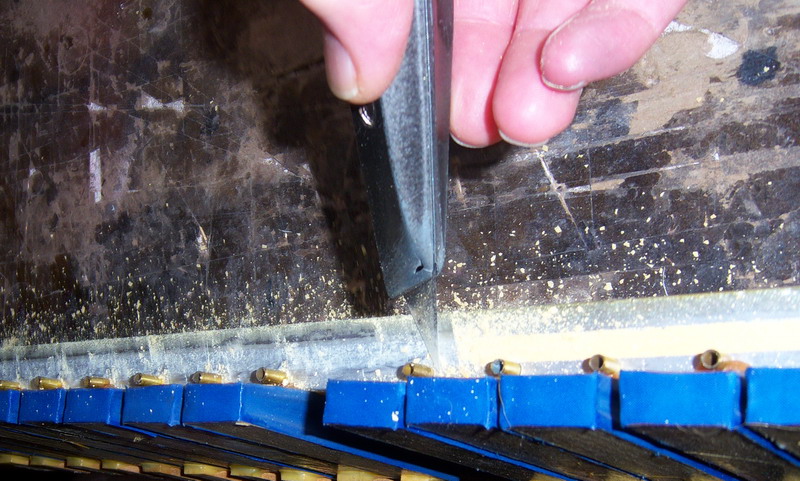
 Once the old tape has been pulled off, what remains is the adhesive. I use the flat backside of a steel blade to scrape off the old adhesive, but just about any kind of a blade or scraping device can be used to do the job.
 Next, the remnants of the old rings must be removed. This debris is not 'glued' to the aluminum but it can be a bit of a pain to dislodge. I use a very small (1/2" x 1-1/4") steel wire brush to do the job. What's important here, besides removing the debris, is not damaging the inside walls of the pouch well. Remember, aluminum is a soft metal that is easily damaged by harder metals. So, if you feel more comfortable using a softer brush, try a small wire brass brush.
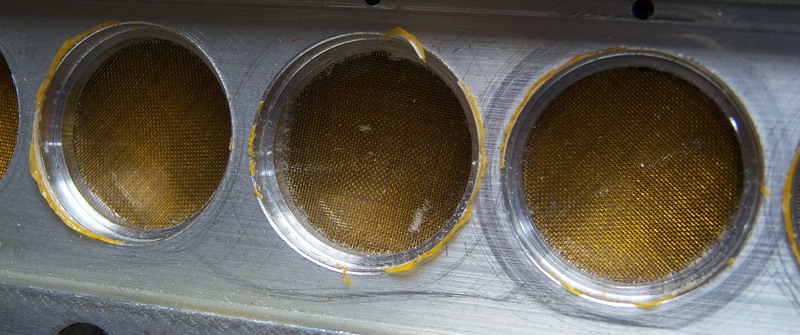 WARNING - EXTREMELY IMPORTANT NOTE: UNDER NO CIRCUMSTANCE SHOULD YOU BLOW COMPRESSED AIR INTO THE PORTS THAT LEAD TO THE INDIVIDUAL NOTE BELLOWS. DOING SO COULD DAMAGE THE BELLOWS CLOTH AND/OR THE GLUE SEALS -WHERE THE CLOTH IS GLUED TO THE WOOD (OR PLASTIC) OR WHERE THE BELLOWS IS GLUED TO THE STACK. The final step in the cleaning process involves blowing out all of the debris in the stack. I know of no other way to do this effectively than by using compressed air. As you'll see in the short video below, there is debris in places inside the stack that are not readily visible to the naked eye. Note in the picture above that in the center pouch well there appears to be some specks of white material on or under the brass filter screen. This debris is particles of paper that were sucked into the pouch well during normal operation. In fact, the debris is so common and, more importantly, problematic to the proper operation of the stack that the brass filters are there to help prevent the debris from getting any further into the system than the bottom portion of the pouch well. (As a side note, should this debris clog up the bleed hole -which is only slightly larger than this period '.', the pouch will not properly deflate after the perforation in the music roll passes, and it could take up to a second or longer before the note can be played again. -This is a conversation for a later time.-) I have my air compressor set to 90 pounds of pressure to do this job, but I imagine that 45 pounds would be enough to do an effective job. Below is a short video in which you might be able to see the paper dust that gets blown out of the pouch well through the brass nipple. If you can't see it, you'll just have to take my word that it's there. What's important here is that the pouch well, the bleed ports, and the bleed be thoroughly clean before beginning the assembly phase of the project.
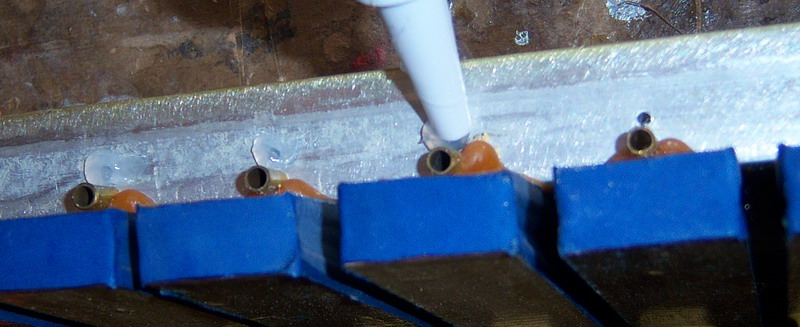
The assembly process begins with sealing the external bleed access ports. In the diagram below, you can see the ports and bleed which I have drawn into the diagram of the stack that's found in the Classic Service Manual. The internal bleed ports (which supply constant vacuum to the underside of each pouch) and external bleed access ports (which provide a way to clean the bleed should it become clogged with paper dust or debris) are 1/16" diameter holes. The bleed itself is 0.025" in diameter (a #72 drill bit). Considering how critical the bleed is to the proper functioning of the valve, you can see how important it is that the external bleed access port be 100% air-tight. It is for that reason that I chose a silicon caulk to seal the port. 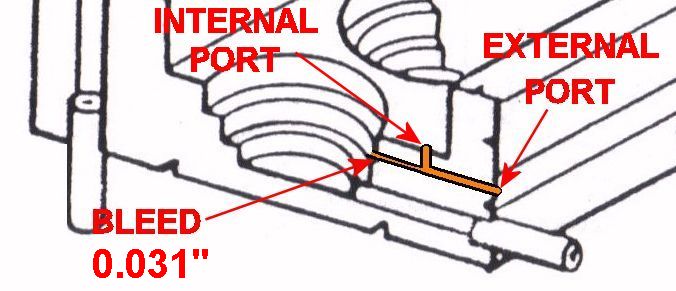 Return to Sealing the Rings -below WARNING - EXTREMELY IMPORTANT NOTE: UNDER NO CIRCUMSTANCE SHOULD YOU INTENTIONALLY SQUEEZE THE SILICON CAULK INTO THE EXTERNAL BLEED ACCESS PORTS. In the picture below, I'm sealing the external bleed access ports. What might not be immediately clear from this picture is the fact that I AM NOT intentionally squeezing the caulk down into the hole. As you will see in the video below the picture, I create a ball of caulk at the tip of the tube and then 'lay' it over the hole. Then I pinch off the ball away from the hole. However, as you will also see in the video and the picture just below the video, when the seal is removed it's obvious that a small amount of the caulk gets into the hole. For this reason, should it ever be necessary to remove the seal, I recommend using a method identical to the one presented in the video. Should you slice off the caulk flush with the stack, it might prove quite difficult to extract the tiny 'plug' that's still in the hole. But, should the plug remain in the hole after the seal is removed, I also recommend using a needle to extract the plug. Stick the needle into the plug (from the outer edge of the hole) at a 45 degree angle to the hole and pull outwards.
 After the silicon caulk has fully dried -which can take up to about 24 hours- the next step is sealing the brass nipples with Phenoseal. I use a plastic hypo-oiler to do the job, but an eyedropper or a tiny artists brush would undoubtedly get the job done. Here's a video of me applying the Phenoseal.
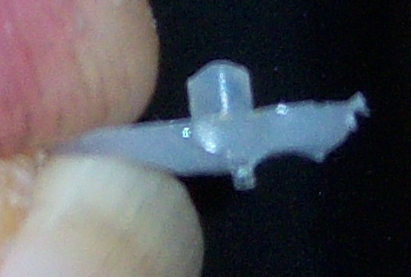
After the Phenoseal dries, which only takes about an hour at the most, you're ready to start installing the pouches. As a result of the fact that the original rings were reused and that during the recovering of the rings the edges where beveled slightly, this part of the job might actually be easier than removing the rings. To begin with, I place a finished ring over each pouch well and press it down into the hole by hand. Although it's not critically important, I do attempt to keep the ring fairly parallel with the stack as I'm pressing down, but if the ring is at a slight angle, you're not going to damage anything. After the rings are about as far down as they will go by hand, they need to be 'tapped' into their final resting place. Here it is important that the device you use between the hammer and the ring be placed parallel to the stack. What you are doing here is seating the bottom of the ring on the ledge inside the pouch well. As you have seen in previous pictures, this ledge is very narrow. In actuality, it's about 1/2 the width (or thickness) of the ring, which is only 0.070" thick. I want to emphasize here that you are NOT trying to 'seal' the bottom of the ring against the ledge. You're merely making sure that the ring is all the way down in its place.
WARNING - VERY IMPORTANT NOTE: BE OBSERVANT! IF YOU NOTICE THAT THE PHENOSEAL SEALER IS 'VANISHING' AS IT IS APPLIED TO THE EDGE OF ANY RING. STOP AND READ THE LAST PARAGRAPH OF THIS TREATISE. The final phase of the installation process is sealing the pouch rings into the stack with Phenoseal. Again, the plastic hypo-oiler is used to do this job, but you can probably achieve the same results with a small artists brush. There are two things that are important about this phase of the operation. One is making sure that you get a bead of sealer all the way around each ring. That's fairly easy. But more importantly, what you MUST NOT DO is let any of the sealer get into the internal bleed port. If by chance you accidentally get some of the sealer into one of those holes, the entire bleed channel will have to be flushed out with denatured alcohol to remove all traces of the Phenoseal. If you don't think you can seal the rings without getting a little sealer in the bleed ports, break round toothpicks in half and stick the broken end into the hole. Then, if a tiny bit of the sealer gets onto the toothpick, let the sealer dry before removing the toothpick. That way you'll pull out all of the sealer that's in the hole. (That's because the sealer will soak into the wood, not the metal, and you'll remove all traces of the sealer with the toothpick.) Here's how I do the job.
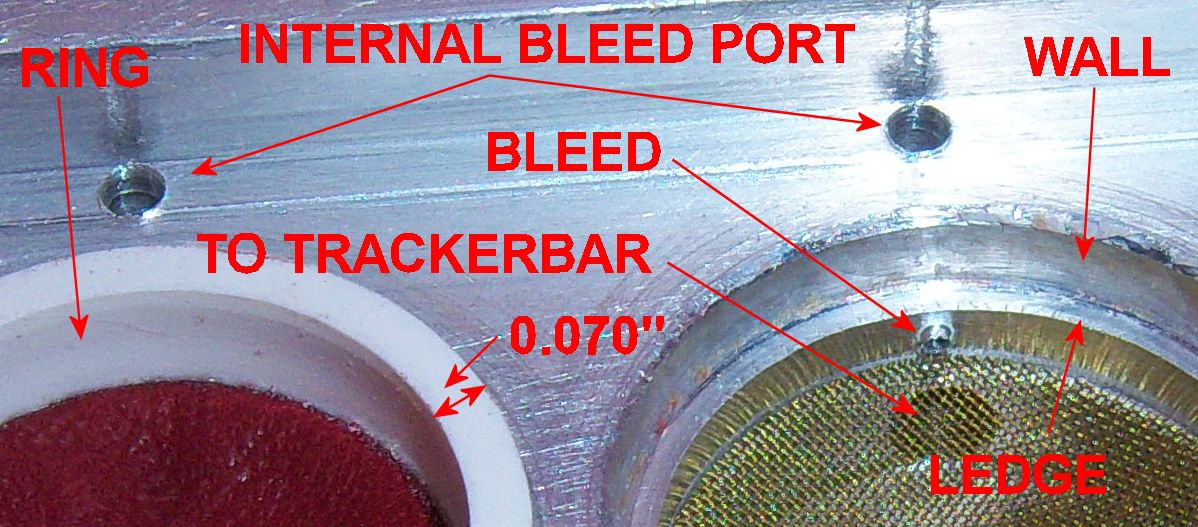
Lastly, since this has happened to me once, I believe it's important that I include a closing comment and a picture. Because of its physical location with respect to the bottom of the pouch ring and the fact that the Phenoseal is almost as thin as water, it's possible for the Phenoseal to 'flow' between the outer edge of the pouch ring and the edge of the pouch well and cover the bleed hole if the ring is a bit loose and it hasn't been well seated before the sealer is applied. As you may recall, the bleed is about 0.025" in diameter. Looking at the picture below, you can see how close the bleed is to the ledge upon which the ring rests. To me then, the obvious question is; How can I tell if the sealer is migrating (or 'flowing') between the outer edge of the ring and the pouch well? Or; How will I know if there is a potential problem? The answer is surprisingly simple. Put simply, you will see the Phenoseal 'disappear' almost as quickly as it is applied the the edge of the ring. If there is as little as 0.001" (a thousandth of an inch) of free space between the outer edge of the ring and the pouch well, the Phenoseal will attempt to fill in that space. For this reason, you MUST BE OBSERVANT when applying the sealer. As soon as you notice that the sealer is 'disappearing' into the space between the ring and the well wall, stop applying the sealer and remove the ring. Next, with a fine artists brush, paint the wall, the ledge, and the outer edge of the ring with Phenoseal and let it dry. (It will turn clear when it's dry.) Next, put the ring back in place and seat it as was explained previously. Next, apply the sealer again. Unless the ring was "extremely loose", the sealer should not migrate down the wall, but keep an eye on it for a couple of minutes just to be safe.
 Return to the Previous Paragraph
This ends the segment on Removing and Installing the Pouch Rings. In the final segment, we'll reassemble the stack and test the valves. Here's a preview of one step in the testing process.
|

|
Since "Player-Care" is an internet business, I prefer that we correspond via E-Mail (click here to fill out the 'Request Form'). However, if I'm not in the middle of some other activity, you can reach me at 732-840-8787. But please understand that during the hours from 8AM-5PM EST (Mon-Sat), I'm generally quite busy. So, I probably won't answer the phone. If you get the answering machine, please leave a detailed message stating the reason for your call. Also, repeat your name and phone number clearly and distinctly. By necessity, I prioritize everything in my life. And, if you call and just leave your name and number, and ask me to call you back, it might be a day or two before I return your call. Why? Because I don't know why you want me to call and I might not be prepared to assist you in an effective and efficient manner. If you leave me an E-Mail address (which I prefer), spell it out phonetically. The more you do to help me, the more I can help you in return. Don't rush. You have four minutes to record your message. |
|
407 19th Ave, Brick, NJ, 08724 Phone Number 732-840-8787 (Voicemail Only, No Texts) |
