
|

|

|
|
|
|
|
| Home | Manuals | Supplies | Search | Consult | Contact | Testing | Service |
Re-bushing the Connecting Rod
The two most important things to you need to do before gluing in new bushings is testing the fit until it's perfect and turning 'on' the hot glue pot. Using the old bushing as a template for the new bushing WILL NOT WORK. The only thing the old bushing is good for is determining the density (thickness and weave) and gaging the approximate width of the replacement cloth piece. Once you have obtained a suitable replacement piece of woven felt, you need to pre-cut a strip. I start with a piece that measures 1-1/4" X 9". Next, taper the last 1-1/2" of one end in a 'V' shape (see Figure 2). Now pull the tapered end through the bearing hole. If the fit is correct, the two outside edges of the cloth will meet as the tapered end passes completely through the hole. If the total width of the cloth is too great, the edges will overlap and start to buckle. Too narrow and the edges won't meet firmly. Once you believe you've got it right, and with the cloth still in the hole, take the cam shaft and push one end into the hole. Examine the fit very carefully. There must not be ANY open space between the two edges of the bushing. Now you're ready to glue the bushings in place. Pass the tapered end of the strip through the bearing hole and pull it along the strip until you come to within 1/2" from the end of the strip. Apply hot hide glue to the remaining 1/2" of exposed cloth and then pull that section into the bearing hole until just 1/8" of the cloth is exposed. Cut off the excess on the side opposite the glued side, leaving about 1/4" extra cloth. Immediately insert one of the ends of the cam into the newly bushed hole on the non-glued side and allow the glue to set. Then remove the rod and rough trim the strip to within about 1/8" of the bearing hole. Cut the cloth in a circular motion around the bearing as opposed to just cutting the cloth all at once. This reduces the possibility of pulling the freshly glued felt away from the wood. Repeat the procedure for the four remaining bearings. Normally, there is plenty of room on both ends of the cam to accommodate all five connecting rods (three on the end of the cam where the gear is attached and two on the other end). Allow the glue to set for about 30 minutes. Remove the rods from the cam. Take a new single-edged razor blade or extremely sharp exacto knife, locate the point opposite the point where the edges of the cloth join, and gently 'saw' the excess off. If you allow the glue to harden, trimming off the excess cloth will be a little more difficult and it will dull the blade more rapidly. If the glue starts sticking to the blade, allow the piece to set for a little longer. Also, be sure to clean off the blade with a little hot water after each piece is trimmed off. This will make the job go smoother. Once the excess is trimmed off, place the rods back onto the cam ends and allow the glue to harden. I usually leave them sit overnight. 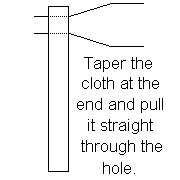 Figure 2 Refer back to 'Removing the Connecting Rods'. Back to 'The 360-Test'. As per the Fair Credit Billing Act, your bank cannot hold you liable for more than $50.00 of fraudulent credit card charges. PLAYER-CARE will pay the $50.00 if the unauthorized use of your card resulted from a purchase made through our site. We are so confident of the security measures we've put in place, we'll also pay you an additional $25 just for the inconvenience! Disclaimer: Player-Care assumes no liability with regards to the suitability of any product sold at this web site. In other words, how you use the product is up to you. Player-Care is only liable for the quality of the material, and any product that is found to be defective will gladly be replaced. |
|
Since "Player-Care" is an internet business, I prefer that we correspond via E-Mail (click here to fill out the 'Request Form'). However, if I'm not in the middle of some other activity, you can reach me at 732-840-8787. But please understand that during the hours from 8AM-5PM EST (Mon-Sat), I'm generally quite busy. So, I probably won't answer the phone. If you get the answering machine, please leave a detailed message stating the reason for your call. Also, repeat your name and phone number clearly and distinctly. By necessity, I prioritize everything in my life. And, if you call and just leave your name and number, and ask me to call you back, it might be a day or two before I return your call. Why? Because I don't know why you want me to call and I might not be prepared to assist you in an effective and efficient manner. If you leave me an E-Mail address (which I prefer), spell it out phonetically. The more you do to help me, the more I can help you in return. Don't rush. You have four minutes to record your message. |
|
407 19th Ave, Brick, NJ, 08724 Phone Number 732-840-8787 (Voicemail Only, No Texts) |
