
|

|

|
|
|
|
|
| Home | Manuals | Supplies | Search | Consult | Contact | Testing | Service |


Technical Articles |
REBUILDING THE BUSH & LANE METAL CECILIAN ACTION |
|
The stack is heavy, about 250 lb. Don't attempt to hoist it out of the piano intact, or you'll be wearing a truss. You don't need to. I take it out one unit at a time, starting from note 1, (low A on the piano) and continuing up. Remove the screw at the top of the signal tube fork and loosen the one on the windway clamp, and the thing will come out as a unit, pneumatic, valve and signal tube. DO NOT GET THEM OUT OF ORDER. If you pay attention, you'll find that the nickled signal tubes have been "adjusted" individually to mate with both the valve block and the hole in the manifold at the top. If you stir them up, you'll never get everything to seal properly. I usually number them with wire markers or some such non-permanent means as I remove them. Use what makes sense to you. I always number (any) stack by tier. Thus, T-1 = 1st unit on bass end of top tier. C-1 = 1st unit on bass end of center tier. L-1 = 1st unit on bass end of lower tier, because it makes sense to me that way. Your mileage may vary. Do what works. When you have them all out, you can then remove the skeleton of the stack without risking your health, leaving the piano's action available to be repaired, regulated, rebuilt, whatever. The wind motor may or may not be of ironwood, (heavy) may be 10-pulse or 6-pulse. You already know not to mix up the pneumatics, but pay attention to the fact that they aren't exactly "hinged". Each is a sort-of accordion pneumatic. If you try to recover them with a regular hinge, the motor will bind and not work. Be accurate in measuring for new cloth. The rest of the wind motor rebuild is very conventional. It'll have a Brand tracker with a fishing pole. Nothing unusual there. To replace the string I usually used waxed "carpet and button thread" as original, but I expect that some sort of synthetic fish line would probably be a good choice in a climate with massive temperature and humidity swings. Lubricate nothing in the friction drives of the tracker (which is actually part of the transmission). It relies on friction to work. Be sure it's all nicely grease-free. You already know about tubing transposing tracker bars and all that. If the lead is in good shape, try not to disturb it since plugging and boring the spoolbox shelf/manifold for installing elbows is a pain. Now: The stack itself: You'll quickly discover that in order to recover the pneumatic, you need to disassemble everything since there is a "tang" that covers the hinge end of the pneumatic. The 3 screws that attach the valve to the pneumatic are under the pouch, so plan to replace the pouches. There is no other way. If you’re into self-flagellation, replace them with zephyr skin. If not, use the thinnest pouch leather that Organ Leather Supply can provide, retain and re-use the lifter disks, and be certain that you have done a _very_ thorough job of sealing the pouches. (With any pouch leather from whatever source, before cutting anything, it's a good idea to hold the skin up to some good light and mark any pinholes with a marking pen so you can avoid those spots....and there will be some.) The original pouches are zephyr, which is extremely airtight, so if the replacement (leather) pouches aren't _very_ well sealed, the effect will be that of too large a bleed. Do these valve/pneumatic things one at a time. Again, in your climate*, which is not kind to pot metal, I advise against leaving a valve in 3 pieces any longer than necessary. It's remarkable how fast the pieces can grow in different directions... (*Michigan) Take one apart, 2 itsy-bitsy machine screws on the signal tube, 4 machine screws at the corners of the valve, 3 wood screws through the pouch section into the pneumatic, 2 wood screws holding the clamp-toe to the pneumatic's top board, 2 more holding on the finger. Clean up the pneumatic and recover it, then go on to the valve. After this length of time, it'll need to be releathered. Use thickish pouch leather. (I like the grey kangaroo from Organ Leather Supply which in spite of their protestations to the thinness of it, usually seems to be about 14-thousandths, because the nap is very fine. If you have something more suitable, fine, use it. Both upper and lower leathers are glued (hot hide glue) and the stem is glued to the center of the lower leather. Be accurate in your placement of the stem. (See picture below) Player Piano Co. has again available gasket sets for this action. They're not cheap, and you may have to make some minor adjustments to them. (The character at Fullsound Piano in Michigan also punches B&L gaskets, but they're double the required thickness (which is 1/32") and the holes are the wrong size....they won't work.) While gaskets are available, pre-cut pouches aren't. I've had good success by making a template thusly: Take a chunk of pouch leather, lay it over the pouch section of a valve, and using something like firm modelling clay, create the pouch well without stretching. Without stretching or wrinkling, smooth the leather over the metal and rub where the 6 holes are, then cut the edges. You will have a piece of leather with slightly bowed sides that's a bit longer than the block and with 6 marks in the leather. Hopefully, you didn't stretch anything so the piece will be flat. With tube punches of appropriate size, punch out the 6 holes. NOW, use this piece of leather to make yourself a template of heavy construction paper, bristol board, or whatever works for you. From that, you can fairly quickly cut pouches that are the right size and shape. Better that they're a hair too large than too small, since they can be trimmed after the thing is assembled. Back to valve unit #1: Clean up everything else including gasket leavings from the signal tube and screw the pouch-well section to the now recovered, tight and dry pneumatic, being sure you have an airtight joint. (there's a gasket) Lay the new pouch. I like to use a bit of shellac for glue here. Some use fish glue. Keep it away from the edges of the well, of course. I like to tack one side only of each of the gaskets with shellac or fish glue. With the newly releathered and dry valve inserted, reassemble the unit with the 4 machine screws, but don't tighten yet. Make sure the front face (signal tube side) is square and then snug up the screws. If it isn't square, the tube won't be airtight and the note will cipher. Go ahead and reattach the tube and set the unit aside until you have all of them done. (Still numbered, of course) With the test rig you have hopefully constructed, be sure that each unit is leak-free and will cycle rapidly and reliably at about 4 1/2" to 5" of suction. Valve throw should be about 3/64", but you can make fine adjustments on your test rig by screwing in or out the brass upper seat for best performance. Clean up everything else on the skeleton, make new gaskets for the two cast iron stack manifolds, etc, be sure the weighted pushrods are free, etc. etc. etc. If either manifold is cracked, you can probably make a decent repair with epoxy. When the piano tech is _finished_ with the piano action and it's regulated and in the piano, stick the skeleton in and make any adjustments you need to regulate the pushrods to the piano wippens. (about 1/32" clearance works well out here) Where the fork end of the signal tubes attach to the spoolbox shelf/manifold, there is a gasket. If you're lucky, it's leather and salvageable. If you're not, it's cork and will need to be replaced. I usually do it in short sections since otherwise, I find I get the holes too far apart and outsmart myself. Now you can start reassembling the stack. You might find it easier to pull the skeleton forward (towards you) a few inches to do this so you can peer behind as you go to be sure that the fork on the finger is engaging with the pushrod wire properly. I start reassembling with the top note and work down. Note that the spoolbox shelf/manifold thingie has some fore and aft adjustment by loosening the 2 machine screws at either end if your new gasket isn't exactly the same thickness as the original. You don't want to torque the signal tubes even a tiny bit. When you have all the pneumatics you intend to install back on the skeleton, you can slide carefully the whole thing into position under the piano's wippens. Be _very_ careful, because at the treble scale break, there is a nasty sharp wood screw supporting the lower windway. It clears the upside pneumatic (usually an Ab) by a few thousandths of an inch only, and it is _very_ easy to tear the cloth. Don't ask me how I know this. Note that the above is MY way of doing it. If you find a better way that works as well or is easier for you, have at it. 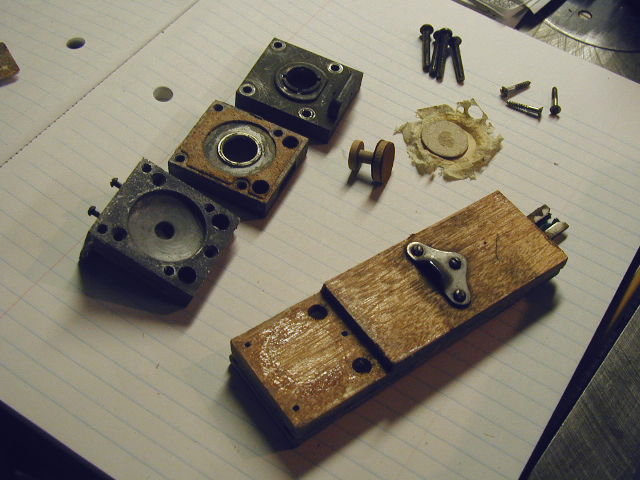 back backThe above photo was supplied by Dan Harrett with the accompanying comment, "Hi John, it's immaterial to me whether I'm credited personally with the article. The real source was Dean Randall, a remarkably generous if crusty source of irreplaceable information. The rebuilding community will miss him. Attached is picture of a dismantled B&L Cecilian metal unit pneumatic, if you think it would be a useful accompaniment to the article. (I wonder if any other rebuilders have similar detailed information from him in their possession? An inquiry to the MMDigest (Mechanical Music Digest) might shake out a few more. Bush & Lane pianos were his passion.")  Dean Randall (Approved for display by Ron Babb) I told Dan that I'd send a posting to the MMDigest, and thanked him for selecting Player-Care as a worthy repository for Dean's treatise on rebuilding the metal B & L Cecilian action. The information contained in this page may not be used without the express written permission of Dan Harrett. It is with deep sadness that I inform you of the passing of Dean Randall, of Tacoma, WA, on Sunday, February 23, 2003. |
Now Playing: "Love Isn't All That Matters", by John A. Tuttle.
We Gladly Accept These Cards

![]()
|
Since "Player-Care" is an internet business, I prefer that we correspond via E-Mail (click here to fill out the 'Request Form'). However, if I'm not in the middle of some other activity, you can reach me at 732-840-8787. But please understand that during the hours from 8AM-5PM EST (Mon-Sat), I'm generally quite busy. So, I probably won't answer the phone. If you get the answering machine, please leave a detailed message stating the reason for your call. Also, repeat your name and phone number clearly and distinctly. By necessity, I prioritize everything in my life. And, if you call and just leave your name and number, and ask me to call you back, it might be a day or two before I return your call. Why? Because I don't know why you want me to call and I might not be prepared to assist you in an effective and efficient manner. If you leave me an E-Mail address (which I prefer), spell it out phonetically. The more you do to help me, the more I can help you in return. Don't rush. You have four minutes to record your message. |
|
407 19th Ave, Brick, NJ, 08724 Phone Number 732-840-8787 (Voicemail Only, No Texts) |
