
|
Ampico Problems with
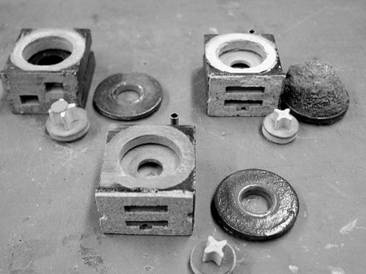
the Early "Pedal Stack" Well, anyway thats the best way I know of to describe this genre of reproducer, sometimes called the Amphion Ampico (the name comes from the Amphion block valve with the wooden lids, but many later Ampicos still retained the pedal stack). Regardless which note valve, which note stack, or which drawer it may include, these old fellows with the bellows stacked on top of the pedal lyre pose a few problems that the later models didnt, namely a compromised loud pedal when playing late model B rolls, as well as a weak soft pedal. I thought that maybe youd appreciate an additional angle on a few of its typical problems and how to adjust them out. These older players can have a variety within 3 different block valve types, but the primary stack will always be behind the note stack, so the note tubing will always be woven through the area between the note stack and the primaries. Its kinda "busy" between the two, and so you need a good light because the pedal operator supply hoses are routed (usually) around the striker stack and through the note tubing weave between the primary and secondary stacks. They then go above the primary stack to the loud and soft pedal valve blocks. On occasion, the hoses pass through the secondary stack when gaps in the scale allow for it. The pedal stacks also remove differently sometimes, and more often there are access holes through the pedal lyres top platform which permit both to be dropped as a single unit. Thats fine for technicians but I dont like the idea because its betting that piano movers will notice the hoses which come apart as the pedals fall, so I paste cloth covers to prevent a screwdriver from accessing the long mount bolts which drop the assembly as a unit. I also shellac the supply hose elbows except for the joint I want to come apart. (Hopefully they wont come apart where I dont want them to, but I wouldnt bet on it, either). Putting the lyre onto the pedal operator stack can be difficult if the piano is on its legs and sometimes a lot of damage is done trying to force it into place. Either raise one of the front legs and block it up, or install the lyre while the piano is still on the skid board, and then let the lyre come down on a heavy moving pad, supporting the piano that way. That was the way early piano movers used to do it. Doing it that way, putting the lyre braces on through a belly cloth is far easier, anyway. The piano then stands on the lyre rather than the treble leg, before the bass side is raised for its leg. "Originality Wonks" are correct as far as the end product is concerned. But although you achieve far more than they ever expect to performance-wise, you did it with the same kind of Moxie that Charles Stoddard used when he built this instrument, while they are still fussing about "purity." Yet, they would be saying, "Now thats what Im talking about" when youre finished and its playing. What you did however, is use your head rather than pretend to own Harry Potters magic wand. Let me tell you about "Purity." In Charles Stoddards mind (you knowthe guy that developed this system?) Purity was to be the music, while the pianos in any given era varied among themselves. Charles Stoddard wasnt a musician but he loved the arts and had a keen ear. So if you can take an older Ampico and make it sound like a later Ampico A, do you think Stoddard would roll over in his grave? I dont think so. Do you think he would point the finger and tell you that that instrument was only supposed to be playing the original Rhythmodik Ampico Roll Records? NawI kinda think he would be siding with you. His purpose was quality music and NOT variations in equipment. Speaking of variations, I have yet to restore two Ampicos identical in every small detail. So lets start with the correct goal, and well end up with the best solution. The two most important aspects of reproducing music isprecise pedaling and phrasing. Unbeknownst to most owners and some rebuilders, expression is subjective. That means, the detailed dynamics of particular notes are arbitrary. It varied from artist to artist yes, but it also varied with each performer from performance to performance. To be accurate though, we still want the precise dynamics preserved for us forever as it was cut on the roll, as the artist expressed them during his performance, that day in the studio. But the point is thisno one else is going to pedal and phrase the roll like he does it, although his dynamics changed with the performance depending on the day, the instrument, the audience, and his own intentions, in the same piece of music. Phrasing is ones personal way of saying something. Its equivalent to how an actor delivers his lines. Pedaling is equivalent to the major emphasis on his phrases, the words he carries out, or holds for effect, while expression is equivalent to the dynamics and emotion intoned. It is the vast panoply of variation here which can change slightly and never be noticed, even by the most astute music critic. So while the phrasing and the pedaling must be precisely on target, small variations in dynamics are allowed without complaint. It is still the artists playing that is fully appreciated. The phrasing is cut into the rolls notes. Its there, forever. The pedaling however depends on the instrument and thats where this article intends to focus. The early Ampico and the model A relied most heavily on extended note perforations to pedal it, and then the sustain pedal was there for conveniencean alternate way to hold notes over, so it was not made to be necessarily quick-acting like the Duo-Art, which had no choice in the matter. The Duo-Art pedal operator was quick and powerful because of pump limitations regarding its power reserve and expression characteristics, since it spilled a great deal of its capacity through the expression box. So both instruments had weaknesses and both were completely compensated for by their roll coding system. The "weakness" of the early Ampico (as far as late model B rolls were concerned) was that only one small block valve was used to power a large pneumatic 19 cubic inches when open. Closing speed was sufficient, but the time required for it to relax open again was slower, and on late B rolls the pedaling sometimes overlapped. As a matter of fact it requires roughly .3 second to drop the dampers which is about .1 second too slow, so chords on quickly pedaled rolls tend to hang. The Aeolian-American company was actually responsible for this coding oversight but during the depression didnt seem to care. Some musicians might call this "a warm arrangement." "Warm" is our term for over-pedaling. Its a legitimate pianistic effect and sometimes done on purpose, but it shouldnt be up to the piano to decide to change the arrangement. So in deference to the music on the roll (which is what this should be all about, anyway), Im going to offer a few suggestions as to how to make the sustain pedal a bit quicker. Its not hard to do. The first trick is to give the pedal block valve poppets more travel. What works for a note pneumatic doesnt work for a pedal operator. And youll notice too that the pedal valves both have felt mufflers tacked or glued over them. Thats also a problem today and it limits the return speed of the pedal pneumatic greatly. So instead of rebuilding the pedal valve to the small striker pneumatic requirements, lets rebuild it to the large pedal bellows requirements and see if we cant get a little better response. Instead of saying, "Ill double or triple the valve travel," instead, were going to experiment with a closely pedaled B roll and try to make our piano play it well. Remember, the factory didnt have this option in 1920. It really didnt even NEED a sustain pedal pneumatic at that point in the development. Yes, I realize thats heresy to some but meanwhile the truth will eventually surface and Ampico options will ultimately prevail. So instead of inventing a new "standard" for pedal valves in old Ampicos, what say we finish the restoration first and then perfect the pedaling with the music? The reason this is the better way is because wood, cloth, and leather actions are all a bit different, not to mention the variations in the trap work under the keybed which transfers the force. There seems to be 3 variations of block valves found in
the pedal systems of old Ampicos. These vary between two valve sizes, the 0.4 "and
the 0.5 " hole. Also, the 0.5" hole and wooden lid comes both as a block with
two parallel slots as well as two offset square holes (later model). As you can
see in the picture there is a considerable difference here. But some of the
block valves had a black composition inside valve seat with the early Amphion
wooden lid seat, and one variation used a wooden inside seat only with the
large hole (not shown). There were also variations of felt muffling. The felt
"stack" muffler is shown. You can see that these close off quickly and get
highly resistive to the passage of airthe exact opposite effect that we need
for a quick pedal.
The adjustments referred to below will not apply to block valves with the small poppet, so I suggest either finding a large poppet valve to start with, swapping one out from the same instrument, or simply building one, because even the large hole Ampico valve block is very marginal for this job to begin with. Remember, Ampico initially wasnt interested in a fast loud pedal. It is sometimes necessary to shorten the cover of the Loud pedal bellows as well. If you notice, the Loud pedal bellows is the lowest of the two in the stack and faces front. Its top moves and is restricted by the Soft pedal bellows hinge end, so if its cover is longer than necessary, that extra wide opening wastes power and slows it down (and likewise with the soft pedal operator as well). The original bellows measured outside roughly 2-1/2 to 2-5/8" open. Covering that bellows to 2-1/4" makes a noticeable difference in both its power and quickness. The soft pedal operator you will notice is also larger yet than the loud pedal operator, not because of clever design, but because of linkage clearance problems. Because of the shape of the bellows, both lack power for their size, and if the pump isnt spilling at least 20", these bellows are going to suffer serious performance problems and the soft pedal operator wont even be able to raise the hammers its full design distance. So what goes for the sustain pedal here also applies to the Soft pedal (hammer rail lift). The best way to correct these deficiencies is after the restoration. Find a B roll of "dinner music" that has close pedaling and wont play as well typically on an old Ampico piano with a pedal stack. Thats what you must work with, first. After that, increase the bleed size of the block valve to about a #58 or #59 drill. Thats to start. Then remove the felt muffling on top of the valve. When you still hear too much sustain pedal, start gapping the valve. This is really "cut and try," but its the best way to get that piano closer to an Ampico B pedal response. If that still isnt enough, you can increase the bleed up to a #57 drill but I hesitate going any larger, and even at that, bleed size is a last resort and you might find that the pedal no longer operates smartly. Adjusting bleed size is exacting and requires several rolls to get right, so I am not making any hard and fast rules about it. We want performance. The reason that bleed size is a last resort is because you are decreasing the sensitivity of the pedal valve exponentially with drill number sizes. They seem linear but they are not, area-wise. Likewise with the valve poppet sizes. The difference in area between the .4 and .5 valves is 1.5 times as much air volume. Even with that, you will not have enough air volume until you re-gap the valve. Mine usually end up gapped about 1/16" or a little more. That requires a new and very flexible pouch thats also sealed well enough so that changing the bleed size can be measured, performance-wise. A note about unsealed pouches: Nothing can be more exasperating than a bunch of unsealed new pouches which vary all over the place. When it comes down to troubleshooting weak valves, ciphering pouches prevent any intelligent decisions on finding the trouble, so dont leave any original pouches in an Ampicoever, and dont seal things up without sealing new lambskin pouches. I use Dow Corning 111 Pure Silicone Grease, thinned with lacquer thinner (see NOTE). One coat is plenty. It will not seal leather perfectly because you dont need to, but it will not make pouches stiff either, like rubber cement does. Ampico originally used rubber cement, but if you will notice, all Ampico pouches today stand up like mounds around the lifter because they are stiffened by old cement which has since embrittled (look at your old original tubing, sometime. Rubber cement does exactly the same thing, only quicker). The reason Ampico pouches require sealing is because the valve is so far distant from the trackerbar. If a pouch lifter disk is required, then that must be glued on before the sealant is applied and the sealant should go on before the valve block is glued together. The pouch boards are then shaken in a talcum sack first before gluing to the valve block. In the case that the pedal is still slow, it may be necessary to change things further, like plugging and re-drilling the valve mount to install the valves right-side up. This isnt changing anything, since Ampico had them both ways. Youre just changing your older valve mount for a newer type. Remember, the musics the thing. Lets get that right. We dont keep the piano pristine (crippled) at the expense of the music. And if its at the expense of such a factory variable low-priced component, then dont worry about it. Just remember, Ampico changed them all around, so you really arent "going out of school." And Ampico also used a variety of different vintage Ampico parts in serial-numbered pianos which were close together, even within two-three years of each other, and in some cases made some extreme changes which even required stack covers to be modified to allow strikers outside the ends of the main stack. In 43 years you tend to see a lot of strange factory compromises. So keep them as original as possible but vary as necessary, within the factory options of that time period. Regarding the "valve noise" muffled by the felt, I suggest changing the felt out altogether and making a muffler felt cylinder above the outside valve seat. The very worst system of muffling was in using a heavy black felt cover nailed to the block. Use a punch to cut a ½" hole in some ½" thick felt about 1-1/4" OD and gluing that to the top of the block valve. It completely silences the valve without compromising operation. Chances are you cannot hear the pedal valves anyway, so use as little felt as needed to do the job. The factory wasnt too particular because the rolls didnt require it. It was only 10 years later that they ran into problems with the new piano coding. Today we buy rolls in collections rather than at a music store as in days of yore. We still expect them all to play faithfully, in the same feeling way that the original artist played them. That means were likely to get some reissued, converted B rolls or newer rolls issued by Aeolian-American in that collection, too. Just a note regarding adjustments of the piano note stack: These same early note stacks used direct vertical wires with adjustable graphited wooden rod strikers threaded on their ends. The best way to adjust these to the key is without any free travel or lost motion at all. The reason is because the soft pedal, which raises all hammers allowing the key to drop in front, in turn lightens the weight of that damper, and creates a lot of lost motion between the note striker and its key tail. It is that lost motion during short staccato notes and triplets with the soft pedal on which cause notes to miss, even though theres nothing wrong with the player portion. So starting with zero lost motion prevents extra additional repetition problem on certain rolls with softly played staccato notes. Otherwise, raising the first intensity to cover that deficiency is the only way around it. As to the interaction between the loud and soft pedals, there is only one way to prevent it and thats with damper regulation. The wedge and trichord dampers need to be trimmed as short as possible so that the damper rail can lift them all clear of their strings with very little travel, and the damper levers must be set higher so that when the soft pedal is on and the hammer rail is raised, the key tails do not lighten the dampers. That means the damper in a reproducing piano should actuate in the last 3rd of the key travel (1/8") so damper travel by the key is minimal. Thats the difference between action regulation of a regular piano and a reproducer (piano tuners please note). The damper rail travel is also kept minimal for quick actuation sake but set to a little more travel than the key provides. A regular piano does not have to be adjusted this critically. It isnt possible physically to retain the same basic design and make an early Ampico as quick as the model B, but it is possible to make it perform every bit as well as a late model A, and of course you can also use these same principles to improve the late A, as well. Some people wonder why I am willing to give my tricks away. I just say that the better the reproducing pianos play, the more demand there is for them, and everybody wins, but theres more to that. When I started I had to learn everything the long, hard way because nobody would share anything with me. I promised myself that I wasnt going to be like that. I later realized that you cannot give away a keen musical ear, and you cannot give away a demand for perfection, nor your determination, nor your ability to stick to it until each one is exactly right, nor your decision to keep working and doing it over again until its as perfect as it can be. So in the end, Im really not giving away anything that really counts for much. But whatever else I can do for someone who wants it right, I will. Thats my privilege. Thats all there is to it really, and your early Ampico or as we call them, the Amphion Ampico with the early pedal stack will play every bit as well as a later model Ampico having the finger stack and more powerful directly connected pedal operators. Just remember that this early system was weak at best and still requires a bit higher pump pressure, even after youve taken care of these details as best you can. Youll be rewarded with better performance. NOTE: Sept 29, 2017: It has come to our attention that due to the changes in the chemical composition of modern lacquer thinner, Dow Corning 111 does not dissolve properly. To correct this problem, add one part of Xylene (or Xylol) to ten parts of lacquer thinner. Craig
Brougher |
| Home | Manuals | Supplies | Search | Consult | Contact | Testing | Service |
|
Since "Player-Care" is an internet business, I prefer that we correspond via E-Mail (click here to fill out the 'Request Form'). However, if I'm not in the middle of some other activity, you can reach me at 732-840-8787. But please understand that during the hours from 8AM-5PM EST (Mon-Sat), I'm generally quite busy. So, I probably won't answer the phone. If you get the answering machine, please leave a detailed message stating the reason for your call. Also, repeat your name and phone number clearly and distinctly. By necessity, I prioritize everything in my life. And, if you call and just leave your name and number, and ask me to call you back, it might be a day or two before I return your call. Why? Because I don't know why you want me to call and I might not be prepared to assist you in an effective and efficient manner. If you leave me an E-Mail address (which I prefer), spell it out phonetically. The more you do to help me, the more I can help you in return. Don't rush. You have four minutes to record your message. |
|
407 19th Ave, Brick, NJ, 08724 Phone Number 732-840-8787 |
 These are almost always used in conjunction
with the small valvetotally useless for quick pedal operation. Change them,
first.
These are almost always used in conjunction
with the small valvetotally useless for quick pedal operation. Change them,
first.