
|

|

|
|
|
|
|
| Home | Manuals | Supplies | Search | Consult | Contact | Testing | Service |
|
VERY IMPORTANT NOTE: Do not remove the valves from the chest. This repair technique does not require the removal of the valves. It can be done with the valves in the chest. However, you do have to remove the tiers from the valve board. (See IMPORTANT ADDITIONAL INFORMATION and DISCLAIMER below.) As the number of Do-It-Yourself rebuilders increases, so do the phone calls I get about leaking Standard Valves. While all professional rebuilders know that replacing 80+ year old valves is a must, many novices have neither the patience, tools, nor the knowledge to do the job successfully on their first (and possibly last) try. And while I in no way endorse the following "repair" technique as a panacea for deteriorating valves, it will improve performance in the vast majority of cases. The most common point of leakage in a Standard valve is where the valve facing and the valve stem contact each other. On the intake valve facing, this area is not visible to the naked eye because it is covered by the force-fit brass collar and a round piece of thin pneumatic cloth or leather. On the exhaust facing, the area is visible, but it is very hard to access because the valve stem guide is in the way. However, with care, both areas can be accessed with a hypodermic syringe. (See areas marked in red in the above diagram of the valve parts.) Armed with a hypodermic syringe or 'hypodermic oiler' and a product called Phenoseal, both valve facings can be sealed to the valve stem very effectively. The procedure involves drawing a thin bead of Phenoseal around the collar of the intake facing and a small bead of Phenoseal around the valve stem of the exhaust facing. The easiest way to accomplish the task is to hold the syringe stationary and rotate the valve facing with a large sewing needle.
 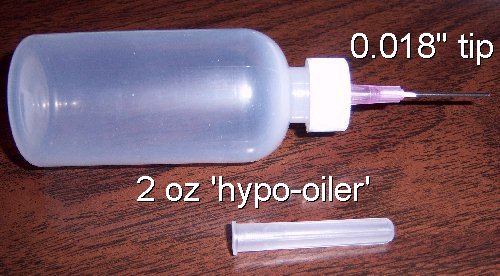 Available for purchase (with 8 oz of Phenoseal) for $8.45. The picture above shows the bead while it is still wet. When the bead dries, it will be clear. And what is most important is that the bead will remain flexible forever. This allows the facing to 'wobble' correctly, which helps insure that the facing seats properly with the valve cap. How to Use the Oiler -Video-
In July 2010, it was brought to my attention by John Rutoskey that an even more effective repair would involve removing the valve and sealing the intake valve facing from the underside. I fully agree with him. I have noted the area that gets sealed in blue in the diagram at the top of this page. Also, there are two other important things to do. One, carefully mark the exact location of every valve plate, valve, and valve stem guide. They must go back exactly where they came from. Secondly, be sure to seal the valve plate when it is reinstalled. This can be effectively done by drawing a bead of Phenoseal around the edge of the valve plate after it has been put back in place, and before the screws are tightened. This allows a small amount of the Phenolseal to get between the plate and the wood, creating a good air-tight seal.
DISCLAIMER: UNDERTAKE THIS JOB AT YOUR OWN RISK!! IF THIS JOB IS NOT DONE EXACTLY AS DESCRIBED, AND PHENOSEAL GETS ON THE VALVE FACING WHERE IT MAKES CONTACT WITH THE VALVE PLATE, OR IF PHENOSEAL GETS ON THE EXHAUST VALVE SEAT, THE VALVE FACING COULD VERY EASILY BECOME PERMANENTLY OR PARTIALLY GLUED TO THE VALVE SEAT. IF THAT HAPPENS, THE VALVE WILL EITHER LEAK VERY BADLY OR NOT WORK AT ALL. THERE IS NO ROOM FOR ERROR HERE!!! AND SINCE THAT IS THE CASE, I ASSUME ABSOLUTELY NO LIABILITY FOR ANY PROBLEM/S THAT MAY ARISE IF THIS PROCEDURE IS USED TO SEAL THE VALVE FACINGS TO THE VALVE STEMS..... SIGNED: JOHN A TUTTLE
|
We Gladly Accept These Cards

![]()
|
Since "Player-Care" is an internet business, I prefer that we correspond via E-Mail (click here to fill out the 'Request Form'). However, if I'm not in the middle of some other activity, you can reach me at 732-840-8787. But please understand that during the hours from 8AM-5PM EST (Mon-Sat), I'm generally quite busy. So, I probably won't answer the phone. If you get the answering machine, please leave a detailed message stating the reason for your call. Also, repeat your name and phone number clearly and distinctly. By necessity, I prioritize everything in my life. And, if you call and just leave your name and number, and ask me to call you back, it might be a day or two before I return your call. Why? Because I don't know why you want me to call and I might not be prepared to assist you in an effective and efficient manner. If you leave me an E-Mail address (which I prefer), spell it out phonetically. The more you do to help me, the more I can help you in return. Don't rush. You have four minutes to record your message. |
|
407 19th Ave, Brick, NJ, 08724 Phone Number 732-840-8787 (Voicemail Only, No Texts) |
