
|

|

|
|
|
|
|
| Home | Manuals | Supplies | Search | Consult | Contact | Testing | Service |


|
|
The adjustment for regulating the stack to the piano action is located on the wippen of the piano action.
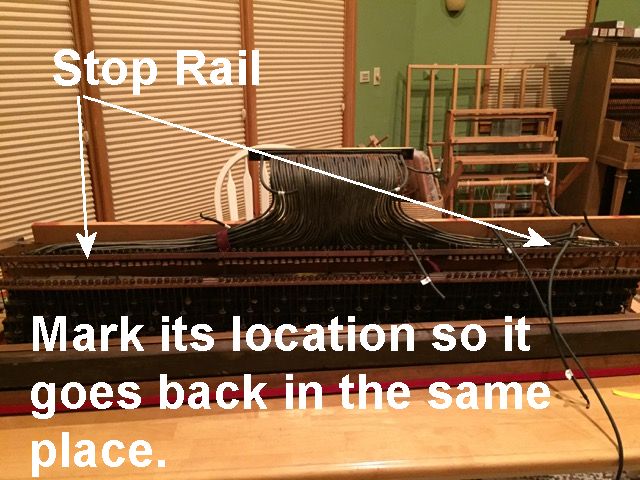
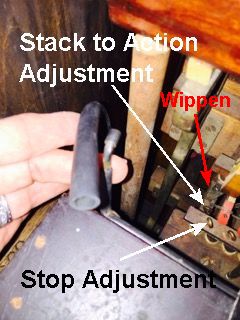 There are two adjustments (see: regulate-stack.jpg) The stack-to-action adjustment is the one that reduces the 'free play' between the pushrod button and the wippen. When correctly adjusted, there should be a scant 1/16" of free play between the adjuster button on the wippen and the pushrod button on the stack. To make this adjustment, you must fold the upper half of the 'upper section' out of the way. (It's for this reason that the trackerbar should have been tubed up to the stack with the action folded over.) It is almost impossible to "see" the 1/16" space between the two buttons because of their location. To make the job easier, I always remove the Stop Rail. 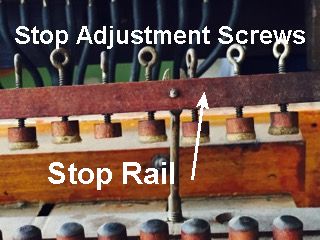
 (see attachments above) Once it's out of the way, should first examine all of the piano hammers. If any of them are not resting on the hammer rail, (see below)
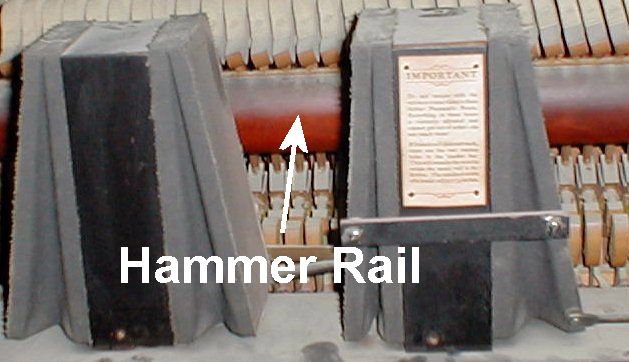 adjust those notes first by turning the adjuster button counter clock wise. Once the hammer comes to rest on the hammer rail, turn the adjuster button one additional 1/2 turn counter clock wise. That extra 1/2 turn will create the correct spacing between the pushrod button and the adjuster button. Next, starting with note #1, start turning the adjuster button clock wise until the piano hammer starts to move off of the hammer rail. Then do as I just explained above. BTW, this adjustment is also commonly referred to as the lost motion adjustment for the stack because you're removing the free play, or lost motion, between the two buttons. However, it's important to remember that there must be a slight amount (1/16") of free play between the two buttons. (I won't explain why it's necessary, but it is!) After the lost motion adjustments are finished, play a 3-5 note chord on the piano by hand. When you play the chord, keep the keys depressed. In other words, 'play-and-hold' the chord so the notes continue to ring on after the hammers have hit the strings. While keeping the piano keys depressed, look carefully at the position of the hammers in relationship to the piano strings. If the piano action is correctly regulated, the hammers should be approximately 1" to 1-1/4" from the strings. Put another way, they should be approximately 1/2" from the hammer rail. Now, here's the concept that you must understand before making the stop adjustment. Just as the piano keys push the wippens upwards to get the notes to play, the pushrod buttons push the wippens upwards to get the notes to play. In other words, the note bellows (and their associated rods and buttons) push the wippens upwards just like the piano keys. So, in a perfect world, the goal of adjusting the stop adjustment is to get the bellows to push the wippens upwards the same distance that the keys do. Also, this explains why it's important to have a 'feel' for where the hammers "stop" when the notes are played by hand. Here again, the goal is to have the action of the bellows replicate the action of the piano keys. (Side note: referring to the picture 'stop-adjustment-screws.jpg', take note of the fact that the position of the buttons on your rail seem to be all over the place. In a well regulated piano, those buttons should look like a line of skilled wooden soldiers. In other words, they should all be in the same position. So, it's my recommendation that before you start doing anything with the stop rail, make a determination as to what you believe is the average position of all of the buttons, and 'pre-adjust' them to that position. I find that the easiest way to do that is with a yardstick. By laying the stick on the buttons you can easily see which ones are higher (or lower) than the rest. Start by adjusting those ones until they are more in line with the average.) Now you can put the stop rail back in place. BUT, understand that the stop rail can be adjusted in two ways. The first way is what can be called a "bulk" adjustment. Typically, there are three or four screws that hold the stop rail in place. The stop rail is mounted on supports, and as you can see in the picture (stop-rail-supports.jpg),
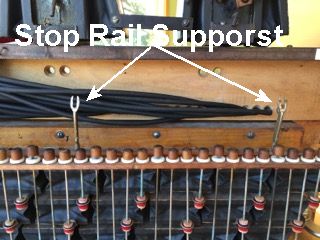 the rail can be secured to the supports anywhere from the bottom of the slot (in the support) to near the top of the slot. Getting the rail in the correct position before you start making individual adjustments to each button can save you hours of work. The easiest way to make the bulk adjustment is to look very carefully at the supports for evidence of the previous location of the mounting screws. Most often, there will be what I can a shadow or marks on the metal which indicate where the screws where previously. Here you need to understand that when the piano was built, the people who put everything together had many years of experience. So, they knew the best general location to place the rail before making the fine adjustments. Ergo, it's called a 'bulk' adjustment. But, if by chance there aren't any tell-tale marks, there's another option. Put the rail in place but do not tighten the screws. In fact, make sure the screws are loose enough that the rail can move up and down freely. Next, play a full chord on the piano as explained previously. Since the rail can move freely, the action of playing and holding the chord will automatically position the stop rail at it's optimum location. You will need to repeat the above in the bass and treble registers. If you can have someone else play large chords in the bass and treble simultaneously, that will free you to tighten the screws while the piano keys are being played and held down. Once the bulk adjustment is completed, you can begin making the individual adjustments. In the Lauter, this is more difficult that in other players because the only thing that contacts the wippen (to activate the piano note) is the pushrod button. So, what you have to do is physically lift each pushrod button up with some sort of a tool (like a screwdriver) and verify that there is sufficient travel for the piano hammer to strike the strings and return to a resting point that matches the point where the hammer stops when the note is played by hand (with the piano keys). Your goal is to duplicate that 'stopping point'. For more detailed information about action regulation, see: https://www.player-care.com/regulating-the-action.html Hope this helps.... It's a lot of work, but it's worth the effort.
John |

![]() ..To
The Top of this Page . . . . . . . . . . .
..To
The Top of this Page . . . . . . . . . . . ![]() ..To The HOME Page
..To The HOME Page
|
Since "Player-Care" is an internet business, I prefer that we correspond via E-Mail (click here to fill out the 'Request Form'). However, if I'm not in the middle of some other activity, you can reach me at 732-840-8787. But please understand that during the hours from 8AM-5PM EST (Mon-Sat), I'm generally quite busy. So, I probably won't answer the phone. If you get the answering machine, please leave a detailed message stating the reason for your call. Also, repeat your name and phone number clearly and distinctly. By necessity, I prioritize everything in my life. And, if you call and just leave your name and number, and ask me to call you back, it might be a day or two before I return your call. Why? Because I don't know why you want me to call and I might not be prepared to assist you in an effective and efficient manner. If you leave me an E-Mail address (which I prefer), spell it out phonetically. The more you do to help me, the more I can help you in return. Don't rush. You have four minutes to record your message. |
|
407 19th Ave, Brick, NJ, 08724 Phone Number 732-840-8787 (Voicemail Only, No Texts) |
